
Gearboxes
Transmission Swap Dramas
Shifter Bush Replacement
VW DSG Transmission
Pedal stuff and Clutch Tube Repair
Transmission swap dramas
By Jeff Marvin
May 1999
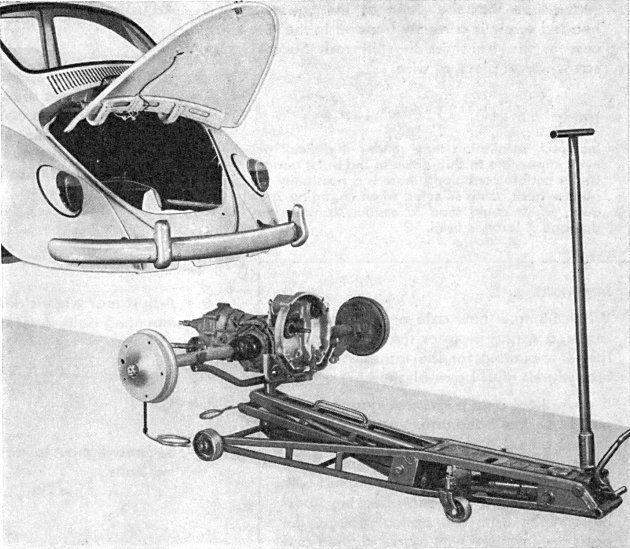
After a marathon effort, I have now installed a 1973 1300 swing-axle transmission into my 1966 6-volt Beetle. I don't know I'd do it again.
Of course, later VWs had longer axles so I had to swap over the axles and tubes. Not too bad, except for the massive circlip that retains the axles. Very hard to get out, and just as hard to re¬install. Maybe a workbench would have been better than the front lawn as dusk was coming. Anyhow, I eventually got them off. Now to start on my old trans, and perform the same operations. A lot of mucking around later, I've got 4 axles, 4 axle tubes and two transmissions. Glad I only have to reinstall 2 of each. Now to put the new trans in the old car. I had tried to be smart, installing the trans with just axles attached, to add the tubes later. Bad news, as you cannot access the bottom retainer plate nut to torque it up.
Out came the trans again. Torqueing up the axle tube retainer plates is a trial and error procedure - you add a gasket, torque up and then check free movement of the tube. Not enough play, undo everything, add another gasket, torque up and try again. One side took 4 gaskets (rather than the thicker shims) and the other side took 3 gaskets.
The nose cone was very different, and the nose cone mount totally different, so they had to get switched over as well. The transmission-grounding strap on the new box was too short, so the old one got swapped.
Removing the axle tubes means disconnecting the brake hardware, so that all has to be bled when you put everything back together. But in my case, I had old fluid in the system so I changed the fluid as well - which I discovered you do in the reverse order to bleeding the system. To change the fluid you open the longest run of brake-line from master cylinder to wheel and empty it by pumping the brake pedal, working down to the shortest run of line at the closest wheel. To add the new fluid you open the shortest line and work up to the longest line. Then you go around again to bleed the system properly working from the longest line to the shortest. Adjust the two brake lining adjusting stars on all four wheels, and the handbrake cables which got disconnected when you pulled the trans. Hey, what's time if not for working on our toys??
Oh yes, the engine replacement was the hardest I've ever had to do as well. I forgot about the flywheel, didn't I. You know, the different diameter between 12V and 6V flywheels? I decided to try the American backyard enthusiast's method of clearancing the bell housing. Whack the engine in as good as you can, fire up the engine and let the flywheel do it's own grinding, and may the toughest piece of metal win. I modified that barbaric practice by turning the crank by hand to do the grinding, and something just shifted and the engine went on - well, I winched it on using the starter motor bolt and nut in the opposite side bolt hole, pulling the engine into position until getting the bottom two nuts on the studs and using them as well.
Did you know a 6V starter doesn't fit a 12V bellhousing properly either - it uses a different bush. Solution - drive the 12V bush out and just whack the starter in. Just make sure it's snugged home nice and tight. The shaft sits in mid-air - I think that should help with cooling the starter, right? On top of all this, I used vast amounts of degreaser, nylon brushes, steel brushes, a brass brush, and elbow grease to shift an accumulated 33 years of crap from Marvin's trans and chassis frame horns, plus just 26 years of gunk on some bits of the donor trans (a lot of it was cleaned up by the guy I got it from, thanks Leigh).
Don't forget to purchase a set of axle gaskets and ring seals like I forgot to do. I also got an axle bearing stuck halfway along the axle for a day. Anyway, the engine is in, brakes done, wheels on. It all now looks great. Except I forgot to reconnect the fuel line. And adjust the clutch cable. So I started that and snapped the wing nut on the clutch cable. That took 1.5 hrs to remove. Wish I was billing for this. OK, fobbed up a replacement set of washers and nuts to substitute for that. Hook up fuel line (spilling only 250 ml of petrol down my arm while doing it), axle nuts torqued and pinned.
Leave on car stands and see what happens. The car starts first go (second crank). Terrible screeching. OK, it's just the flywheel doing its thing to the bellhousing. Put up with it for a while. First gear - well, super heavy clutch, but easy change. No vibration either, but still screeching. 2nd. 3rd. 4th. I can see smoke under the car, and the alloy is discolouring from heat. Hmm. Rear wheels don't turn. Handbrake is on; why didn't the car stall? Handbrake off. No movement at rear wheels. I can rotate them by hand, but the engine won't turn them. Oh no, have I snapped the crankshaft? Destroyed the flywheel? Broken the mainshaft of my new gearbox???
Engine off (neighbours are all watching and listening, this project has been stinking up everyone's house for a week now). Crawl under the car again. I can turn either rear wheel any direction I like. Same direction, opposite, reverse, no difference. Put shifter in first, same result. Coupling come loose? Back seat out, inspection flap open - all in place, and hooked up. Son changes gears while I listen to box. Appropriate clunking noises emanate from inside the case. As I look at the dripping oil I know the awful truth - the engine has to come out again.
Yank the engine. Then I discover the other difference in the two transmissions. Throw out bearings - totally different. And the new one has a shroud around the mainshaft that projects forward - that was what was preventing the engine from going in previously. But I had done such a great job of winching the engine in that I very neatly flanged the end of the shroud with the clutch plate and jammed the throw out bearing. Hence the screeching on startup, and the burning smell. Then, while son pumps the clutch pedal so I can prise the stuck throw out bearing off, my nifty fabbed up nuts fly off the end of the clutch cable. I still don't know if the threads are stripped. I don't want to know right now.
Now it's a different throw out bearing right? Different method of securing it to the support arms, different diameters to fit different clutch sizes, different support arms on different actuating rods in different size holes with different size bushes. But I'm going to swap the clutch actuating lever, rod, and bushes, support arms from my old trans case into the new one. Aren't I? No I'm not. The dimension I didn't measure means it won't fit without a large bush I don't have.
Phone my VW mechanic, saying the throw out bearing is different. Oh yes, I forgot about that, he says. Actually that's because they started using a different pressure plate. You've got a 180-mm clutch haven't you? Now I'm sweating coz I know they went to a 200 mm clutch, mine is 180 and a 200 will not go on my flywheel - I can only change flywheels. But, he finds a late style 180-mm pressure plate for me. OK, grab that, and a new throw out bearing, and new guide (I'd had to cold chisel the old one to get the burnt throw out bearing off).
Install it all, engine in, and Brrm. We are going. And it's great. The pain is nearly forgotten. But I won't do it again tomorrow!
Moral of the story? Never accept on face value that it will bolt straight in. Measure everything in sight and think if they changed one component, how many other things could they change?
Shifter Bush Replacement
By Bob Donalds
July 1999
Symptom: You can move your gearstick about 100 mm side to side while it is in gear; in neutral you can move it about 300 mm. At idle in neutral, there is rattle in the tunnel just below the shifter that is driving you crazy.
I figured out a few years ago what makes a car feel old when you drive it. It's when the gearstick is sloppy; the brake pedal goes way down and has to be pumped; there are all sorts of clunks and rattles in the front end and you can move the steering wheel about 50 mm without changing the direction you are travelling. If you fix these things one at a time, your car will still be old; it just won't ‘feel’ as old. And the good news is that the shifter bushing is probably the biggest bang for the buck in this department. A tight, rattle free shifter will take 10-15 years off the ‘feel’ of your car. Below I have outlined the procedure for doing this.
1. Remove the gearstick. Pull the mat or carpet up and take out the two bolts on the plate on top of the tunnel. Underneath the main cover is a shift gate plate. Make note of how this thing is oriented as you take it off. I don't have one in front of me as I write, but I do know that it is possible to put it on backwards (spun 180 degrees under the gearstick). When you do this, you cannot get your VW into reverse.
2. Remove the shift rod (the rod inside the tunnel that connects the shifter to the tranny nose under the back seat). Disconnect it under the back seat (remove the oval cover). It slides out of the front of the car. There are two or three plates in the front you need to take off, depending on what year you have. One is between the front beam tubes at the frame head (the wide oval cover). You will have to crawl under the nose and look up to see it. The next one is in the back of the spare tyre well; it is a round cover. If you have a '68 and newer non-Super, there is another round cover in the front apron just below the bonnet. You don't have to take the rod all the way out, just out of the bushing bracket behind the shifter hole, but you may want to take it all the way out to clean it up. If it has a lot of surface rust on it, it may be difficult to slide it back into the new bushing so you may want to wire brush it a bit. You especially want the rod to be very smooth in the area where it rests in the bushing. Use a wire brush and a fine emery cloth if necessary.
3. Get a new bushing and install it in the bracket. You can get one from all well-equipped VW workshops and parts outlets. It is nylon-like and has a little wire circlip. Take out the old bushing if you can find it. Put the new bushing in the bracket in the tunnel (hope you don't have fat fingers). The flange on the bushing should go on the FRONT side of the bracket, the wire clip goes on the back, but don't put it on yet.
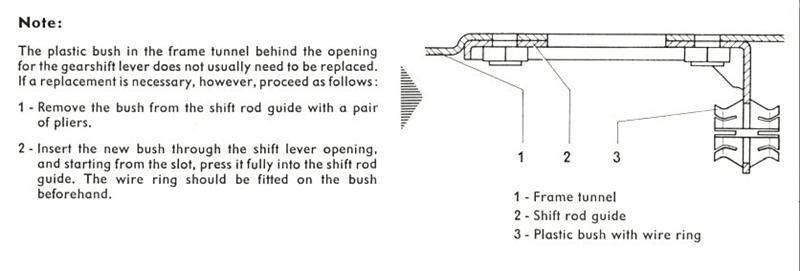
4. Put the shift rod back in. Smear a good lithium (white) grease all around it and on the end of the shift rod and start the rod through the bushing. It may be a snug fit and difficult with grease all over everything (I remember thinking “I bought the wrong size!”). Push it from the end sticking out of the front of the car if you have to and continue by using a piece of wood as it goes in. Once it is started in the new bushing, start the circlip on the rod but don't put it on the bushing yet. Work the rod all the way back, keep sliding the clip along to keep it reachable near the shifter hole (requires a lot of back and forth movement if you are working alone). Just before pushing the rod back the last inch or so, smear a lot more grease around the rod where it will be in the bushing. Reconnect the rod to the tranny under the seat, then slip the clip on the bushing. The cut in the bushing should face up.
That's the quick and dirty of it. The only problem you may have is an overly enlarged opening in the bracket if the car has been driven with a nonexistent bushing for years. In this case the shifter will be sloppy somewhat, but won't rattle until the new bushing wears out.
Now take a nice long drive where you will have to do lot of shifting. You will be amazed at how much ‘newer’ your VW feels.
VW’s DSG Transmission
By Steve Carter
December 2002
Volkswagen has presented a worldwide technical innovation: the sporty and economical automatic gearbox – the ‘DSG’, short for Direkt Schalt Getriebe (Direct Shift Gearbox). This gearbox with integrated dual clutch will be used for the first time in the Golf R32. In the course of the year 2003, its use will be extended to other production series - primarily in conjunction with high-torque engines. With the new dual-clutch gearbox, Volkswagen continues its power train offensive across all classes.
Volkswagen was one of the first manufacturers to offer manual 6-speed gearboxes as optional equipment in the volume segment for certain production series and models. In the luxury class, a new 6-speed automatic for the Touareg V10 TDI will be introduced in mid-September. Early in October, with the New Beetle Cabriolet, Volkswagen became the first manufacturer to offer a transversally installed 6-speed automatic gearbox in the compact class - a configuration long considered impossible. With the DSG, the company now extends this spectrum by a technically completely new type of gearbox.
The DSG will be manufactured at the Volkswagen plant in Kassel, where 150 million Euros were invested in production. At full capacity, up to 1,000 DSGs can be produced per day.
The gearbox has been designed to fulfil the demands of European customers for sporty driving and fuel economy. One significant difference to the familiar fluid automatic gearboxes that have been popular in the USA for years is that the DSG does not employ a torque converter for a standing start. Nor is the DSG a derivative of the automated manual transmission used in the Lupo 3L TDI. Rather, the DSG engineers took a technically completely new and revolutionary path by harmonizing the agility of a manual transmission with the ease of a conventional automatic gearbox.
The DSG is significantly superior to the manual gearbox regarding fuel economy and performance, speed and ease of shifting as well as driving fun.
This new Volkswagen gearbox offers a genuine alternative in particular to those drivers who up to now have preferred manual gearboxes, because the DSG suffers no disadvantage in terms of fuel economy or performance. On the contrary: with identical acceleration and top speed, it shifts as smoothly as the best conventionally built automatic gearboxes; in addition, manual shifting is possible using the Tiptronic function or, in the Golf R32, buttons in the steering wheel. And shifting occurs faster and more ‘crisply’ than possible up to now with either manual or automatic gearboxes, and without interrupting tractive power.
In the DSG, the next gear is permanently engaged and ready for activation. As one of its outstanding design characteristics, the transversally installed DSG gearbox possesses two wet clutches (greater thermal capacity and better regulation than dry clutches), the pressure of which is hydraulically regulated. The so-called clutch 1 (C1) serves the odd gears (plus reverse) and clutch 2 (C2), the even ones. Therefore, for all intents and purposes, one must speak of two parallel gearboxes in one. A consequence of this elaborate clutch management is that during a shift, there is no more interruption of tractive power as is typical of an automated manual transmission. Consequently an incomparably dynamic and, at the same time, smooth shift feeling with a high degree of comfort is conveyed The high efficiency of this gearbox is very close to that of the classic manual gearbox.
Together with Mechatronic, an intelligent hydraulic and electronic gearbox control, the two wet clutches with two input and output shafts are responsible. This interconnection enables the next higher gear permanently to be engaged and ready for activation. And like lightning, to be sure. For example: While the car is being driving in third gear, fourth gear is already engaged, but is not yet active. As soon as the ideal shift point is reached, the clutch for third gear opens while the other closes, activating fourth gear. The opening and closing of the clutches coincide in the process, producing the smooth shift already mentioned above. The entire shift process is completed in the especially short time of three to four one-hundredths of a second.
Parallel to the fully automatic shift programs ‘D’ and ‘S’, the DSG has a Tiptronic function which enables manual shifting. Beyond that, the driver of a Golf R32 can select gears using shift buttons in the steering wheel. In both cases, the result is a shift feeling marked not only by superior comfort but also by extreme fun when shifting. Drivers with sporty ambitions will experience for the first time that gears can be changed as with the press of a button. And what's more, in the even sportier mode (position ‘S’), the engine and gearbox control units even activate a form of rev-matching, which further enhances the shift dynamics: Using wheel speeds provided by the ABS, the gearbox control unit ensures that no unintended up-shift occurs in the middle of a curve.
It is generally true that an engine coupled to the DSG is always in the position spontaneously to have the desired tractive power available due to the fast, independent gear change. No less decisive is the fact that the new gearbox provides the great agility of a manual transmission but undercuts the latter substantially in fuel economy. The R32 with DSG consumes only 10.2 litres Super Plus petrol per 100 km, undercutting the manual version by about one and a half litres (11.5). Such extreme fuel reduction can otherwise be achieved only through the use of extremely lightweight building materials. Acceleration is tangibly better than for a manual. Equipped with DSG and an integrated launch control (an electronic start program), the Golf R23 sprints to 100 km/h (about 61 mph) in only 6.4 seconds (with manual gearbox in 6 seconds). The top speed of 247 km/h is the same.
With the DSG, Volkswagen is the first manufacturer to develop a dual-clutch gearbox ready for production. Such gearboxes have already been used in motor sports, but the uncomfortable shifting due to inadequate means of mechanical and electronic control made them unacceptable for use in production cars. In its own undertaking, Volkswagen solved the problem of exacting demands in design; in addition to numerous new hydraulic components, a complex Mechatronic was developed which first made possible the DSG as it is now being introduced in the Golf R32.
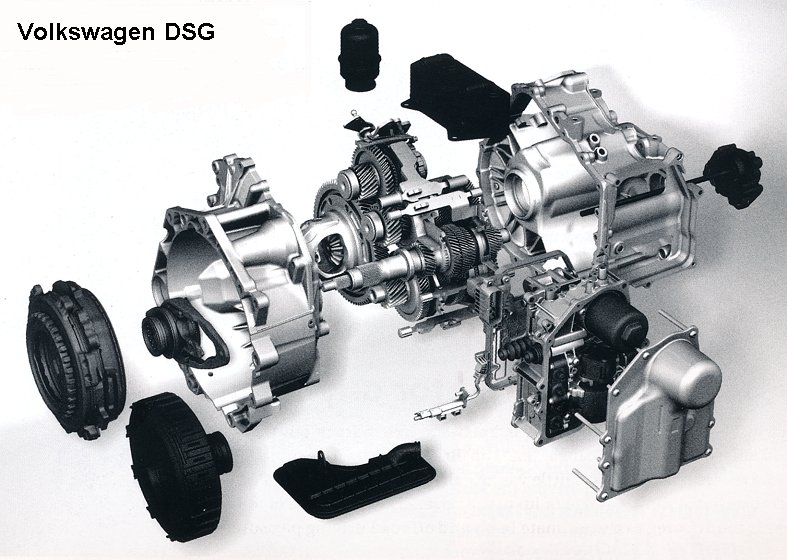
The new automated 6-speed gearbox was designed for a maximum torque capacity of 350 Newton meters. Including 6.4 litres of oil, it weighs 90 kilograms. Viewed from the engine side, the aluminium clutch housing with splines and pilot journal pin of the gearbox input shaft, the gear teeth of the differential and, in the upper section, the parking lock actuator can be seen.
From the side away from the engine, one sees the entire gearbox housing with a heat exchanger for optimising the thermal balance, a pressure filter for cleaning oil, the outer cover for the Mechantronic integrated in the gearbox and the oil pump as well as a socket serving as interface to the vehicle electronics.
The two input shafts divide the DSG into two gearboxes; the Mechatronic, the shift nerve center, is located in the forward section of the gearbox.
The cross section through the inner gearbox construction can be fundamentally divided into front and rear sections; this also explains again the definition of ‘two parallel gearboxes in one.’ The Mechatronic module, the shift nerve centre of the DSG, is located in the extreme front of the gearbox housing. Behind that, the reverse gear shaft and output shaft 2 (for gears 5, 6 and R) connect in the so-called drive gearbox.
Input shafts 1 and 2 and dual clutch, with a spring damper element, driven by the engine via a dual-mass flywheel, are located in the centre. The clutches are controlled by a hydraulic system; solenoid valves designed especially for this purpose regulate the pressure exerted by the pair of clutches. The solenoid valves are directly connected to the Mechatronic module, which coordinates everything.
The driver of the Golf R32 experiences a new and fascinating ‘drive train feeling’ through the use of the new dual clutch.
The dual clutch, comprising the so-called C1 and C2, represents a complex and innovative component, which has matured over many years of development. The initial requirement, to attain stress ability comparable to that of a hydrodynamic, or conventional, torque converter was fulfilled without restriction. The unique dual clutch represents a ‘standing start’ element with characteristics that cannot be matched by conventional automatic gearboxes with torque converters.
The oil pump is also located on the side away from the engine; it is driven at engine speed by a shaft running through the inner drive shaft. The output shaft 1 (for gears 1, 2, 3 and 4) and the differential with integrated parking lock gear are located in the lower section of the gearbox.
An interesting technical overlapping between the worlds of manual and automatic gearboxes: Every gear of the DSG is associated with a conventional synchro shift unit, just as they are known in Volkswagen manual gearboxes. The performance of these synchronisers is substantially enhanced further by the friction layers, in order to achieve minimal synchronization times. Thanks to the use of these shift units, which can be operated independently of each other, the engineers could fulfil all requirements for free choice of gears. The reason for this is that the development and continuing optimisation of shifts free of tractive force interruption between even gears as well as from odd to even gears is of eminently important significance. For the result enables the DSG to make shifts - for example the fast change from 6th to 2nd gear - which as yet no other automatic gearbox can do.
All components of the DSG are manufactured with extreme precision. The tolerances are decidedly low and are comparable to the precision engineering of the finest watches. In the case of hydraulic components, the gaps, for example, are just 0.003 mm. Nevertheless, all components can be heavily stressed.
The two input shafts of the gearbox are an exceptional example of innovative manufacturing technology; they assume a key function in the design. Both input shafts share a common axis. The outer input shaft 2 is designed as a hollow shaft in which input shaft 1 is integrated. The concentric shafts rest on two needle bearings and are so constructed that individual components from existing Volkswagen manual gearboxes could be employed.
Considered as one shaft, the 5th-gear wheel is located on the side away from the engine, followed by the wheels for reverse and 1st gear. The impulse wheel (for determining rotational speed for synchronizing shift procedure) for drive shaft 1 is located after that. The wheels for 3rd, 4th and 6th gear as well as 2nd gear are located behind it. The impulse wheel for input shaft 2 is located directly behind the 2nd gear wheel. At the same time, this arrangement reflects a unique quality of the dual-clutch gearbox: Other than in conventional manual gearboxes, here one shift unit each is allocated to gears 1 and 3, 2 and 4 as well as reverse gear. In conjunction with an elaborately designed synchronization (multi-code systems of gears 1, 2, 3 and reverse gear), one result is the especially short shift times.
The most complex component of the DSG is the Mechatronic module for controlling the gearbox. It is located directly in the gearbox; that is, in oil up to 140 deg Celsius. Special for the protection of semiconductor elements of the high-performance computer, the heat exchanger bolted on the outside of the gearbox ensures healthy thermal conditions under all operating conditions.
The basic design of the Mechatronic comprises a control unit and a so-called valve chest with twelve individual sensors (a sensor converts physical or chemical quantities into electrical quantities) and actuators (an actuator is an interface between electrical signal processing and a mechanical process).
In detail, the Mechatronic module determines and manages, among other things, data for controlling the clutches, the input and output shafts, the cooling, the individual gears, the pressures as well as various malfunction security levels. Five modulation valves, five shift valves and numerous hydraulic slider valves serve this purpose. Gearbox data are transmitted from the control unit to the onboard network via a connector, while information from the vehicle and engine flow through this interface in the other direction to the gearbox computer. And this all functions so perfectly that this gearbox could be the breakthrough for the automatic in Europe, in the volume segment where today the manual gearbox still dominates.
Pedal Stuff and Clutch Tube Repair
By Steve Carter
February 2003
Symptom: You have tightened your clutch cable as much as you can, but it still doesn't disengage completely; you get a clanking or clunking sound inside your car somewhere when you push the clutch pedal all the way down and let it up.
Now that I think of this, it seems odd that in all of the internet VW forums I have never seen anything on this one; but it was a job I had to do on 2 of the 4 Beetles I have owned. There is a tube inside the tunnel on the pan, which carries the clutch cable to rear of the car where the bowden tube (that flexible, plastic coated tube) then takes it to the bracket/arm on the tranny). This tube is welded in three places inside the tunnel: 1) up front, just rearward of the pedal cluster; 2) about halfway back, somewhere underneath the emergency brake; and 3) at the back, under the rear seat, next to the shift rod coupler. The problem is that the tube has a tendency to break off from its mounts in either the front or mid mounting point (never the rear, because that is the only one that is accessible and that would make the repair too easy).
If the tube breaks loose from one of these points and is not immediately fixed (it may go undetected), it will eventually break off at the other weak location as the tube flexes heavily when one point is lose and the clutch is used. This is because the tube is not straight; it slopes down slightly at the front and up at the rear, and as the cable inside it is tensioned, it tends to want to straighten out. When both the front and mid points are broken off, the clutch is all but inoperable and you hear a lot of clanking and clunking when you press the pedal all the way down and let it up.
So, yes, you have to cut into the tunnel and re-weld the tube. But before you get out the saw, take your pedal assembly out and assess the situation up front. Remove the circlip that holds the master cylinder push rod to the brake pedal arm, crawl under the back and take the clutch cable nuts off the end of the cable completely, then take out the two 17 mm bolts that hold the pedal assembly to the side of the tunnel. With the bolts out, pull the clutch pedal all the way down (toward you) and it will release from the clutch cable tube in the tunnel. Carefully take the accelerator cable off of the accelerator arm by bending the end of the cable a bit. You may want to disconnect the accelerator cable from the carb to give you more play. Once you get the pedal assembly out (turn it counter clockwise a bit as you pull away), reach in with a couple fingers and pull the clutch cable all the way out.
No before you go checking out the cable tube, let's look at a few other parts for wear. Unless your clutch cable is really shiny and has absolutely no signs of wear, replace it. If you are reading this prior to getting into your clutch problems and think you will do this, buy or order one now. Next, examine the pedal assembly. First, look REALLY close at the arms that go from the pivots to the rubber pedals. Especially on the earlier year Beetles (50s and 60s), these are known to crack, down near the bottom, and you don't want your brake pedal to snap off when you really need it. If you see cracks, replace the arm or the whole the cluster. I would only recommend trying to weld up a crack if you live on the polar ice cap or the Australian Outback or something and NOTHING else is available.
Now look at the ‘hook’ that your clutch pedal actuates inside the tunnel and make sure that the inner part of the hook (the part that the cable loop pulls against) is not worn too thin. It should be as thick there as it is on the rest of the hook. If there is less than about 4 mm of metal left I would replace the whole thing. I've seen some pretty bad ones. Even if you have none of these problems and are anal like me, you will want to take apart the cluster and clean it up. I know that the early ones just have a pin in the shafts that you can hammer out with a hammer and thin punch or big nail and then re-install. Take it apart, wire brush it, paint the pieces with a good black paint, and then reassemble using good grease in all the right places. You've just done a ‘pedal cluster resto’. I'm told that good used clusters are getting harder to find, so its a good idea to take care of yours.
Remember that Australian VWs are RHD and have a different design from LHD VWs sold in the USA. So don’t try buying a new pedal cluster from the US.
Ok, now about that tube. First poke your finger into the hole where the cluster goes and feel for the end of the tube. It's about one average/large size index finger back from the hole. Over the years I have used an assortment of light bulbs and mirrors to see the inside of the tunnel. A parking light bulb with long alligator lead wires soldered on and wrapped with electrical tape is in my specialty tool, as is a 3-cm square piece of mirror thermal glued onto a piece of coat hanger wire. If you are even the slightest bit inclined to make up these things (BEFORE getting into this) do it! I promise that you will use them for years to come. Whatever you do, you want to determine if the tube is still securely welded to the front bracket. If it has cracked loose, it may still rest on the bracket in the absence of the cable being in it. Use a bent screwdriver or something to put upward pressure on it and make sure that it is secure on the bracket. It should be welded to a 2.5 cm-high bracket that spans the floor of the tunnel. If it is loose and the mid bracket is also broken, you should be able to flop it up and down easily with your finger.
Now for the mid bracket. If it were my car, and the front was loose, I would open up the mid section, even if I wasn't sure it was broken, and strengthen it. In any case, you have to open up some access at that point to see. You might be able to get some clue of its location by taking your emergency brake handle off and looking down in there.
You will need to drill an access hole on the driver side of the tunnel to check it out (take the seat out, carpet up, etc. obviously). I would recommend a 10 mm hole, positioned so that if you do have to open up the tunnel to repair, you can use this hole for starting the saw. You want to drill your hole about 13 cm off the floor and just about 5 cm to either the front or the rear of the bracket. Now if you made the inspection light for the front, it will really be handy here. You need to get light into the tunnel so you can see the bracket. If you make the light, make the wires long (speaker wire works good) so you can poke this light back into the tunnel near the mid bracket. Now peek into the hole and find the bracket. If I remember correctly, it is about a 20mm-wide piece of metal that is welded to the tube and to the passenger side of the inside of the tunnel. The tube tends to flex up and down, the bracket flexes where it is welded to the side of the tunnel and eventually breaks off there. Now that you have located the bracket, stick a long screwdriver in the hole and ‘feel it’ underneath the tube and try to pry it upward. If the bracket is broken here, it should be pretty obvious that it is loose.
At the time I first encountered this problem, I had a job installing car stereos and had access to huge metal cutting hole saws and a Bosch drill that would rip your shoulder out of it's socket if the drill bit ‘hung’. So I cut a 100 mm round hole in both places in the tunnel. The second time, (different car) it had only broken loose in the centre, so I drilled two 10 mm holes on either side of the bracket (passenger side) about 13 cm up from the floor. I used a metal cutting blade on a sabre saw and cut between the holes, then from each of the holes vertically down to the floor. With the 3 sides of the rectangle cut, I could pry the metal back and down to gain access, and then bend it back up again when I was done.
Now in the interest of preventing an ‘Oh Crap!’ remember that your fuel line also runs through the tunnel. What I did was to put a new saw blade in a vice and snap off all but about 30mm of it, then put it back into the saw. This insures a depth of cut that is minimal (less than 12 mm on my saw). BE CAREFUL. Look to see where your fuel line is; they may be in different places on different years.
I honestly could not recommend any thing but re-welding the tube. But before you go about re welding make sure that the tube itself is still good. I have heard of cases where the clutch cable had cut through the tube in the places with the maximum bend. Use your mirrors and lights to visually inspect the tube. Look at the top of the tube in the area rear of the mid bracket where the tube takes a bend upward. Also, look closely at the places where it broke off from the bracket. If the tube itself is damaged (punctured, ruptured, piece of metal torn out of it), I would not recommend re-using the tube. The inside surfaces of the tube must be smooth as not to chew up the cable.
If the tube is ‘open’, it would be difficult to re-weld it and not somehow affect the inside surface. On the first VW I did, I replaced the tube with a piece of thick walled gas pipe. It was about the same outside diameter of the original, but much thicker. I felt good about this. You will need to take the shift rod access plates off to remove the old tube and slide a new one in.
The front bracket design is adequate, I believe, and you can just re-weld the crack. I was brazing at the time; I think it is fine for this. But MIG welding would be best. Stick arc welding I believe is too inaccurate, creates slag, generates too much heat and is likely to burn though the tube in an instant. Make sure that the opening in the front of the tube is not obscured by weld metal when you are done and that it is free of burrs. Otherwise it may chew up your new clutch cable in a few weeks.
REMEMBER THE FUEL LINE marches right past this area. I always made a heat shield out of a scrap of sheet metal or aluminium flashing to put around the fuel line in the area where I was welding. I remember driving my first '68, with the tunnel opened and no clutch cable, to a friend whose father owned a local service station for welding it up. Note: as a Beetle owner, you should have the skills to drive your car, up shift and downshift through all four gears, without the clutch. If you have to come to a stop, slip it into neutral and stop the motor, then put it in 1st gear. When the light turns green, hit the starter and er, err, eerrr, rrrrrrrr, off you go. I had to do this at least 3 times in the last 16 years. Try it sometime before you HAVE to.
As for the mid bracket, I think it is worthwhile to improve the design. As stated earlier, the natural tendency of the tube when the clutch is used is to flex up and down; not front to back or side-to-side. So a bracket from the floor of the tunnel up to the tube is called for. In my second repair, I used a ¼” threaded hook and drilled a hole in the floor and put a nut beneath. I brazed the hook to the tube and also re-welded the bracket coming from the side of the tunnel. In hindsight though, I wouldn't recommend drilling a hole in the floor of the tunnel, it is just asking for trouble with rust. If you are really stuck for a fix and absolutely can't get anything welded, you might do this hook trick with no welding. Although I tarred the exposed nut and threads underneath, it definitely opened up the possibility of more rust formation.
I would recommend making a tall ‘Z’ bracket out of 10 or 12 gauge steel and welding to the bottom of the tube and to the floor; and also re-welding the original bracket. Do this and rest assured you won't have to do it again. To be really thorough, wire brush your welds and tar them, and, of course, brush and tar the underside of the tunnel below where you did the weld, or rust will move in there tomorrow.
When I did my first job, where I cut round holes for access, I had the metal circle I removed from the mid area re-welded in, given that the tunnel is the structural backbone of the car.
So now the tube is fixed; you just have to put everything back together. As Frankie Valli sang in the 70's film, “Grease is the word.” There's lots of metal-on-metal friction happinin' here, and you don't want to be back in there again. Usually when I finish a new clutch cable installation, I look like I was caught in an industrial accident at Castrol.
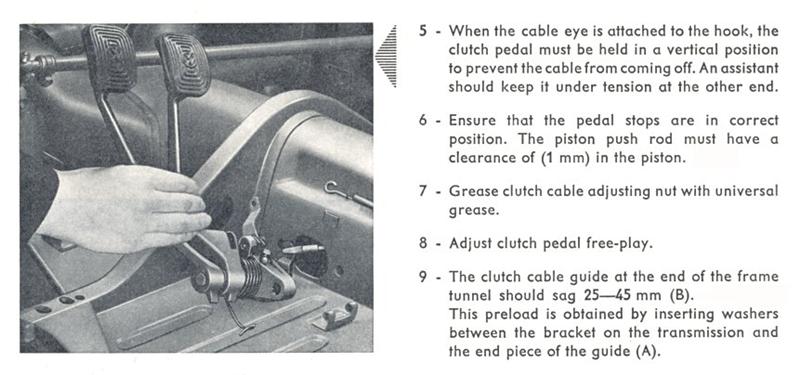
And if you didn't open up the tunnel in front and you haven't re-installed a clutch cable before, trust me, it IS possible. My technique is to first take the bowden tube off at the rear, then grease up the threaded end of the cable and my hands and hold the cable with two straight fingers (you decide which two work best) and a thumb (same hand). Now poke the cable into the pedal hole in the tunnel and let the tip of your tallest finger (you know, the one you use when you drive) feel for the end of the tube. Then push the threaded end in and start feeding it through. If you have really fat fingers, you may want to find someone with skinny ones, they work best. Now as you feed the cable through, smear lots of grease on it. Push it all the way through, until the ‘loop’ end is just inside the tunnel. Now go down back, thread the cable through and re-install the bowden tube, and slip the cable through the clutch lever. Just start the wing nut on a few threads.
Then re-install the pedal cluster. You want to ‘hook up’ the clutch pedal hook to the cable end and keep the clutch pedal upright. If it flops down forward to the floor when you are putting the assembly back in, the cable will unhook. You might use a bread twist tie around the hook to hold it in. I have found it easier to re-insert the accelerator cable with the assembly not bolted up to the tunnel but with a slight angle to it. You can reconnect the master cylinder push rod with the assembly fully bolted up, but make sure that it (push rod) is in place in the master cylinder before re-installing the assembly.
There is a little plate with a flange on it bolted to the floor (on the year models I have experience with) whose job it is to make sure that the clutch pedal doesn't flop forward, but this is only effective when the assembly is bolted tightly in place. If you are anal like me, you will want to adjust this plate to make sure that your clutch pedal rests ‘even’ with you brake pedal, for aesthetic reasons, of course. When you have the assembly all bolted in, go back and tighten up your clutch cable and re-attach the accelerator cable at the carb if you took it loose. I always liked a nice tight clutch cable, one with around 15-20 mm of freeplay at the top of the clutch pedal. This seems to make shifting less of a chore. Since you are wondering, the symptom of a too-tight cable is that your clutch slips on acceleration when the pedal is all the way out.
So that's about it, you've fixed just one more rattle/clunk in your VW, and it's all the better for it, and more fun to drive too.
OK, you really haven't really fixed anything yet. You just read to the end of this article. Now, go get all the stuff you need and tell the wife/girlfriend (or husband/boyfriend to be gender sensitive) that you will be busy this Saturday.