
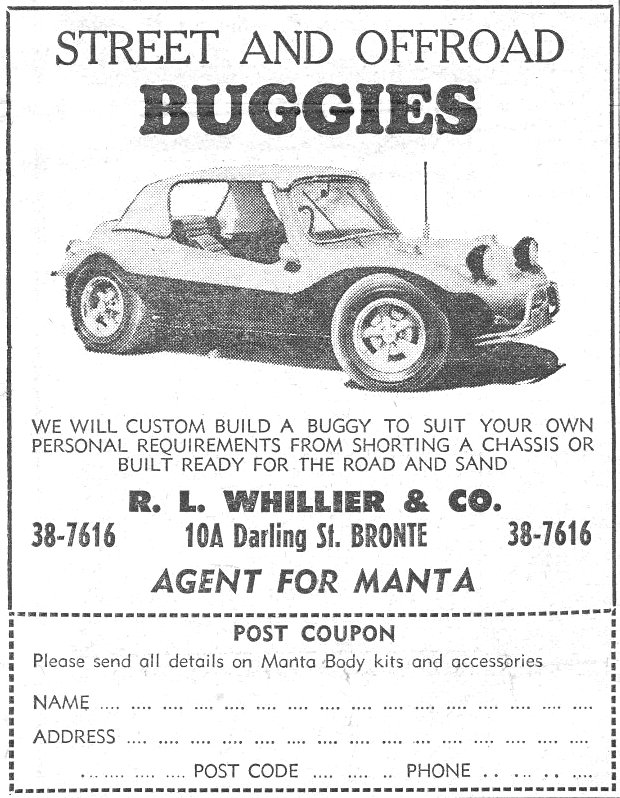
Beach Buggies
You'll love this buggy!
Superbuggy!
Beach Buggy Improvements
Shortening a VW Floorpan
The Manx dominates the slalom!
You’ll love this buggy!
From the Sunday Mirror, 8 November 1970
March 1985
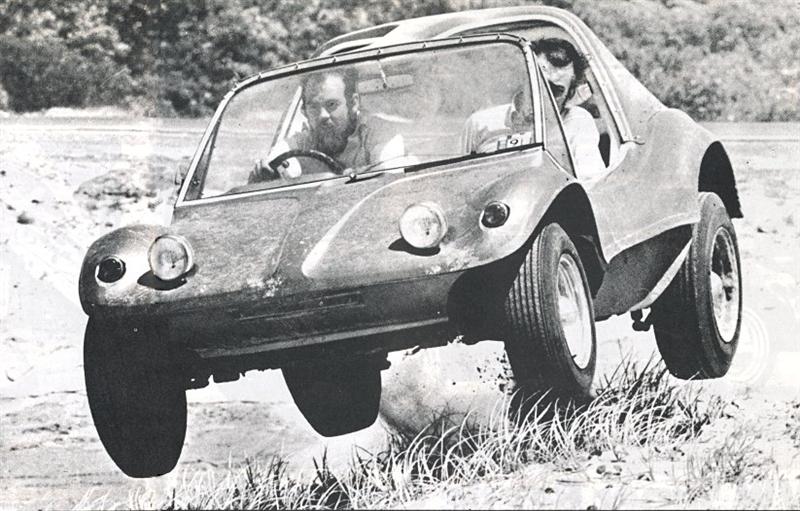
Weird, but what a fun drive!
Brother, but we've been having fun driving the weirdest looking, safest handling, most exhilarating crazy-type wheels we've ever seen. A dune buggy, no less!
Dune buggies are exotic machines built to run over sandhills. They're big in America and they're gaining popularity here, too. Some are mere steel frames powered by hulking V8 engines and wearing anything up to four rear wheels for better traction on the sand. Strictly not for the road.
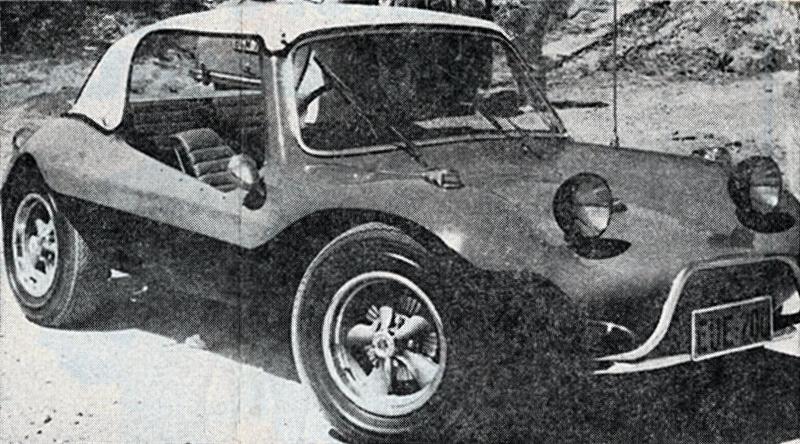
But the dune buggy we had was a sophisticated job acceptable for registration for road use and an ideal fun machine for anyone with a limited budget. It was made from the floor pan of a 1966 VW 1300 Beetle and fitted with a snazzy fibreglass top roughly shaped like a manta ray. In fact, the Melbourne-made fibreglass top is actually called the Manta.
Our test buggy was built by Richard Whillier, of Bronte, who sells do-it-yourself body kits, custom builds dune buggies himself and acts as a general adviser to the dune buggy clan. He shortened the VW floor pan 14¼”, softened the suspension and fitted all the trimmings including sports steering wheel, mag wheels and the best bucket seats we've ever struck in a sporty car. He also supplied a fibreglass roof you can remove in moments merely by undoing a few screws.
It's now the proudest possession of a young Sydney girl but she loaned it to us for a brief try-out on the road.
Wow, did it go!
Any similarity between the dune buggy and its Beetle ancestor was purely co-incidental. We clocked 0-30 mph (48 km/h) in 4 secs, which is darned good for a Beetle engine, and 0-50 mph (80 km/h) in 10 sec, which is even better.
The ride was totally different, too. More like handling a high-priced sports car. And we got the shock of our life to learn that the big radial tyres contained only 8 psi (55 kPa) pressure up front and 12 psi (83 kPa) at the back. Reason: Dune buggies are so light - maybe half a ton (508 kg) - that they don't need high tyre pressures. And dune buggy owners say they get tremendous mileage out of these under-inflated tyres.
If we loved Mr Willier's masterpiece our lady test driver flipped over it. “It's gorgeous, absolutely gorgeous," she said and she kept on saying it to everyone who'd lend an ear. "It's so safe. It squats on the road," she said. "And those brakes!"
Brakes, indeed. They're standard VW but because the dune buggy weighs so much less they'll pull you up on a 5c piece. In fact, there are times you don't have to touch the brake - merely lift your foot from the gas pedal and the engine acts as sufficient brake because the buggy is so light. On the other hand- put your foot on the gas and
- VA-room!
But the real thrill came when Mr Whillier and his offsider, Mr Brian Neale, loaned us another Manta buggy stripped for action and let us loose on the Kurnell sandhills where the Kurnell Dune Buggy Club was having its fortnightly meeting.
We went down a 75 deg sand slope and with a roar and a swirl of grit and then we were into the most exciting driving we've ever done.
You make a tight turn and away goes your tail, but you never really get into a bad skid because the loose sand builds up against your wheels and stops you sliding. Then up the walls of the dunes - as fast as you can make it go because otherwise you're going to bog on the way up. You leap across the crest of a dune, hover in mid-air for a second then go careering down the slope towards the next obstacle. It's living, we can tell you!
Yet it's remarkably safe - possibly because you never seem to get out of first and second although we had 50 (80 km/h) on the clock as we started the ascent of one dune. And we'd rate the chances of rolling a dune buggy at about one in 10,000.
In fact, the Kurnell Dune Buggy Club has never had a serious accident - partly due to their safety measures, partly because of the remarkable stability of the buggies.
The dune buggy is a lot more, of course, than a showpiece like the one we had on the road, or a competition vehicle like the one we drove over the sandhills.
It'd make a wonderful vehicle for beach fishermen and those backwoods types who like to get away from it all. In fact, one farmer has a Manta dune buggy in preference to a four-wheel drive farm vehicle. He carts logs in it across the paddocks, loads it with his fire fighting equipment and has even rigged a power take off from the engine.
You're naturally going to suspect that Mr Whillier charges like the Light Brigade for his buggies. You're dead wrong!
If you want to do-it-yourself and you've got a VW to start with, Mr Whillier will sell you the basic fibreglass body for $275 and shorten the Beetle's floor pan for you.
His dearest kit is $850 and that's really fancy. Or he'll make one up entirely for you in about eight weeks. The buggy you see on this page cost $1850, including the ’66 Beetle on which it was built.
Giving you a pay-as-you-drive rundown on a dune buggy is a bit of a trick because prices vary so much and because most buggy buyers don't use hire purchase. They prefer credit union or bank loans because it's easier to get cheap insurance if a vehicle isn't on hire purchase.
But let's assume you ask Mr Whillier to make you up an $1850 model. We'd suggest you save $350 before asking for credit. Your credit union would lend you the $1500 balance for $11.51 a week over three years and over an average four-year period of ownership that would break down to a piddling $8.67 a week.
Over the same period $1.04 a week would cover you for registration, third party and the initial stamp duty you pay with rego. Because no hire purchase is involved, buggy owners are getting insurance for as low as $1.55 a week.
If you used a dune buggy solely on the road you'd only need routine VW servicing and that's an economical 66c a week - standard for a VW1300. What's more, any VW shop can look after your buggy.
If you compete with the boys at Kurnell, of course, wear and tear will be greater and maintenance dearer.
One other thing. The fibreglass bodies are quickly and cheaply repaired. It's merely a matter of replacing any section that gets bingled, gluing the new piece in and sanding it over before repainting.
It costs only a fraction of what you'd pay for a panel beating job. Petrol too. Manta buggy drivers report an average of 37 mpg (7.6 L/100 km) around the city and up to 42 mpg (6.7 L/100 km) on a country run. So a week's petrol for the city would cost only $2.57 on their figures.
It adds up to a pay-as-you drive total of $14.49 a week. You couldn't do better anywhere.
Superbuggy!
From Sports Car World, July 1972
October 1985
Someone bright is going to realise that combining a Volkswagen Superbug 1600 with a new buggy J and S fibreglass is making will give them an absolutely brilliant sports car.
Sure, our pictures show this buggy flying across sand dunes. But that's not the point - although they do demonstrate its versatility.
What matters, as we discovered in a week at the wheel of this little terror, is that as a street sports car they don't come much better. Particularly when you consider you could have one on the road in immaculate condition for less than $2000.
Brother, this thing handles, goes and rides.
Even though the car we had was J and S's workhorse with an almost clapped 1200 cc engine, we had no trouble blowing the pants off several MGBs, two Sprites and a Torana GTR that issued challenges. Through bends they had no show (they passed us on the straights, of course - the poor old mill wasn't up to dragway stuff).
But we saw the potential - if you set out to forget any off-road stuff and built one of these Trail Buggies strictly as a road sports car, then you'd have a brilliant machine on your hands.
We suggest using late model Superbug chassis, suspension and engine since with the MacPherson strut front end and double-joint swing axles at the rear it is in itself an exceptionally good handler. Its bigger 1600 cc engine has far more poke too (Note – beach buggy bodies were not designed to mount MacPherson struts – Ed)
In ultimate form, you could of course see a VW expert like Lindsay Tooley and take the mill out to 2-litres with very big horsepower. It'd be goodbye for every sporty except Lotuses. Even with old model 1200 components the car would still be admirable.
Yes, there have been buggies before — hundreds of them. But this one is different. It was designed by Jeff Simmonds, who runs J and S, to break away from conventional buggy styling, and yet incorporate many safety features, strength and all-weather practicality.
Apart from its sleeker, more flowing lines, the Trail Buggy's main departure from the norm is in its Triumph Stag-type top. Besides improving looks and forming a very rigid platform for the clip-on soft-top, this hides a strong steel roll-bar. For additional safety, a roll cage runs around the body shell, protecting occupants from side, front and rear impact.
Inside, though, the driving position is tremendous and the seats very good. Room is adequate, and there's space for a third person in the small seat behind.
The top and its separate side curtains fit very well. They let no water in despite three days of rain while we had the car.
The kit for the car is available in two forms. The basic ‘Constructa’ kit is $745 and contains the complete body, all lights, windscreen, roll and protection cage, fuel tank and mudflaps.
The $1250 ‘Assembler’ kit also gives you two 13 x 6 front wheels and tyres, two 14 x 7 rear wheels and D7OH14 tyres, exhaust extractors and mufflers, front bumper bar, steering wheel, wiring harness, seat belts, soft top and curtains, fully-trimmed seats and interior trim.
That's a very complete kit - leaving you $750 to get the VW mechanicals to bolt it on to. For other Veedubs that's more than enough to play with. Superbug bits may be more expensive though.
Even so, it would still be a very cheap sports car indeed, and marvellous motoring fun.
Beach Buggy Improvements
By Lance Plahn
January 2000
Working as a mechanic at a VW repair shop for many years, with the beach on one side and farming/cattle properties on the other, I got the chance to work on all types of VWs including the Country Buggy and an array of registrable beach buggies. One thing you quickly notice with the beach buggies was that they were a fad toy (buy - play - sell), with the owners spending little or no money on maintenance or enhancement. They had poor brakes, stock 1200 brakes that needed a full rebuild, complete with poor handling mainly due to tired and weak chassis (these vehicles were only on the road when they crossed it).
A little while ago I purchased a very tired Kalita beach buggy, requiring a major rebuild and extensive fibreglass work. I checked out my old VW books and manuals, even the web. I spoke to many beach buggy owners, drawing on my own experiences, then mapped out a plan of attack. I wanted to build a beach buggy that was reliable and fun to drive, but at the same time functional and practical. There is plenty advice and information out there, but you have to find and collaborate it. Below is a list of improvements/modifications I did to the Kalita during the rebuild. It's by no means complete and only list of improvements/modifications, but a good starting point.
Engine
Just a couple of issues that continually occur when using a VW engine.
Fit all the tinware VW made for the engine, including the two rear tinware pieces around the pulley. This may slow the entry of foreign material into the engine by the crank pulley scroll, and offer some protection for the fan belt. I made and fitted extra tinware to the outer edge of the cylinder cover, to prevent water from splashing onto the spark plug and leads.
If buggy extractors are used, make and fit extra tinware to fill the void left by the absent heater boxes to retain air pressure and flow, plus protection for the push rod tubes.
Consider modifying the dog style fan housing to accept the wider seven-row Type 4 oil cooler as opposed to the stock five-row oil cooler.
Weld a washer to the centre outer tappet cover to enable you to tie wire the tappet cover clip to the washer, reducing the chance of an object unclipping the tappet cover.
Gearbox
In the centre at the top of the gearbox selector housing is a breather hole, which may allow water to enter the gearbox while negotiating water crossings. This requires the gearbox oil to be changed, at worst harming the gearbox. To reduce the possibility of water entering the gear box, drill and tap the vent hole, and screw in a steel brake line fitting, with a straight section pipe welded to the fitting, then bend the pipe to desired angle, fit a length of rubber hose with a fuel filter at the other end, securing in a high dry area. Of course the selector housing should be removed to carry out this task.
Wheel hop is a situation that occurs from stock Beetles to all out drag cars, but in a beach buggy negotiating a loose embankment it can be intolerable. To eliminate, first check the basics. Gear box mount in good order and tight, torsion bar rubbers good, and flexible clutch tube having sufficient bend, 38 mm deflection is required. Many owners fit strap type supports, but most do little other than come loose. The system I prefer requires a 6 mm plate bolted to the four lower gear box to differential housing bolts (use cardboard to make a template) welded to pipe that extends past the horns/ frame. A bracket is welded to the horn/frame with a Kombi gear box mount (P/N 211 599 481) at each end, between the two. But it does hang down a little, so I made mine to go over the top.
Front End
There is much written about caster, and how it affects the Beetle's handling, causing it to wander when owners lower the front end. It is the same for buggy owners who raise the rear end, especially by using very large rear tyres. Standard caster is 3 to 4 degrees, but aim for around 6 degrees. To adjust, you fit caster wedges between the bottom beam and bulkhead; this tips the beam out at the bottom and increases the caster to correct wandering. Caster is a feel angle and does not affect tyre wear; caster is like the angle on the front forks of a pushbike or on the wheels on a shopping trolley.
When browsing through a VW parts book on the Type 181, I noticed VW fitted a brace between the shock tower and top beam. If VW do this as standard format on their off road vehicles, maybe buggy owners should do it too. I cut 200 mm of 50 x 50 mm x 3 mm RHS diagonally in half, giving a brace for each side, then welded into position, along with seam welding the shock towers.
Front-end adjuster or cutting the beam and rotating the middle torsion bar anchor will raise the front. Replacing the outer double torsion bars with one solid one (next one in, from another front end) will stiffen up the front and raise it, but the front end no long supports the heavier steel Beetle body. A stock front end usually works well.
The front sway bar should be removed for off road and sandy terrain
Rear Suspension
I have found questions requesting to raising the rear suspension are in the biggest demand. When worked hard they do sag quickly, requiring resetting. One big problem to cause sagging is rear toe-in being out of specification. Too much (toe-in) and big wheels drag the suspension down. Do yourself a favour and get the rear alignment adjusted, especially after resetting the rear torsion bars.
When resetting rear torsion bars, a hot tip is to fit the larger diameter torsion bars from the Type 3 wagon. Also ensure the four torsion bars rubbers are in very good order, otherwise replace.
The rubbers are ok but wear quickly. I have used the urethane ones, but be warned they are very noisy and it’s near impossible to stop them squawking when the rear suspension moves. It is hard to know what specification to set your buggy rear suspension to; with heavier bars and now a lighter body, but I have found stock specification for that pan to be close. Always measure suspension height before and after and record that along with what degrees you set it to for reference if/when you do the reset again.
Brakes
If you are using tall off-road wheel/tyre combination on the rear it is important to improve the rear brakes. This is achieved by using Type 3 wagon rear brakes.
Steering Column
Having the blinker/wiper switch controls from a 1972 Superbug, complete with ignition lock, I decided to use it. With the Superbug outer column being too short, I modified a 40-hp outer column to Superbug specifications. I topped it all off by using a 1500 steering shaft, thus giving a functional steering column lock, plus some safety with a collapsible shaft. All by mix and matching stock VW parts.
Anti-Theft
In reality, if a professional thief wants a vehicle there is very little stopping them from taking it. That is not to say we are just going to hand over our possessions, no sir, we have to make it as hard as we can for joy riders and professionals alike. By fitting one or more anti-theft devices, here are a few suggestions:
- Kill switch - coil negative to switch to earth.
- Steering wheel/pedal bar lock.
- Fuel cut off valve, fitted between tank and engine. Turn ignition on and it operates an electronic valve. Ignition off and it turns the electronic valve off (no fuel flow). The advantage being, a would-be thief jumps starts the vehicle, travels a short way and stops because of no fuel. Thieves do not wish to go to the trouble of finding out what's wrong.
- Battery switch (suggest marine type) - fitted on the positive lead between battery and starter and positioned between the seats, make it hard to by-pass. Also prevents flat battery due undesirables turning on current operator in your absence.
Roll Bar
The roll bar will have to be constructed to conform to the laws of your state/country. A typical set up would be a main hoop with two rearward braces, but this set up can be taken a couple of sets further. Where the rear braces mount to the body, plate both sides of the body (100 x 100 mm x 6 mm plate) then continue the pipe down, and mount to the chassis forks/ horns, using a old tow bar clamp, thus mount the main hoop back to the chassis.
Fit a smaller hoop (height) under the dash, this will give a good mount for the steering column. The column can be made to be adjustable by slotting and shimming. It also provides a mounting point for an adjustable chicken bar (a T handle out of the dash)
With two hoops in place, one front the other to the rear of the vehicle, gives an opportunity to fit a side intrusion bar, a piece of pipe running lengthways down the outside of the body, under the body roll, mounting through the body to the two hoops.
Jack
Very few buggy owners give much thought to a spare, not to mention a jack. I made a roof rack for my buggy and fitted the spare to the roof rack. Retain the spare with a bolt through a 300 mm disc 5 mm thick; yes an overkill, but this disc doubles as a jack base if required.
A Kombi jack would have sufficient lift, but I wanted a hi-lift jack (to lift the big wheels out of deep holes) but being a true VW owner I did not want to spend much money. Having a few early VW jacks laying around, I thought it would be easy to make a hi-lift jack by replacing the shaft with a longer one. A careful look revealed the early VW steering shaft was the same inside and outside diameters. There’s a very inexpensive but functional hi-lift jack.
If you wish to do tyre repairs and need to break the bead, you can jack the vehicle up on the tyre, then turn over and repeat. Place a piece of wood measuring 10 x 20 cm (4 x 8 inches) between the foot of the jack and the tyre to distribute the pressure.
I trust the above information is of some help to you in building your buggy. Remember to enjoy your beach buggy and keep it upright.
Shortening a VW Floor Pan
By Lance Plahn
January 2000
Have you ever done repairs on your vehicle and had to research or refer to a manual, only to find it did not tell you what you wanted to know? Or have you completed a task then said if you did that again you would do it differently? Well this story covers some of the above issues.
I have recently shortened a floor pan to put under my beach buggy (Kalita). It is not a step by step how-to, as this information is available from the manufacturer or in beach buggy books. But it contains tips and suggestions to make things easier and improve your buggy. If your pan is in good order or you’re not planning a replacement, read on, as there could be some ideas to improve your buggy.
Most buggy design come from the ‘60s and were made to fit on a ‘60s VW floor pan. These floor pans are still in reasonable supply at a fair price. Later floor pans that have double-joint rear axles and a ball joint front end are harder to find and more expensive; many of them are now under hot Ovals! To acquire a floor pan I purchased a complete cheap Superbug, thus giving me all I needed (well, allmost). The drawbacks were having to remove the strut bulk head (drill out the spot welds) and fit (align and weld) a ball joint bulkhead, then purchase a 1500 ball joint and disc front end. Another challenge was the later set up has a wider track, so the wheels protruded outside the guards. This was easily fixed by widening the guards. Certainly a lot more work, but the end product is very nice to drive and worth the extra effort.
After obtaining a pan and stripping it down in preparation for shortening, the first thing is to measure the clutch and accelerator tube protrusion and exit angles from the floor pan for later reference. Then unpick (angle grinder/hacksaw blade) the welds securing these two tubes to the rear of the floor pan.
Mark out the section to be removed. I found this easier to do with the pan upside down. Use the torsion tube as a reference to mark and draw the cut line square across the pan.
Then cut. An angle grinder is good for this task. Be sure not to cut the clutch, accelerator and fuel tubes. Cutting the heater and handbrake tubes will be ok.
Gently separate the two halves, guiding the three tubes out of the back half of the pan.
If the heaters are not to be retained, remove the heater cable tubes and weld the tube holes in the horns to prevent water entering the tunnel during creek crossings.
To join the handbrake cable tubes; I got some tubing to fit over the handbrake tube from a Hydraulic Hose repair shop. Shock bush sleeves can also be used. Cut two lengths approximately 60 mm long, slide them over the hand brake tube in the front half of the floor pan, then braze them in position. Don’t weld – a good penetration from oxy or Mig may cause damage or lumps inside the tube, causing the cable to premature wear.
With these sleeves now protruding out of the pan, join the two halves. It’s not easy guiding the three tubes (clutch, accelerator and fuel) through the back half, along with guiding the hand brake tubes into the new sleeves. After a trial fit, weld the two halves. A quality Mig is best for this task. Position and re-braze the clutch and accelerator tubes in back half, and cut off excess tubes, including fuel line.
It may be necessary to add a support/brace in the tunnel for the clutch tube. Use 75 mm of 25 x 3 mm flat. Weld lengthways along the inside of the tunnel and braze along the clutch tube. This task may be undertaken before joining the halves, working out the position during the trial fit.
To shorten the hand brake cable, cut to correct length at handbrake lever end. Make a new fitting out of 10 mm hexagonal rod, 70 mm long. Thread one end 40 mm (6 x l mm), drill a hole (just large enough to accept the handbrake cable) in the centre of the hexagonal rod at other end. Drill and tap one or two holes into the side to accept a setscrew. This will prevent the cable from coming out.
Before shortening the chassis, you may wish to remove both left and right-hand floor pan sections. This is done by drilling out the spot welds. I suggest you purchase a spot weld drill from a good tool supply shop. A 3/8” drill will do the job.
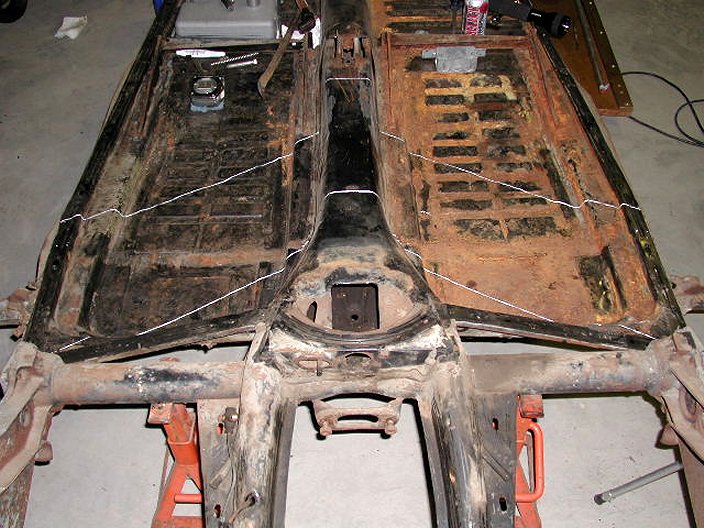
With the left and right pan section removed, shorten and re-weld the chassis. Then shorten the floor pan sections and refit. It is easier to do it this way but involves a lot more work. Instead of refitting the pan section you may wish to use 2 mm sheeting.
In some buggies (Kalita) the side body panels do not extend to the floor, requiring a 2 x 2 inch box section pipe (50 x 50 mm RHS) to be attached to the pan. When this is secured to the rear torsion bar tube and extended to the front end, it firms the chassis, reducing twisting which in turn is a cause of the tunnel to crack. It is like a lift kit but only on the sides. To add strength to the sides of your body you may wish to use some thick wall 30 x 30 mm RHS, either inside or underneath. Bend to required shape (cut out a V and reweld or have it bent at fabrication shop) put a length of 20 x 10 mm flat inside the RHS, secure by drilling some holes in the RHS, then spot weld (through the holes) into position, and cap both ends. Mark holes in RHS to coincide with mounting holes in floor pan/body, drill and tap. Apply some rust preventive into the RHS through the holes. Done this way no water will enter the RHS and should last many years.
During the pan shortening you will have noticed VW used a sealer in some of the joins. Remove all remaining sealer and clean, then reapply new sealer (3M Drip-Chek sealer)
Clean floor pan, using wire buff on angle grinder, paint with fish oil and allow a few-weeks to dry, then paint with a good paint.
You may even consider getting your floor pan galvanized. There are companies that cater for large objects like boat trailers, charging by weight. Excellent for constant beach work.
You will notice the rear section of the floor pan drops down, reducing ground clearance. To improve clearance, cut the side out of the drop, bend the front of the floor up, reweld. It will give a flat under carriage and original look.
Water drains are a necessary to allow washing salt and sand off the pan, as well as to allow rainwater to exit. Many owners just punch holes in the floor, but this allows water to enter during creek crossing. Rust usually starts around these holes. I cut the large bungs out of 44 gallon drums then welded in to the back section of the floor pan on the under side. I placed 15 mm of 80mm inside diameter pipe over the bung, using 150 x 3 plate as a sump guard or ramp over the pipe, cutting a hole in this plate to fit over the pipe.
One area that can cause trouble is the front gearbox mount. Even though it does not hang down, in some off road situations the mount can catch on large rocks or logs, breaking the mount or selector housing nose cone. To reduce this occurring, weld a piece of flat 90 mm x 6 mm and 140 mm long, between the mount and floor pan, parallel with the horn and ground. It will act as a skid plate and reduce the tendency of objects getting caught on the mount.
The tunnel is the backbone of the floor pan, and with the body now removed more stress is placed on the tunnel. The handbrake hole is a weak area. I got some 3 mm plate, cut a hole in it to fit over the handbrake hole, then bent it to go down the side of the tunnel towards the floor, then weld in position. Many off road racers did this in the early days.
Pedal clusters often seize up due to the hostile environment they live in, requiring removal, dismantle and freeing up then regreasing. To prolong this task, drill and tap a hole in the brake pedal pivot, fit a grease nipple and grease often. Some pedal cluster setups will not allow this to be done to the clutch pedal pivot.
I trust the above information is of some help to you in shortening your floor pan. Remember to enjoy your beach buggy and keep it upright.
The Manx Dominates the Slalom !
By Don Wilcox
March 2001
I first met Ted Trevor at an autocross or slalom type event a couple of months after I wrote off the yellow Devin in San Diego. I had been running the championship events in a series of borrowed cars that friends had been willing to loan me, primarily because I was leading the SCCSCC Championship points race at the time of my wreck. I ran one of the Championship events in Jim Dunn's TR-4 and managed to win the class, so I got the maximum 100 points out of that one, and ran another in Roy Ferguson's Lotus Super 7, and won that class in it for another 100. So when I met Ted, I was still in the Championship points race lead, and looking for a ride that could replace the Devin.
The event was in Pomona somewhere, and was not a Championship event, but a smaller and less formal one that allowed ‘fun runs’ after the timed event was over. I was there to watch, and keep an eye out for a potential ride I could borrow, when Ted drove in in the strangest vehicle I had seen in a long time. It was a bright purple metal-flake Myers Manx dune buggy with huge sand type tyres on it, and a Corvair engine!
All the sports car purist types laughed at it, and had a lot of fun with jokes about such a car daring to show its face at a ‘real’ sports car event. I felt a little differently about it, because when I looked the car over carefully, several things began to add up in my head.
First the workmanship in the car was all of superb quality. The car was beautifully built, and was full of special parts that had obviously been handmade. Second, it had several factors in its basic design that had real potential for a slalom/autocross car - short wheelbase, high power to weight ratio, quick steering, light weight, etc. The more I thought about it, the more it looked to me like a potential winner.
I talked to Ted for a long time, asked a lot of questions about the car, and we ‘hit it off’ right from the very beginning. He was the owner of Crown Manufacturing Inc in Costa Mesa, and was in the business of special machine parts, among which was the hardware to drop a Corvair engine into a VW! The buggy was his pet, and ‘demo’ car for his line of such equipment, and he was quick to see a potential market if the car could be competitive in this type of event.
I encouraged him to enter the event (he said he had never seen one before!) and he agreed to do so, if I would also enter the car and drive it to give him an idea of what the car could do with a more experienced driver. The results were pretty funny.
The car had huge tyres on it, because it was set up for off-road work in sand and desert. The suspension was jacked up as high as it would go, and the car was set up for the opposite of what we were asking it to do. Ted immediately spun it out and off the course several times, and everyone had a real big laugh about the funny looking car. When I drove it, I managed to keep it on the course, but the car showed only its potential - we did not win that event.
After the runs and after all the laughter had died down, Ted and I talked for about an hour about combining forces: installing my hot, Bill Thomas-built Corvair engine (now ‘surplus’ after totaling the Devin) into his buggy, and then Ted setting the buggy up specifically for slalom/autocross type events. The plan was for me to bring the engine down to his shop in Costa Mesa on the coming Thursday evening and proceed from there. I didn't know Ted yet, and had no idea how quickly he operated, or that he had almost total recall about anything mechanical.
When I got to his business Thursday evening, I nearly went into shock. The car looked like it had exploded! It was literally scattered all over the shop. It had been completely disassembled and parts of it were everywhere. I had mentioned several things that I thought we needed to be competitive: wider wheels, fat, sticky, low profile tyres, good shocks, quicker steering, lower centre of gravity, etc.....
All of this was in the process of happening. Ted had made a set of wheels for the car: 13 inchers (7 inches wide) to drop the front end, and a set of mind blowing 15 inch rear wheels that were 10 inches wide. (This was in the days when normal race tyres were on 4 to 5 inch wide wheels, and the tyre revolution had not yet started). He had come up with a set of Koni shocks (Porsche racing version) and had dropped the suspension so that the ride height was about 6 inches lower in front and 8 lower in the back. A set of super sticky racing recap tyres was en route from San Francisco where a company that did sticky tyres for drag cars had agreed to do a set on road racing carcasses, and include a bit of a tread pattern for legal reasons only. Everything on the car that could be removed to lighten it a bit was gone, and although it looked like the car would never run again, it was really in the process of starting to go back together again. I guessed it would be a month or so until we could hope to try it out, but Ted said come down on Saturday, and we would try it in a huge nearby parking lot!
When I got there Saturday morning, the car was so transformed that other than the bright Southern California purple metalflake colour, it would not have been recognisable. Instead of being a ‘high rider’ with a foot of ground clearance, it was lowered to the max, and the top of the dashboard was now less than waist high. It sat on the widest set of tyres I had ever seen, and the hot engine was in and ready to go. When we fired it up, and I tried it out a bit, it was obvious that we had something special on our hands. We had nothing to compare it with, but it was QUICK! The handling was so sensitive that it was a bit of a handful to control, but it was obviously going to be some serious fun!
The next day, we took the car to a big event, and started with a rather embarrassing debut. Ted was taking the car through tech inspection, and for the brake test, each car had to accelerate up to about 40 and make a hands-off the wheel, brakes-locked stop. Ted was feeling a little frisky, and for the acceleration part revved the thing way up, and dropped the clutch to pull a big wheely (which the car would do fairly easily at that point, before we did some weight redistribution). The result was very impressive for about 20 yards, then the ring and pinion gear in the transaxle let go, and our day was over - before the event had started. Everyone laughed and had a great time abusing us as we crippled the poor thing home.
During the next week, Ted repaired the transaxle and passed a law for the car: NO full throttle starts in first gear! And NO more wheelies! Starting in second gear, the clutch slipped just enough to get the car launched without the revs bogging too much, and it was so light that there was really very little loss in performance. So second gear starts were the rule from then on for all competition events.
In the next six months, we secured the year's overall Slalom Championship with a perfect 1200 point score (never done before), which meant that we were never beaten at a Championship event during the year - by anyone, regardless of class. We entered 20-some events, and won every single one in our class, and all but about 4 of them overall as well. We were definitely off and running. The large picture in our basement of the dune buggy with all the trophies around it is the original purple car, and the trophies are our ‘take’ from the first SCCSCC Championship year that we campaigned the car together.
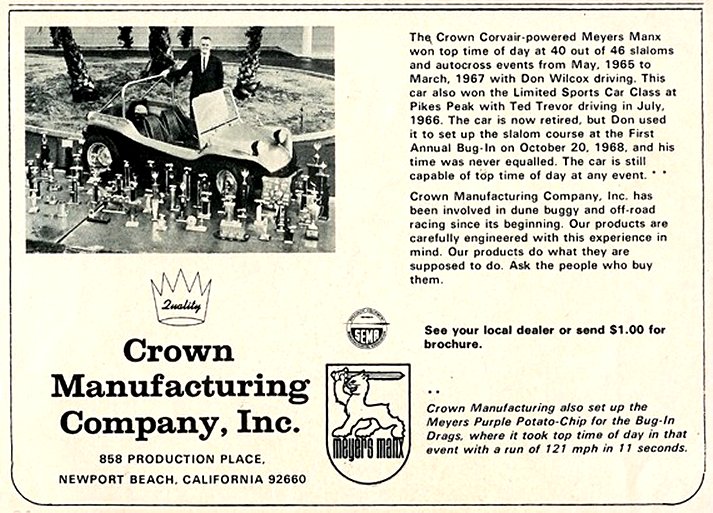
During the next year, we ran over 40 more events, and set the FTD or ‘Fastest Time of the Day’ at all but two or three, where we lost usually to only one car - Chuck Green's factory Cobra. Those were often ‘open’ courses where we couldn't come close to the Cobra's upper end performance. We still usually beat the other 20 some Cobras, all the ‘Vettes, and the Lotus' etc. but Chuck was just too good! I think that during the time that we ran the buggy, it was really only beaten by a couple of people when we got in a run that was really our best stuff: Chuck Green, and Chuck Beck who eventually built an even smaller, and lighter, monster autocrosser. Chuck Green was as smooth and accurate as anyone could be at that type of event and was always a threat for FTD - and Chuck Beck was a creative designer/builder who was braver than Dick Tracy, and if he finished without hitting any pylons, he was FAST. I also remember several other amazingly quick guys that I always liked to watch and learn from. There were some seriously quick people playing the game at that time, and that made it real fun for everyone.
As we experienced so much success, we got to feeling pretty frisky, and had a lot of fun playing mind games with people. We would wait until as late in the day as possible before we ran the car, letting everyone chip away at the FTD until everyone had taken their ‘best shot’ - then we would run the buggy and beat 'em all. Man, was that fun!
After a while, people began to grumble that we always waited until everyone else had run so that the course was cleaned of any tiny rocks or that rubber had been laid down by the cars all day, making the course ‘faster’ when we ran. This was partly true, but in order to play with their heads even more, we started going to the events very early in the morning, when they were first set up, and running - then leaving the FTD for everyone to shoot for, and we won them that way also. On another occasion up in a race at Santa Barbara, I got into the last turn too hot and spun the car 180 degrees approaching the finish line. I just kicked in the clutch and let it roll across the line backwards, and the time was still nearly fast enough for FTD. The announcer was having a lot of fun with the fact that the defending Slalom Champion of Southern California spun out, and was razzing Ted about it. So Ted, in his usual subtle fashion offered to bet the announcer that we could take our next two runs, spin the car again both times, and still take the FTD - backwards. The bet was made, and I spun the car on both the remaining runs, and we did set the FTD - backwards.
Another neat period was when people began to try to outlaw the car via various rule changes. Some were pretty funny, and one that we had a great deal of fun with was a ‘safety’ rule that was passed requiring that, “All engines be enclose with metal,” to be cleared through tech inspection. Of course, this also outlawed all the ‘Vettes with their fibreglass bodies, but before it was repealed we ran a couple of events with an engine cover made of coat hangers and aluminium foil. The engine was enclosed in ‘metal’ and was legal in the strict sense. The car usually left the ‘engine cover’ at the starting line, or somewhere on the course, but it still won.
The car was running in the Modified Sports car class, and we made no pretence of it being a ‘stock’ or production car, so we really did not care at all what class they put us in. We ran with the idea of FTD every time we showed up. We ran with the object of beating every car that entered, and we didn't care what it was. They eventually settled on a Class N designation for the car, where we ran against the unlimited class vehicles: pure race cars with big engines (over 2 litres displacement) formula cars, etc. which arrived on trailers. We drove the buggies to the events, often with my wife riding shotgun and our daughters Laurey and Lisa in the back with a picnic basket, ran the events (and won over 90% we entered over a 3 year period), then drove home.
We always both drove the car at events, and Ted always ran first, and was a very good driver - usually finishing second in our class, and in the top dozen or so overall. At one event, he ran particularly well and set the FTD on his run, so I never took my runs and he got the FTD. I could have sand bagged my runs so he could win, but we knew each other too well for that. We ran the purple car, and later the blue Pikes Peak car, over 100 times together, and this event (and Pikes Peak in 1966, but that is another story) were the only two times that Ted was faster.
The spring of 1966 Ted began to talk about building a second buggy, and making it a race car from the beginning. The catalyst of the idea was the Pikes Peak Hillclimb. One of the most famous races of its kind, it is a full USAC Championship event, and attracted some of the big names along with a bunch of eager amateurs. Ted decided that we ought to take a shot at the mountain, and he wanted to drive it too, so he built a second car that he called the Crown Meyers Manx Super Buggy. This car was built literally in two weeks preceding the event, and is the blue Manx that is in our garage at the moment.
The Pikes Peak saga is a whole chapter of its own, so I will skip the details of that event here. When we got back to Southern California we decided to semi-retire the purple car, and start racing the blue one on the slalom and autocross circuit. The first two events were a disappointment because the turbocharged engine in the blue buggy sputtered and choked every time it turned hard to the right. We spent two events before Ted found the fix with a vent tube inside the carb to handle overflow fuel. After sorting that out, we went on to win another Championship or two, and the buggy was a consistent FTD level competitor as long as we ran it.
Our interest in the parking lot type events was sort of dulled by the heady experience of Pikes Peak, and we began to look at the idea of expanding a notch. Ted wanted to get into off road racing and try to gain a foothold in that market segment, so the blue buggy was fitted with all sorts of crash bars around the engine and under the car, off road lights, and some very ugly spare tire mounts etc. I never liked it set up that way. It was like a thoroughbred made to pull a plough! Ted eventually gave up on trying to make a competitive off road car of it (after it finished 4th in the Mexican 1000, driven by Eric Ressler), and bought a Burro, a hugely-ugly off road racer that was sturdier, stronger framed, and had longer suspension travel.
But the real jump into the big time was our venture into USAC Indy car racing! That also has its own chapter, but it started in the spring of 1967 when Ted bought a three year old Indy car that was being rebuilt in a Costa Mesa shop after Al Unser visited a wall with it. After running the Indy car the summer of 1967, we just never really got back into the full swing of the slalom and autocross events that we had so much fun with. After 200 miles an hour, and running with Andretti, Foyt, and the Unsers - it just was never quite the same.