
Type 3 & 4
The Type 3 Karmann Ghia
VW 411 – Love at First Sight
Soft Throttle Pedal
Betsy the Wonder Wagon
Type 3 Wet Feet Syndrome
Making Your Type 3 Handle
Push Me – Pull You
Save Your Rusty Type 3
The 1966 Fastback Story
Close Encounters With The Third Type
Type 3 Tips
Why a Type 3?
Type 3 12-Volt Conversion
Type 3 Models
Our 1965 Type 3 1500 ‘S’
VW Type 3 – a Short History
Type 3 Engine Mounts
VR6 Notch
Bryan Thomson’s Volksrolet
VW 1600TL Fastback
VW’s Big Car – a Sneak Preview
History of the Type 3
VW 1500S - four world records
The Type 3 Karmann Ghia
By Greg Figgis
August 1987
Production of the Type 3 Ghia began just six months after the original 1500 Type 3 sedan was introduced at the Frankfurt Motor Show in the autumn of 1961.
The car was basically the creation of US-born Tom Tjaarda, who at the time worked in the design studios of Carozzeria Ghia in Turin, Italy. He had done design work on the Chevrolet Corvair (which looks similar to the Type 3 Ghia in some areas), and later became famous for styling the DeTomaso Pantera.
Wolfsburg had given Ghia the assignment of building a coupe version of the standard Type 3. Like the Beetle-based Ghia, the new coupe was to be sporty, well built and, of course, economical. The latter was easy. With the standard Type 3 sedan already weighing in at under a tonne, the more aerodynamic and slightly lighter Ghia would readily make over 23 m.p.g. (12.3 L/100km) even in the heaviest stop-and-go driving. But bringing quality standards up to those of Volkswagen had long since established itself as not so easy. As is often the case with a new model, especially one being assembled outside the parent factory, it took just under a year to work out the production line bugs in the Karmann works.
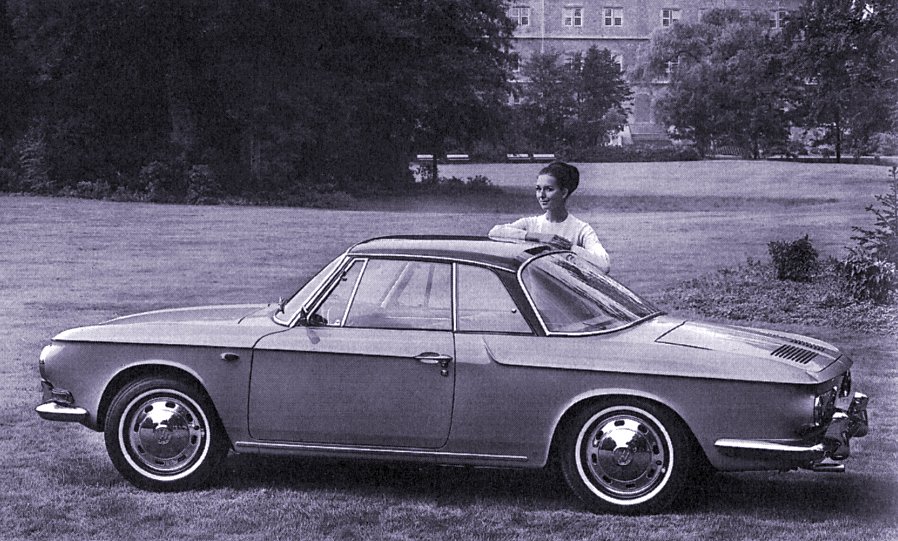
Probably the biggest contributor to the coupe’s notoriety was its unusual styling. While the plain rear end was quite contemporary, the front end was as controversial as the Beetle’s original styling. Unfortunately, the end result received mixed reactions. As on the Type 1 Ghia, the larger Ghia had a protruding snout. But instead of being left simple and uncluttered, incorporated into the front was a set of eyebrows and two pairs of lights. Near the bridge of the nose was a set of small flush-mounted fog lights; and out at the edge of the mudguards were the standard headlights. One of the Ghia’s most pleasant assets is the large area of glass and the very thin roof pillars, giving excellent all-round vision.
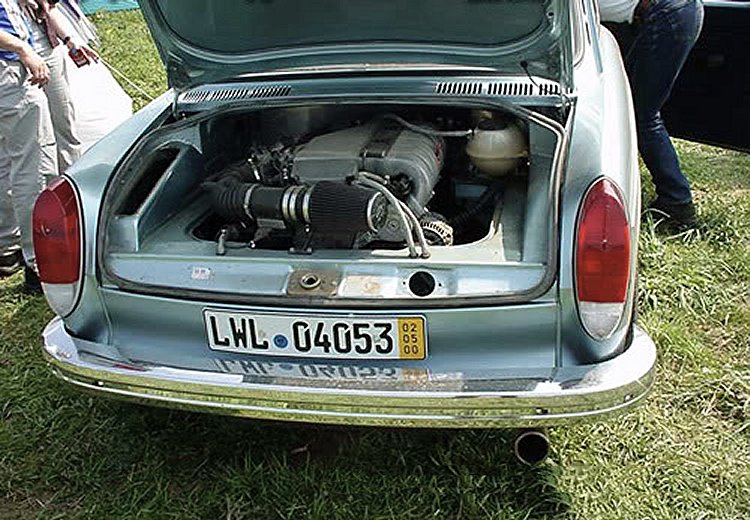
The Ghia was also unusual in that its ‘suitcase’ Type 3 flat four engine allowed room for a rear luggage compartment, similar though smaller to the one in the Type 3 Sedan and Fastback.
Although the Ghia’s styling may have been original, its running gear was not. The body sat on a slightly altered Type 3 platform-type chassis.
The early models used the Type 3 drum brakes and flat 1500cc engine with dual 32mm Solex carburettors. With a smaller body, however, the Ghia was able to trim 14kg from the original car’s weight. Weight distribution was not as good in the Ghia as it was in the Sedan. Whereas the sedan had 57% of its weight over the rear wheels, the Ghia had 59%. But the reduction of 150mm in overall height and a lower seating position resulted in a lower centre of gravity, so handling remained about the same in the two cars.
Performance of the larger Karmann Ghia was slightly better than its Type 3 cousin. Because of its more slippery shape, 100km/h came up two seconds faster than the Sedan, and top speed was nearly 145km/h. When the Type 3 1493cc engine was enlarged to 1584cc in 1966, the Ghia also benefited and performance was further improved.
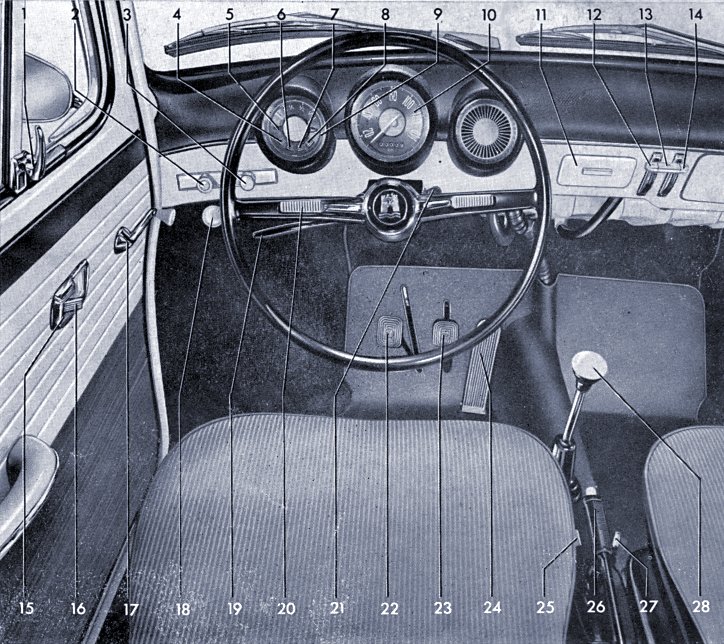
Inside, the Ghia sported two bucket seats up front and a small bench seat in the rear. In front of the driver were three standard Type 3 instrument pods containing speedometer, fuel gauge, clock and warning lights.
Provision was made to mount the clock in the middle of the dashboard if the optional tachometer was fitted. On the early Type 3 Ghias the instruments were different from those of the Type 3 sedans.
Production ceased in July 1969. Type 3 Ghias are rarer than Type 1 Ghias, as total production amounted to only 42,498 cars over seven years. Probably less than 20 of them were sold in Australia, as very expensive special-order full imports. Sadly, the Type 3 Ghia has the distinction of being the first model that Volkswagen ever deleted from its range. Its production line space at Karmann was given over to the VW-Porsche 914.
Love them or hate them, they are definitely a collector’s item, fetching high prices. We are lucky to have several of them in Club VW.
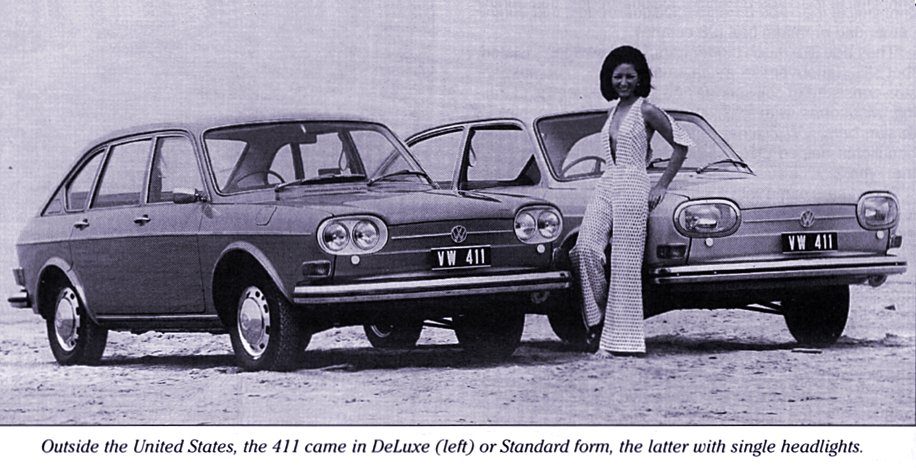
VW 411 – Love at First Sight
By Lou Ceccato
August 1987
Many of you may have read a few months ago about an article on Type 4s, namely VW 411s. Ever since then I've been doing more research and found out some more interesting facts.
The Type 4 as we know it today had its foundations in a design study by Pininfarina, way back in 1962. VW gave the study the design code of EA158, and made 35 prototype bodies in cooperation with the US Budd Steel Corporation of Philadelphia. They developed and tested the monocoque body shell that eventually became the Type 4 in 1968.
The smaller Type 1-based ‘Brazilia’ is a very similar-looking car, developed a few years earlier under the guidance of the then-head of VW Brazil, Rudolf Leiding, who later became the head of Volkswagen in Germany. However apart from a very similar nose and headlight design, the Brazilia has nothing in common with the larger Type 4, contrary to what many journalists might write.
The new Type 4 was announced in May 1968 and was released for sale in August 1968 for the 1969 model year. It was powered by a newly designed 1679cc (90 x 66mm) air-cooled flat four rear mounted engine unit that followed the Type 3’s compact layout with the cooling fan at the rear of the engine rather than above. Suspension was by coil spring, with MacPherson struts at the front and semi-trailing arms at the rear. It was Volkswagen’s first monocoque body shell, and also VW’s first 4-door car. It was also offered in two-door sedan and two-door Variant (station wagon) form, but unfortunately a four-door Variant never made it to production.
The engine capacity was increased to 1795cc (93 x 66mm) in 1973 along with the option of fuel injection, and with a major nose restyling was renamed the VW 412. The ungain¬ly model never really caught on, and a mere 367,700 Type 4s were produced. During these years the Beetle was still selling over one million cars a year and Volkswagen knew that a successor had to be found. We now know that the Golf eventually emerged to replace the Beetle, but in the meantime Volkswagen also tried the K70, a huge disaster by Volkswagen standards, but that's another story. Did you know the VW Type 4 was also made in South Africa?
The 411 was only produced between 1968 and 1974, and by Volks¬wagen standards in disappointing numbers. It ceased production in May 1974, with the last cars being VW 412 Variants. VW Australia did bring in a couple of VW 411s in 1969, after LNC Industries in Sydney took over the importing, but they found they would be too expensive to be sold here. The VW 411 and 412 were never sold here, but the Type 4 engine was to survive another ten years after the end of the VW 411/412 in Europe.
Volkswagen and Porsche have collaborated on many projects throughout the years. One of the less successful projects was the EA 266 prototype, a neat little potential Beetle replacement designed by Ferry Porsche's nephew, Ferdinand Piech. It was powered by a transversely mounted four-cylinder water-cooled engine lying flat under the rear seat. It almost entered production as the VW Type 191, but it was axed at the last minute on cost grounds. Although the EA 266 was not destined to enter production, a further VW-Porsche liaison resulted in the 914 sports car arriving in 1969. The 914/4 was powered by the Type 4’s 1679cc fuel injected engine, and was assembled by Karmann. There were two models made - the 914/4 and 914/6.
The 914/4 was strictly a Volkswagen project. All components used were VW. This mid-engined car with MacPherson strut front suspension and semi trailing arm rear was sold as a VW-Porsche in Europe and as a Porsche in America, but sales were unspectacular. Only 114,103 were produced. The Volkswagen 914 is instantly recognised by its four-stud wheels rather than the five-stud on the Porsche. The engine was increased to 1971cc in 1973, plus an optional 1795cc unit till the pro¬duction run ceased in 1976.
The 914/6 was a true Porsche. All components used were Porsche. The engine used was the 911T 2-litre flat 6 . This was updated in 1972 to 2341cc, namely the 911S motor with 190 BHP. Although performance was on par with the Carrera it never sold in any great numbers and only 3,360 vehicles were made. Production ceased in 1975.
In 1973 the Type 4 motor was used in the Transporter. This was initially the 1679cc unit which powered the original 411, but with twin carburetors instead of fuel injection. These engines had lower compression ratios and proved an ideal combination with the Kombi. Engine size was increased to 1795cc in 1974, still with the detuned version of the fuel injected 411 motor. The engine then became a 1971cc unit in 1976 with twin carburettors or fuel injection, depending on the market and/or year. All developments made on the Type 4 motor were passed on to the relevant models that used them.
Which brings me to tell you about three VW 411s in Canberra. I own a 411L 4-door model that has been updated to a 2-litre. Jens Kruska, a fellow member here in Canberra, now owns two 411s. He has a 411 Variant 1700cc and a 411LE 1800cc 2-door. The LE was recently driven up from Melbourne and was a car that Jens previously owned several years ago. The Variant is the only vehicle not registered, but will be soon. All these vehicles are being restored and will be seen at shows in the future.
I have found another 411 in Canberra. At the moment it's sitting in a backyard collecting rust. The wife of this person told me it's been sitting there for eight years. Both Jens and I are attempting to purchase this other vehicle. If there are any people who know of any stray 411s or 412s, please contact us in Canberra.
Happy Type 4 motoring!
Soft Throttle Pedal
By Rod Young
May 1988
For a long time I've felt that the feel of the throttle on my Type 3 could be improved, as it seemed to be a bit sticky just off idle and made driving in slow traffic rather jerky. (This was probably due to my own throttle linkage, but that's a different story.) I've often thought that more movement at the pedal would improve matters, perhaps a longer pedal. But surely, if you make the pedal move further, you would have to redesign the linkage so that you don't run out of travel? As it turns out, not so.
Looking at the pedal on Type 3s and 1500 and on Beetles, you have a bracket on the back of the pedal that rides on a roller on the lever underneath, thereby pulling the cable. I'd never taken much notice of it until recently, when I finally understood how it works. Like so many VW-designed articles, it's a masterpiece of simple design. The bracket is specially shaped and works as a cam. The section that contacts the roller when the throttle is closed is more steeply angled than the part towards full throttle, where the cam is flat before it ends and becomes a stop. The effect of the steeply angled section is to move the pedal through a greater angle for a given throttle opening than it does further down, which gives you a much better feel just off idle.
As soon as I understood this, I thought, "Where you have a cam, you can play around with the curve". Why not make the high part of the bracket higher and the low part lower, so that at idle the pedal sits further off the floor and at full throttle it does down further?
All it involves is cutting the bracket off the pedal, grinding the stub down a bit, cutting a bit more off the bracket, inserting a wedge and welding it all up. It only takes about half an hour from start to finish.
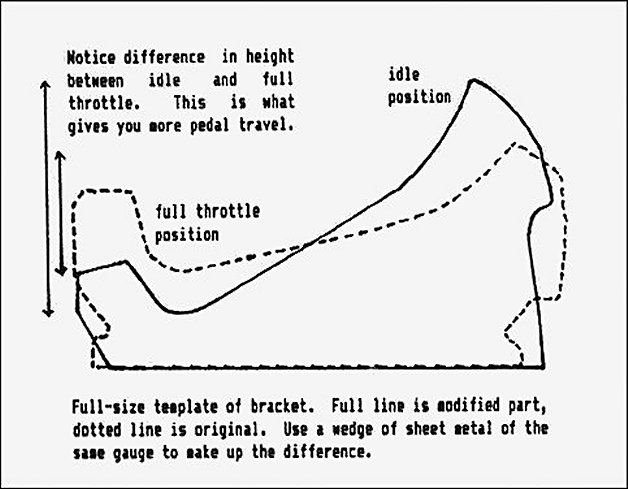
The improvement in feel is dramatic. The modification gives you much more foot movement just off idle than before, which is very important for a smooth driving style, especially with a powerful engine. The pedal is much lighter than before, right through the range. The diagram above shows the difference between the original bracket and the modified one, and can be used as a template for your own modification.
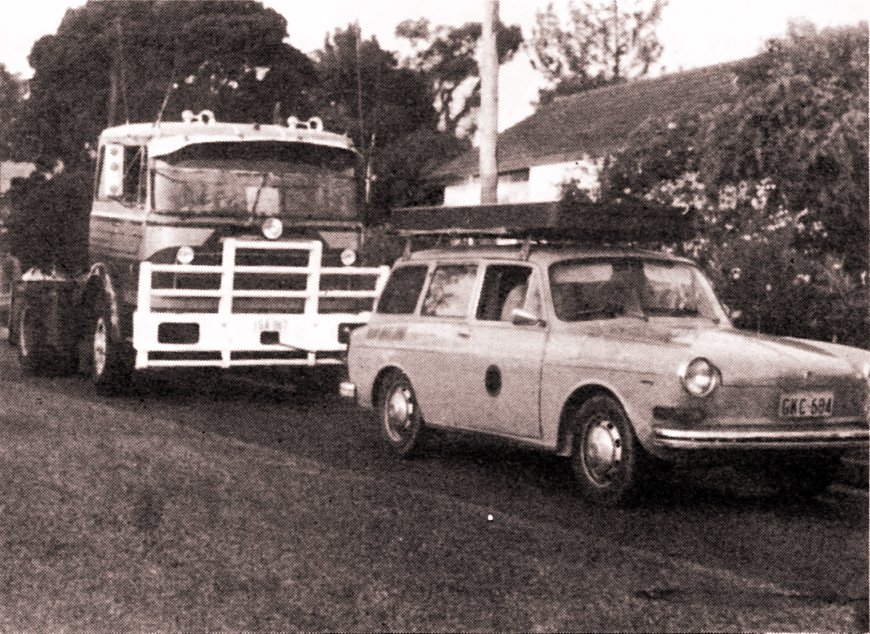
Betsy the Wonder Wagon
By Rob Jurgensons
March 1989
Betsy started her life on the 6th July 1973, being the replacement for the '68 Type 3 wagon.
Little did she realise that her first 385,000km weren't going to be easy. With my father being a painting contractor, this meant Betsy would be travelling to various locations all over Sydney. Not too strenuous you might think. WRONG! Carrying around 4.9-metre ladders, trestles, planks and numerous drums of paint ain't easy.
Apart from her weekly routine she made regular fortnightly trips to the Motor Bike Club (for which I raced bikes for about 11 years). Thinking that weekends were for rest and relaxation, she was forced to slug her guts out towing the trailer, bikes and various spare parts for approximately 300 trips.
Gradually showing signs of her adventures, she battled on for some time, even after having to clutch start a 6 tonne Fiat truck.
Eventually, at about 153,000km, she spat the dummy one day by blowing No. 3 spark plug completely out of the head. No way was she going to be buried yet. With new heads and cylinders being installed, the legendary Type 3 was ready to race again.
Back in the land of the living, again she faced abuse from my right foot (at the time your average 17 year old pimple-faced revhead). Continuing on to about 305,000km, she suddenly had a major heart attack with rings, bearings, you name it, all giving up the ghost. With all necessary parts being replaced, life was still not over, even when second gear disappeared at 330,000km.
After replacing the gearbox with a U-beaut second hand one, Sydney's roads were again in her sights.
The miles kept adding up until overheating problems caused a few head studs to be pulled out. After fixing the problem, the tough Type 3 ventured on and still does so today.
So if you see a mustard Type 3 wagon, GKC 684 around, give her a friendly toot to let her know someone still cares!
Type 3 Wet Feet Syndrome
By Rod Young
March 1989
I warn you, this is very much a sticky tape and chewing gum tip.
If you've owned a Type 3, you've experienced water entry around the front passenger area. This is often due to windscreen leaks, but at least you can see, and therefore fix, those without much trouble. The real problem leaks are those connected with the ventilation system, and they can be a bugger to track down. Early (pre-1971) and late T3s have entirely different ventilation systems, but both have their problems.
I've seen an article in a US magazine that dealt with welding sheet metal over the ventilation inlets to prevent water or air from getting in. This is a drastic measure, probably born of desperation, and I have been near that, so I can understand it, but the article in question showed no attempt at understanding where the water was even coming from.
Firstly, with all models of Type 3, the rubber drain tubes from the plastic ventilation box can become blocked with mud, leaves and other crud, causing water to hang about and overflow from the air exit on early T3s. A quick poke through with some wire can work wonders in clearing the restrictions.
If things have been that way for a while, everything will have been moist and the metal tubes into which the rubber hoses are inserted will have rusted through. The waste water, instead of being dumped overboard under the fuel tank somewhere, can flow back inside a cavity in the bulkhead and from there inside the car. On a friend's Fastback, this resulted in the battery becoming irretrievably flat after being totally immersed in water! The solution is not easy - I inserted some plastic tubing of slightly smaller diameter into the tube and pushed it forward of the rust hole, but I'm not sure it's completely fixed yet.
While still on the early models, the two plastic air boxes can leak from around the top where they join the scuttle panel. It was real great fun finding out why, because those damn plastic boxes are hidden above wiring, the windscreen wiper motor and the glove box, and even then, they're a real mother to get in and out. When I was finally able to see them, I found that both boxes had warped and the rubber seal had pulled away from the metal. Gobs of Silastic fixed it good.
Post-1971 Type 3s have problems of their own. They were totally redesigned around an electric fan. They have one large central box which collects air, water and crud from above. It's near impossible to get out (I had to turn down my 10-mm socket to get it in), and to make room for it, the factory installed a different windscreen wiper motor with arms which park on the opposite side, a rather large hump intruding into the boot space, and even the boot-lid springs were changed.
Unlike earlier models, there is no gauze underneath the grilles in the scuttle panel, and whatever leaves and other road crud get through stay forever behind sheet metal. This eventually causes the afore-mentioned hump to rust out badly. My solution was to cut out all the rust-affected metal and lay fibreglass over the hole. I made sure that I could get the new piece of 'glass back off again and made it screw-onable so that I could periodically get in and clean out the disgusting contents of the cavity.
My feet are still wet, but at least the water doesn't come from the air box any more.
Making Your Type 3 Handle
By Craig Smith
March 1989
We all like driving our VWs on the highways, don't we? If you don't mind altering your car from the maker's specs, you can have a lot more fun. I'm not talking fire breathing motors and bulk HP, but careful thought can make it a dream to drive. Fast engines cost big $$, particularly if you want it to live.
There are more economical and reliable ways to get more satisfaction from your car. Make it go around corners without causing stress on yourself, and trauma for the car, for example.
The Type 3 has always been known for fantastic handling, road holding and stability (of course, I'm joking!) The 1500 Beetle, and particularly the Superbug, just seem so-o much better. Have a look at Type 3 driver's knuckles; they are always white from holding onto the steering wheel as if death is around the next corner!
That doesn't mean you should take your Type 3 out to a paddock and shoot it.
I don't claim to have all the answers, but I though I might share my experiencing in making the Type 3 handle.
The front end must be in good condition with no slop anywhere. Seems obvious doesn't it? But beware - nothing else will work unless you heed my warning. Replace worn components. Check that upper trailing arm end play, and adjust if necessary.
Lowering the front seems to give good results. It makes the car appear more stable at high speeds. It looks better. There are no aerodynamic improvements unless you drive faster than 140km/h.
To do this I recommend removing the complete brake and hub assembly at the ball joints. With a hammer and small chisel, mark the position of the lower trailing arm on the end of the torsion bar. Remove the bolt that holds the opposite end of the torsion bar. Now screw it back in a few turns.
Note, or preferably mark the angle the trailing arm hangs down at; e.g. measure the distance from the ground to the end of the arm.
Now, gently strike the bolt that you loosened and reinstalled gently. That should loosen the inner splines of the torsion bar. The bolt will move in a bit. Remove the bolt.
Two people are needed for the next operation because you are going to drive the torsion bar out of its inner spline. Hold onto the trailing arm as your partner taps the torsion bar out. Don't lose its position. By turning the trailing arm and pressing it in at the same time, you can feel the spline positions. The end of the trailing arm will go up as you turn it the desired numbers of splines.
Reinstall the torsion bar end bolt. On late models, this bolt also holds a bracket that limits trailing arm latitude movement in case of torsion bar breakage. Earlier models have this bracket welded on.
This bracket must be installed in the same position as it was removed from. In other words, install it so it will work and not interfere with normal trailing arm operation.
Now remove the trailing arm from the torsion bar and turn it the opposite direction the same number of splines as the inner spline. The trailing arm end will move down towards the ground.
How many time have I heard it?! I only turned it 2 splines and the trailing arms are on the bump stops. Get it right! The inner splines have 29 teeth and the outer spline has 31 teeth. This equates to the smallest change in trailing arm angle as 50 minutes. You must adjust both splines. What do we do? Cut the bump stops? You can install the front Type 3 upper bump stop rubbers on these lower mounting knobs. The upper bump stop rubbers are shorter. Personally, I like my ride comfort. If you like you car to mow the weeds as you drive across the front lawn, that's fine.
A conservative figure is 2 or 3 spline positions, AT BOTH ENDS.
Do you know what has happened? The front is lower, so the car sits at a different angle. You have increased the amount of caster on the front wheels. The actual change is so small that I think it's not worth worrying about. But it gives a good excuse to lower the rear, to give the car the same attitude so the caster will be as it was before.
REMEMBER the differing numbers of splines inner and outer to give a vernier adjustment.
Now that you have spent up big and bought gas shocks, aftermarket sway bars and decent tyres on wider rims (nothing wrong with steel rims), you can go on. The Japanese make excellent tyres in my opinion. I like 14-inch rims, because they bring the car that little bit lower for stability. Good 14-inch tyres are considerably cheaper than the same-width 15-inch, although in theory the 15-inch handles better because of lower wheel RPM and better tread contact on the road. This includes gyroscopic effect etc. 14-inch is better for the stop light Grand Prix. The arguments could go on.
The Squareback front sway bar, living in the upper part of the axle tube, is thicker than the Notchback and Fastback ones. Get a Squareback bar if you haven't got one.
The Squareback rear torsion bar is thicker also, and provides a huge increase in spring rates. This torsion bar also fits the Superbug.
I found by playing with front wheel alignment, I could make the low speed cornering faster, steering response crisper, without greatly effecting high-speed stability. Understand that these are 2 conflicting requirements.
VW calls for positive camber on the front wheels. I call for zero camber. This is set by swivelling the ball joints.
Now, good grief! Look what has happened to your caster angle. Instead of about 4½ degrees, it's now 1½ degrees. I drove many miles with this setup. High-speed stability (the ability to drive in a straight line) was still heaps better than a stock Type 3, and cornering G forces were unreal (for a T3). However, the lightness of steering felt to me unsettling (less caster gives light steering).
There is a better way. I don't know why (please enlighten me), but the lower beam mounting rubber, the one under the bracket that holds the beam to floor bulkhead and body, has its leading edge thicker than its rear edge. This is not so on all Type 3's. It seems too easy to remove this rubber and reinstall it the wrong way around, to move the bottom of the axle beam out and regain that lost caster.
Believe it - it works! Make sure you loosen the 2 steering-box mounting bolts first. There is a steering-box locating tang on the axle beam. Make sure this doesn't foul. If does, I'm not saying you can grind it off!
There is still not as much caster as there should be, but at 4 degrees it is not far off. I believe that for 1500 Beetles there are shims available to do this.
This set-up has seen through one complete set of tyres, with no abnormal wear pattern. At high speed, the car still displays understeer, and thus has safe handling characteristics. Cornering ability at all speeds is improved.
As far as rigidity goes, there is only one good factor in this area for Type 3s. The VW beam type front end is excellent for keeping the front wheels in their correct place, in relation to each other, when cornering hard. You don't get this with a McPherson Strut front end unless you brace the top of the struts. The Type 3 VW seems to be one of the most un-rigid cars on the road. Have you ever jacked it up and then opened and closed the door. Have you ever been in a Type 3 while being cornered hard, and seen the gap around the door? IT MOVES! Look over your shoulder, the whole roof is moving (no not rusted out yet!) I sometimes wonder how the Squareback rear door stays latched!
What I'm talking about is the torsional twist from the front to back. I think we are stuck with this. Think of it as another form of suspension.
I feel if the engine and gearbox move too much during a sudden deceleration or acceleration, this is detrimental to handling. There is a lot of weight there that could lurch and make a car feel most unpredictable. Just like if you are driving your car on its limits of adhesion around a corner at 100 km/h. On late model Type 3s, this can be a problem. Other VWs are fine in this respect. I am building a double-joint CV rear and that uses the swing arm rear end frame. This has the chassis forks and should limit engine and gearbox movement. Brackets from Automotive Imports have been tacked into position. I'm looking for a competent welder, but as yet haven't bothered.
Push Me – Pull You
By Rod Young
March 1990
Nearly every Type 3 that you find still going on the road, and there are more of them than there ought to be, suffer from a problem that very few owners ever fix, the car being what it is - a cheap form of transport which gets abused and neglected.
Having twin carburettors, Type 3s require a fairly complex linkage system. On each carburettor is a rod with ball joints on either end. Since movement takes place at these ball joints, they wear. Now if VW had done their design homework properly, that wear wouldn't show up as a problem, but you've got to understand that Type 3s, or any car for that matter, weren't really intended to last as daily transport for more than ten years, so we can't be too hard on the factory engineers. You certainly won't see any Type 3s in Europe any more.
Where the design of the twin-carburettor linkage is lacking is in the placement of the return springs. These extend between the pivoting link attached to the top of each carburettor and the tinware above the head. The top location is not ideal. What happens is that as you press your right foot to the floor, the long rods above the top tinware, also having ball joints which are subject to wear, pull on the pivoting links, causing them to pull upwards on the short rods, which are connected to the throttle levers. So far, no complaint from me, design-wise.
But then, as you let your right foot up, the wear in those eight ball joints starts to show up. The long rods move outwards, pushing on the pivoting links. Since the return springs are attached to these pivoting links, the short rods push onto the ball joints. And because the long rods pull when the throttle is opened, but push as the throttle is closed, the balls on the short rods move from side to side in their sockets. Wear in general is never even, so there will always be more slop on one side than the other. This shows up in uneven running, flat spots just off idle, and difficulty in synchronising the linkage movement.
The ideal design would be one where the return springs are attached to the throttle valve levers instead of the pivoting links. In this way, the tension of the return springs would ensure that the levers are pulled back by springs instead of being pushed by the short rods. Then wear wouldn't matter all that much. There is a problem here, however, it you want to change the factory's placement of the return springs. The cylinder-head tinware is too close to the throttle lever for there to be room for a spring of decent length. You would have to cut a large hole in the tin, extend the spring through it and attach it somewhere lower down - not an elegant solution.
Of course, the obvious fix is to buy new ball joints and sockets. But these parts cost money, a commodity rarely on hand for Type 3 owners. The same problem as described will also happen fifteen years more down the line (will there be any Type 3s running in the year 2005?) What's needed is a cure that does the trick without costing any money.

And now, my cure. Since the problem is manifest in the fact that wear in the short rods causes the slop, the fix is to make these effectively solid.
What I did, on a fairly tired 1970 Fastback, was to fit dirty great springs between the pivoting links and the throttle lever, in parallel with the short rods.
You have to choose fairly small-diameter springs, and locate the holes in the pivoting link and throttle lever so that no binding takes place. The tension on the spring pulls the balls tightly into their sockets and they never get a chance to wiggle from side to side.
After fitment of the springs, the linkages can be synchronised properly, with a noticeable difference in smoothness of operation of the engine.
Save Your Rusty Type 3
By Rod Young
May 1990
VW improved a lot of things when they changed the body style of the Type 3 in 1970. But one of the unfortunate consequences of their going-over of the whole car was to build in a number of rust traps which make it just that bit harder to restore these models than the earlier rounded body style Type 3s.
I’ve already mentioned the hump around the ventilation box in the front boot, for example. Lifting the matting over this area in nearly every post ’71 Type 3 will most likely make you feel sick.
The other real design failure was the unfortunate placing of a stiffening panel over the upper inner corner inside the front mudguard areas. This panel helps to support the fuel filler on the right-hand side, but I've got no idea what else it does. Because it forms a large hollow section with only small drain holes, whatever crud gets in has a hard time getting out. If you look inside the boot area and see a large brown stain behind the matting, you've got problems. One car I came across had these cavities half-filled with mud, sand and whatever else it had picked up off the road in its 15-year history. Needless to say, it was thoroughly rusted out. I've had to fix three Type 3s with rust here.
The only real cure needs some pretty handy wielding of the oxy torch. Both sides of the metal cavity are usually gone, so if it is a really bad case, the whole thing, and it is large, can be excised with the torch. A controlled melt with a small tip is usually better than the blow torch, which can set fire to whatever else is in the way (the fuel tank isn't all that far away).
If the rust isn't all that bad, then the outer panel has to be cut away and local repairs made to the inner panel. The aim, in any case, is to leave one panel only, which can be properly treated with anti-rust paint and which presents no capillary joints for moisture to sit in.
To remove the outer box, cut all the way around the perimeter, leaving in place the flange where it is spot-welded to the body. The next procedure is of interest to any car restorers - how to remove panels which have been spot-welded into place.
The flange should be a couple of centimetres wide and be spot-welded every few centimetres. Get out the Black and Decker and drill with, let's say, a 5-mm bit directly into each spot weld. Accurate centring is important. Drill right through the first panel and not far in to the second, trying not to perforate it.
When all spot welds have been drilled out, break the flange somewhere, either with oxy or an angle grinder. Get a pair of large pliers and grip the end of the broken flange, then wrap it around the jaws of the pliers, rather like opening an old-fashioned tin of sardines with a key. As each successive weakened weld is encountered, it will give way with a satisfying "pop".
Break the roll every so often and start again. Obviously, for the procedure to be possible, you must have a narrow strip of metal to work with. Sometimes heating with an oxy flame will expedite the process.
So now you're left with only one panel, just like the earlier Type 3s, which probably need spot patching. Cut a template from thin cardboard with scissors to the exact shape, then trace onto steel sheet and cut out with tin snips. Butt-welding is the only thing you should consider here - a lapped joint holds moisture, which is how the rust got there in the first place.
To hold the patch in place, I have a cunning magnetic device which can be found at engineers' suppliers. It is made up of two pieces of plate with a strong magnet in between. This easily holds the patch in place until it is tack-welded. The same magnetic device has various standard angles built in around the pieces of plate, so that sheet metal or plate can be held precisely at those angles for welding or whatever - very handy.
Once the patch is welded all the way round, I like to go over the join again on both sides to melt all the rough edges. Then wire-brush thoroughly and paint with a good anti-rust preparation. I can highly recommend "Priomat" by Spies Hecker (distributed by Berger). Good old German know-how.
Now the next area that gives concern is the rear pillars. Australian-made Type 3s and Beetles after about 1970 have this problem. The cavity formed inside the pillar requires sealing, and the factory, in its wisdom, chose to inject foam in there. Whoever it was who had the responsibility of specifying the foam really stuffed up, because open-cell foam is what was used. This, of course, absorbs water and holds it against the metal. Closed-cell foam floats and is used for flotation in boats. Open-cell foam sinks. Fastbacks seem most affected; notches have the stuff too, but I haven't seen rust coming through on a wagon, and I'm not going to go digging into one unless I have to.
To fix this cock-up, you have to poke all the foam out. I found that a bit of wire with hook bent into the end did the trick, though it was slow and hard work. If perforation has taken place, you can weld the little spot holes, or if it is extensive, you have to cut out the affected section and patch - very difficult, and maybe serious enough to scrap the car. Rear window and headlining must be nowhere near, of course. We're talking restoration here, not patching up. Thorough treatment with anti-rust stuff for the inside is essential.
Next spot is the inside of the front bumper bracket mounts. Another cavity formed by a panel spot-welded over the outside. I prefer to cut out the affected area and melt the edge back into the parent metal, using filler rod where necessary. It's hard to get in here, as you have to work upside down. The things we do to save cars!
Since Type 3s leak so readily, their floor pans do rust out. They differ from Beetles in having bituminous foam insulation stuck to the sheet metal. Sometimes this is so well stuck down that it prevents rust; sometimes not so well stuck, so that rust has had a chance to form in the depressions in the metal. Scraping the stuff off is laborious, but necessary if you're going to ascertain whether rust is present.
Rust in the top and bottom of the front mudguards near where they meet the door is perhaps the most common rust in Type 3s of all vintages. The problem here is that you can't get to the inside to treat the back of any welds, as there is an inner panel also. The trick is, after having butt-welded in any repair patches, to get some candle wax or plasticine and melt it into the corners of the guard, using a heat gun, until they are full. When the wax hardens, no water can ever get in there again.
Cancer in the front windscreen pillars can be a nasty job to fix. The windscreen has to be removed, otherwise the screen rubber will be destroyed. Dig out the brown stuff with a screwdriver and leave nothing but virgin steel. Then push the edges in and fill up with molten brass. This sits very tightly in the cavity and should prevent any rust from recurring. All traces of brazing flux must be removed from the surface of the job, or else it will eventually bubble up from beneath the paint.
Rust on the pinchweld beneath the windscreen rubber is one of the things that cause water leaks into the cabin. Proper repairs aren't an easy proposition here either, as not only the windscreen, but the dashboard, glovebox, windscreen wiper motor and plastic heat/ventilation vents must be removed before you can get near this area.
Once again, clean out all the rust with a screwdriver. If necessary, prise the two panels apart and clean between them in badly affected areas. Areas that have been rusted right away can be built up with a welding rod, so the screen rubber will grip properly and seal. Both sides of the repair must be rust-proofed, and under the dash as well.
The 1966 Fastback Story
By Les Robinson
July 1990
Early in 1988 it came to my attention that Andrew Dodd was clearing his establishment of some unwanted vehicles. I was given a 1966 Fastback that was going to the tip.
This vehicle was complete with a fully reconditioned engine and two large rust holes in the floor. The fastback was completely stripped and the pan repaired. The body was de-chromed and prepped for painting. It was painted Brooklyns blue. The whole project took 8 months of continual labour. Adrian Muller was the painter, with some help from myself. After buffing, all the body panels were refitted. The interior was sprayed with black vinyl paint, new carpet fitted, late model gauges and a Formuling France steering wheel. The target deadline was VW Nationals 1989.
The vehicle had chrome wheels fitted and was lowered at the front. Air shocks were installed on the rear to give the desired height for wheel clearance. The car was first driven to the 1989 Nationals at Richmond. The original engine ran with some noises. It was decided to build a new engine. A case was located and align bored, fitted with a counterweighted crankshaft and lightened flywheel. 92mm Cima forged pistons, a Watson cam and 40 DCN Weber carburettors were installed. A 2-litre Kombi oil cooler and a deep sump were added. The engine and clutch assembly were balanced.
The rebuilt engine was fitted to the fastback and running in commenced. An oil leak developed through the rear main bearing oil seal and the fan shaft (about one litre of oil for a week). I was told all different reasons for the oil leak, from a cracked case to a faulty fan. I was bewildered!
I visited the U.S in August 1989 and took in the Gene Berg complex. Gene's advice was that the engine had blowby past the rings, causing sump pressure, and forcing the oil out. I was advised to hone the cylinders twice, and fit good quality piston rings. He also added that this was common with 92mm piston and cylinders.
After arriving back in Australia I decided to pull down the engine, and try to fix the problem myself. The pistons were removed and found to have a 1.5mm top ring and 2.0mm for the centre and bottom grooves. I could not buy this size piston rings anywhere in Australia. It was decided to fit 1800 Kombi rings. The top ring groove was machined out to 2.0mm and the cylinders honed. The engine was re-assembled. The oil leak ceased and the car was a pleasure to drive.
The week after the VW Nationals 1990, Pascaline Caumont, a VW enthusiast and a friend of mine from France, arrived in Australia for a short holiday. She was greeted by normal Sydney weather (RAIN!!) We were going to Queensland for a week to take in the sunshine and surf. It was decided to take the Fastback to the Gold Coast, to give the engine a long run. I packed two windscreens in case of mishaps.
We crossed the Hexham Bridge at Newcastle, heading north in pouring rain. Suddenly there was a loud bang and the windscreen went white. My friend, Pascaline, who was dozing, awoke suddenly, and thought I had hit something with the Fastback. After some choice words, we decided to remove all the broken glass and fit the spare windscreen, while parked on the side of the Pacific Hwy.
Pascaline removed all the glass, while I cleaned out the windscreen rubber, and fitted it on the spare screen. A chalkline was used in the rubber groove, and with an agile pair of French hands assisting, we were back on the road in about 45 minutes, and continued our trip to Queensland.
Close Encounters With The Third Type
By Rod Young
November 1990
For those readers who aren't all that well acquainted with VW Type 3s, and even perhaps for many of you who own and drive them, here are a few observations unique to the animal.
Body Styles:
* Five body styles were envisaged for the Type 3. At the Frankfurt IAA in 1961, the Sedan (Notchback) and Karmann Ghia were launched; the Cabriolet was to have been introduced along with them but never made it; the Variant came out the following year, and the TL Fastback in 1965.
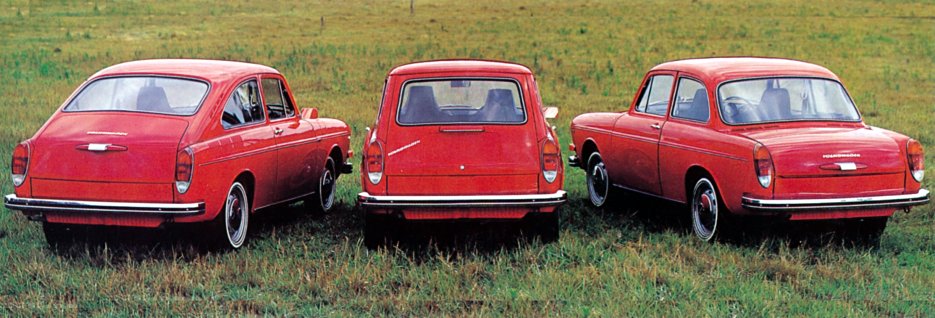
Rarity:
* From a world-wide viewpoint, the Notchback is a rare beast. None were officially imported into the US, only early models into the UK and just about all Type 3s in continental Europe have gone to the big VW car lot in the sky. Only Australia has appreciable quantities left. Why are they still treated as expendable?
Advanced Technical Features:
* Porsche designed the compact ‘pancake’ form of the Type 3 motor for VW. The first versions came with a single carburettor, which was a side-draft type specially designed for the car by Solex.
* Type 3 front ends may look like Beetle ones, but are quite different in principle. Instead of two stacks of leaves anchored in the middle, individual solid torsion bars, which anchor at either side, are housed in the bottom tube. The right-side bar is actually in front of the left one. They are angled slightly upwards and cunningly cross over in the middle. These torsion bars are splined, so ride-heights adjustments are much easier than in Beetles. A stabiliser bar is hidden in the top tube. It's a pity that stiffer ones aren't available; only aftermarket bolt-on types.
* Both front and rear suspensions on a Type 3 are firmly rubber-mounted to isolate the chassis from road shocks.
* The 1967 Type 3 was the first vehicle to apply fuel injection in large-scale production. Bosch and Volkswagen jointly developed the D-Jetronic system. The engines should really have developed more power than the equivalent carburetted models, but were rated the same, due to modest-sized manifold runners. VW's rationalisation was for improved emission control, but with hindsight it appears that what they really wanted was the experience of fuel injection in many of their cars.
* This one generates unbelievers. The opening rear side windows on a Fastback are fixed for the front few centimetres instead of being hinged, and pivoting out the rear to open them causes the glass to bend like a banana.
Tips:
* If the fan belt breaks while you're under way, don't bother stopping to replace it. Just drive on till you get home and replace it in the comfort of your garage. All it spins is the generator.
* Fan belts slip after a while, even though on maximum tight adjustment. What happens is that the aluminium pulley wears, reducing its diameter. Simply build up the generator with some scrap sheet to get adjustment back again.
Trivia:
* The huge fan pulley is rubber mounted. You would never know this unless you cut one apart - I did when mine fell off. There are six little rubber doughnuts in there.
* The cooling louvres in the rear mudguards face forwards on pre-1970 Type 3s and backwards on post-1970 models.
* Engines tend to fall out of the later Type 3s, which are fitted with semi-trailing arm rear suspension. The suspension is much better than swing axles, but they took out the frame horns and relied on sheet metal to hold the back of the motor in place. Bad move.
* Type 3 gearboxes are identical to Beetle except for the selector shaft. The dimple for the coupling faces down, instead of up.
* 1973 Type 3s have the large front brake callipers from the Type 4 and appropriately modified stub axles fitted.
* Rear drums from Type 3s are wider than Beetle, and interchangeable.
* The excellent Type 3 interior light, which rocks from side to side to turn on and off, is also used in the Porsche 911.
* The Type 3 fuel tank sender looks like no other. Instead of a swing arm riding on a coil of resistance wire, which we’re all used to, Type 3s have an aluminium cylinder, which houses two resistance wires bridged by a float. The float simply shortens the path for current to flow through the wires.
* The Type 3 badges on the front mudguards of later models are an Australia-only fitting. The name Type 3 seems to be used only in the English-speaking world, anyway.
Type 3 Tips
By Craig Smith
November 1990
Tinware Troubles
A recent failure in my notchback engine brings me to highlight a potential problem area. It started out as an oil slick on the driveway, and I thought, "if I ignore it, it will go away". So I ignored it, and it didn't go away. It got worse.
What could it be? Rocker cover, push rod tube? No, it seemed closer to the oil cooler. Perhaps just an oil cooler. No, I couldn't get out of it this easily.
An inspection was made with the passenger side upper cylinder shroud removed and what I found was not a pretty sight. This cover plate, cylinder shroud or whatever you call it had worn the crankcase towards the rear of the motor on the vertical surface above number 4 cylinder. It's easy to find because the cover plate is in contact with the crankcase.
The saddest part is that where it was worn through was into the oil gallery that connects the oil pump to the oil cooler. An attempt was made to TIG weld it, but was unsuccessful because of the oil remnants inside the gallery coming through the weld, leaving pinholes. Being a vertical surface made it worse, which makes me think a MIG weld may have been better, as I suspect the MIG weld is less likely to run with gravity.
Conclusion? When rebuilding a Type 3 engine, check for wear in this area of the crankcase from the cover plate being in contact with the case. The alloy here is not real thick. If it is worn more than about 1.5mm, then do something whilst the motor is apart. I'm not sure of the best way to go, but to fill the wear with TIG weld seems acceptable to me. Perhaps trimming the shroud will just cause the wear somewhere else. Most cases may be more likely to wear or shall we say ‘separate’ around number 2 main bearing before this becomes a problem, but watch out anyway.
Twin Solex Carburettors
A lot could be said for this carb setup, but they do work, despite the unusual design. Most of them out there are showing their age, and will no doubt have been through rebuilds; wear can cause some unusual faults. Ever had a linkage detach at one of the socket joints? You cannot undo the wear, but here's a suggestion to secure the socket in the ball.
With a small, flat, preferably jewellers' screwdriver, bend the circlip that sits just inside the socket. Don't overdo it, or the circlip may not seat correctly in the retaining groove. Despite all the wear in the linkage, carbs can usually be adjusted to acceptable smoothness. While you can compensate for fuel pump linkage wear, it is a greater problem in the throttle shaft bore.

And never twist the idle mixture screw in hard; this makes the idle mixture volume setting tricky. An option is to replace with a new Brazilian Solex system, or a fancy Italian kit. The latter kit (starting with 'D', not 'W') seems much better, considering little extra cost. For a hack Type 3, though, keep the originals.
Late Engine in Early Model Car
When fitting a late twin-carb motor in older Type 3s, there are a few minor snags; nothing really mind-boggling, so I'll give you the good oil, in case you need to attempt it.
Have you decided on the starter/flywheel combination? The 12-volt flywheel seals with an O-ring - different from the 6-volt, although otherwise they are interchangeable. Consult a workshop manual for details. If swapping a 6-volt starter for a 12, the bush in the transaxle case must be changed. The two idle cut solenoids and choke are 12 volts and may not run on 6. Consider wiring.
Late model heat exchangers have the control flaps built in, with the control cable attaching to a lever on the heat exchanger. Earlier Type 3s have the flow control valve built into a thermostat housing that is attached to the car body forward of the transaxle. You may have to wire the flaps open. Anyone tried lately to source new ones?
Engine mountings can be a problem. Don't try to install a late engine using the crossbar-mounting bracket fitted (the one that bolts onto the crankcase).
The late Type 3 engine, with accessories, is slightly longer than the earlier one - about 20 mm. It's not much, but it becomes slightly more difficult to fit. I'm not sure where this comes from - pulley housing, fan housing or crankcase?
Perhaps the Type 3 has reached a stage in its life where originality is more important than other factors, so late engine in early car may be out of the question, except where it involves daily transport, in which case this conversation does have practical benefits.
Why a Type 3?
By Craig Smith
November 1990
I guess my affliction for the Type 3 goes back a long way. I owned a 1970 Notchback even before I was old enough to have a licence to drive it. The Notch was a fairly clean car and one of which I was proud. Then my father’s 1972 wagon became available to buy. At 17 years of age, the thought of owning a wagon excited me more than the Notch, and anyway it was in much better condition. The trim, paint and body were all in top original condition and little refinements such as highback seats, late model instruments and steering column with the wiper switch seemed attractive. The Notch was sold to finance the wattle wagon. I still own this car today.
I was always impressed at how one could load luggage, tools and accessories into the front compartment, out of sight and leave the wagon looking neat and tidy. Even modern wagons don't really have this facility. When there were times the car was packed tight with gear, the spare tyre and jack were easily accessible. The Type 3 does live up to the Volkswagen legend of practicality, space efficiency and economy. Dare I say, in some ways, more so than a Beetle.
This car and myself have been through a lot of experiences and years together and we have a very special understanding of each other. I'm sure you can relate to this.
Several years ago I started taking on country work and the Type 3 saw a lot of highway miles put underneath it. This strengthened the bond between man and Type 3 and nothing can weaken that feeling. Even the many times we were on the side of the road, unable to go no more, did not weaken the bond. I suppose I am very forgiving, but maybe not.
Of all the vehicles I've put big mileage on, a lot of them fairly modern, the only one that hasn't left me calling the Motorists Association is my clagged 1800 Kombi and its been to some rough out of the way places and fought off rising floodwaters in central Queensland and passing police roadblocks in the process. Volkswagen rules, but that's another story.
Whether it’s a shattered generator pulley or a rod through the case, or just a frazzled rotor, the good times always outweigh the bad.
I think few VW people would doubt me when I say that the 1969 and earlier Type 3s are quite stylish looking in today’s world. If you say the styling is a bit tired looking, then I think you are still living in the seventies.
Enough of my biased rambling, take it or leave it, the Type 3 is an air-cooled, rear-engined Volkswagen that won’t be allowed to rust into oblivion.
Type 3 12-Volt Conversion
By Craig Smith
November 1990
Converting an older Type 3 to 12-volt certainly cures more problems than it creates. I'll accept that it detracts from the originality of the car, but when it's a daily driver, perhaps the 12-volt conversion may be a wise decision. I'm not going to try and convince anyone, but when you think of bright lights, easy starting and efficient wipers - well! If you think the 6-volt system is adequate, that's fine.
Potential problem area number 1 is when you mount the 12-volt generator onto the fan housing. The 6-volt fan housing is designed for a generator with a small diameter than the 12-volt fan housing. Neither the 12-volt or the 6-volt generator strap is going to fit. You can fabricate your own from flat steel bar.
If looks don't matter, then I can suggest an easier way. Cut a 12-volt generator strap in half, but make sure you cut it in the right place. I suggest it be cut where the alignment dot is. This leaves a closed loop on the 2 ends where you made the cut. This loop is needed to put an 8 mm bolt through. The 2 ends where the cut is must be bent up at 90degrees so that a 8 x 50 mm bolt can be put through both ends of both parts of the strap and tightened. I have used this method successfully.

Potential problem area 2: if you are using the 6-volt fan housing, you are going to use the 6-volt generator pulley on the 12 volt generator. The 6-volt pulley fits exactly as the 12-volt pulley would fit. The 6-volt pulley is smaller in diameter so the generator will run slightly faster than it should. I don't perceive this as a problem. If you use the larger 12-volt pulley, the pulley housing cover, that snap-on plate that gives you access to the Vee belt, will not go on. It will foul on the 12-volt pulley. By fan housing, I mean the alloy casting that is in two halves, and the pulley housing is the sheet steel part towards the rear on the engine. It is the part where the rubber air bellows attach.
Potential problem area 3 is that you will need a pair of tin snips to trim the 6-volt pulley housing so that the 12-volt generator can be moved far enough to the rear so the generator pulley is in line with the crankshaft pulley. You won't have to remove any metal, just a snip from the generator hole in the pulley housing, to the upper edge where the cover plate attaches is all that is needed.
Don't worry about hot air being drawn in, because the 12-volt generator rubber seal will take care of it.
All that may sound involved, but really, I would think about 30 to 45 minutes is what it takes to change from the 6-volt generator to the 12-volt. Perhaps you think it would be better to fit the 12-volt fan housing, which is fine if you are building the engine, but for an existing 6-volt motor?
You can use a 12-volt wiper motor from the 1968 Type 3 on an earlier 6-volt Type 3. It is only the 1968 and perhaps 1967 12-volt wipers that can replace the 6-volt wiper motor.
Otherwise you can use resistors. I made my own using two old electric jug elements and nickel-chrome wire, but perhaps you can experiment with ignition coil ballast resistors. They should be cheap and readily available.
With those minor hurdles behind you, the rest of the 12-volt conversion is a cinch. The horn and the starter need not be changed for now, but you will need headlight bulbs, blinkers, brakelights, parklights, instruments, dome light bulbs, as well as a regulator, flasher relay, headlight relay, ignition coil and battery. Don't forget that relay under the car in the starter solenoid circuit that was fitted years ago because the car wouldn't start. In fact, you may not even need it anymore! And now go out and buy a stereo for the car so you can cruise cool with customised muzak.
If you had a 6-volt DC to 12-volt DC converter for your stereo, you may miss the whistles, hum, pops and crackles that it used to generate on your music. Throw it away.
Turn that starter key in confidence, for no longer will you face embarrassment. I'm not trying to convince you - really!
Type 3 Models
By Craig Smith
November 1990
The Type 3 was basically unchanged over the short 10-year lifespan of its production. Perhaps that's part of the appeal of older Volkswagens, because in today's world it seems as though carmakers must cosmetically alter their product as often as every 4 years or so.
Although the Type 3 looks as though it was undeveloped over its production life, this is not the case. Like all Volkswagens, changes did take place in the safety of the car and other areas of its engineering. In true Volkswagen style for the day, cosmetics didn't alter the purpose of a car. Is that why the Beetle is enjoying such a long production span?
Here I want to present some changes that occurred throughout the model years of the Type 3. The information is very generalised and I make no claim to the accuracy of the contents; I KNOW there are a lot of people who know more on this subject than I. Indeed, please forward more info and corrections to be published in Zeitschrift so that it may be recorded for posterity. I for one would be interested. Don't let the Type 3 rest in peace! I'll leave Engine Changes out as this is a subject in itself.
1963
The first model year for the Type 3.
1966
A new style rear reflector housing was introduced. The new style was more ‘wrap around’ and was chrome instead of body colour. A bigger rear tail light/blinker lens was introduced. On the inside, plastic air/demister control knobs replaced the chrome ones. There were trim changes and a style change on the inside door handles.
1967
12 volts was introduced to the Type 3 this year. A new wrap-around front blinker replaced the pointy front blinker. With this was a new front guard stamping, although the shape did not change. Only the blinker mounting holes were different.
1969
A big year! On the inside the rear vision mirror was now clipped in instead of screwed in. Other safety-oriented improvements were as follows: tandem brake circuit, disc brakes, steering column with a collapsible section and a two-speed wiper motor. Other changes were a different door shape with different quarter windows, fuel filler now behind a flap on the front guard, double-joint rear and different rear brakes, shorter handbrake lever, heat exchangers now have the control flap built into them, instead of the flap being in the thermostat housing; new window winder handles and door hardware including locks and handles, wheels 4-stud with new flat hubcaps, and heater control levers now operate vertically and are located next to the handbrake lever. The front o/s guard for this model is unique.
1970
The only major styling change that the Type 3 underwent. This was most unfortunate but nevertheless probably seemed appropriate at the time. This model must be around 100 mm longer in the front. Other styling changes include: squarer front bumpers, reshaped front panels, larger rear lamps with reshaped rear guards, larger front wraparound indicator; a different rear door on the Squareback with a separate number plate lamp. Other changes include different steering column mounting (that appears to shear off in the event of a major impact), new dash layout, fresh air ventilation, introduction of a 2-speed blower for demister/ventilation, and bonnet release lever in the glovebox.
1971
High-back bucket seats introduced.
1972
A larger disc and calliper introduced with more pad surface area. The bore of this calliper is the same size as previously. A four-spoke steering wheel with a built-in collapsible section also appeared. Other changers are: front and rear indicator lens housings now silverfrost rather than chrome, washer/wiper switch on the steering column, reversing lamps introduced, even though previous models had lenses with the clear lamp section in them; steering column mounting changed again. Intrusion bars were introduced into the doors.
1973
A sad year, as it saw the demise of the Type 3. The bucket seats and mountings were revised. Other changes saw a more attractive looking rear number plate lamp on the Squareback, a 3.88:1 diff ratio along with a more rigid transaxle case that has only the left side cover plate, the previous trans having a 4.125:1 final drive ratio. The interior door handles were now held on by three screws, instead of being hooked in.
It should be noted that the model years for these cars commenced in August of the previous year in Germany. For example, a Type 3 produced in September 1971 would be called a 1972 model. Cars for Australia (assembled in Melbourne) would tend to be updated the following February.
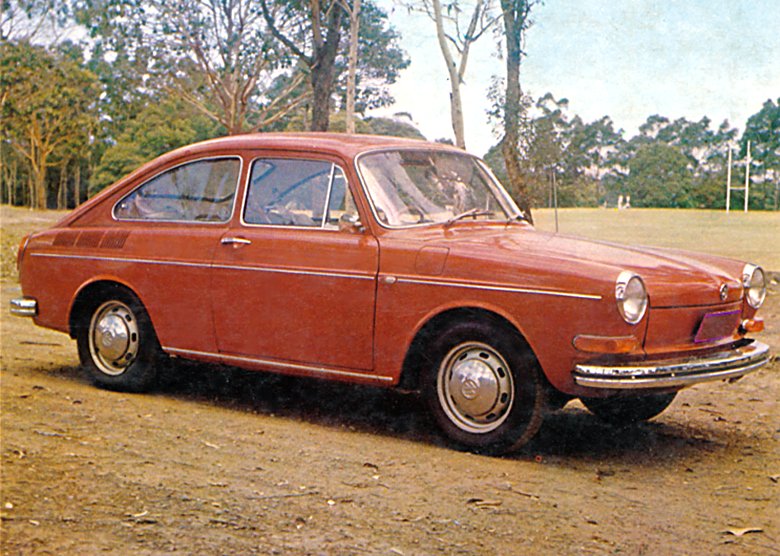
Our 1965 Type 3 1500 ‘S’
By Robert and Donna Hildon
October 1994
The introduction of the Type 3 into Australia in early 1963 was greeted with great enthusiasm by the motoring press of the day. The Beetle and Transporter models were selling well and had earned a reputation for reliability, quality in production and high resale value.
The Type 3, in Notchback and Station Wagon forms, provided Volkswagen enthusiasts with a wider model range to choose from. All early Type 3 models up to mid-1963 were fully imported. Local production commenced for late 1963 using CKD kits, combined with some Australian components to satisfy the local content regulations. It is important to note that even though the identification plate states ‘Made in Germany’, it does not necessarily mean that the vehicle was assembled in Germany. Up to the 1965 model year all Australian Type 3 cars and wagons were single carburettor 1500cc units. This was probably the biggest weakness of early cars, as tuning the single side draft carburettor was virtually impossible to ensure the removal of flat spots.
For the European 1964 model year, an improved new Type 3 was introduced in Germany. Designated the 1500 ‘S’, and available in notchback and Station wagon forms, the new model was an up market version of the more plain standard 1500 models. Most important inclusion in the 1500 ‘S’ was the addition of twin carburettors and dome top high compression pistons. The increased horsepower allowed cruising speeds of around 136 km/h. Other changes from the standard model included side mouldings, wheel trims, wrap around front indicators and rear reflectors, different rear lights, front handle for the luggage compartment and a 100 mph speedo. Finally, Volkswagen had released a Type 3 with performance, and set a trend to be followed in subsequent years when the 1600 cars were released in 1966 with twin carburettors.
Some German-built 1500 ‘S’ sedans were fully imported and sold in Austtralia in late 1964. A locally-built 1500 Twin ‘S’ sedan was released in 1965. The Australian wagon remained single-carb. That meant, that in Australia up to and including 1965, the following Type 3s were available:
i) Standard 1500 - German, fully imported, single carb, sedan and wagon, 1963
ii) Standard 1500 Australian assembled, single carb, sedan and wagon, 1963-1965.
iii) 1500 ‘S’ (sedan only), German, fully imported, twin carbs, dome top pistons, 1964
iii) 1500 ‘S’ (sedan only), Australian-assembled, twin carbs, dome top pistons, 1965
The Australian assembled standard 1500 was a mix of components from the two fully imported models without any of the extras from either model. For example, Australian assembled cars included the side mouldings (stainless) from the imported 1500 S and flat tail lights from the standard model.
Locally assembled cars missed out on the following list of standard inclusions on the imported cars.
1) Pop out rear side windows;
2) centre arm rest in rear seat;
3) safety locks on front seats;
5) bumper over riders;
6) light in luggage compartment / engine bay;
7) steering lock
8) full length arm rests on side trims;
9) fully lined luggage compartments, front & rear.
In brief the local cars were the most basic Type 3 available but were very expensive compared to the Beetle. The imported cars were very expensive also, even when compared to Holdens, Falcons etc. Fully imported 1500 S cars and wagons are extremely rare in Australia, probably amongst the rarest 6 volt Volkswagens to come here.
For the 1965 model year, Volkswagen Australia released their locally-made 1500 ‘S’, featuring twin carburettors like the German ones, but with different trim. Marketed as the ‘1500 Twin S’, the model was only available for one year. The local 1500 ‘S’ was not much more than a standard model with a twin carb motor, but sold reasonably well due to the improved performance. It was replaced in 1966 by the ‘1600TS’ Fastback, which also was fully imported from Germany before being converted to local assembly.
We purchased our Australian 1500 S in 1980 with about 85,000 miles on the clock. The car is in fairly original condition with no rust or body damage. The combination of blue with a grey roof is original and unusual for VW to release a two-tone colour scheme.
Type 3 1500 S models are good touring cars, capable of sustained 125 km/h with reasonable economy. They are quiet and probably only have one minor problem, being hot starting due to heat around the fuel pump.
VW Type 3: A Short History
By Craig Smith
January 1997
As the 1950s were corning to a close and Volkswagen was establishing itself as a world-class automaker, it became clear that it would need to introduce a new, larger car to supplement the Beetle, Karmann Ghia and Transporter, especially in its home market. VW was beginning to feel competition from larger, more luxurious American imports, as well as European makers like Opel, Ford, Fiat and Renault.
When one of the major buildings at the Wolfsburg factory was damaged due to fire in the late 1950s, the order came from VW's head honchos to keep the windows boarded up after repairs were made. It was here in hiding that the Type 3 was born in 1959. By the time 1960 drew to a close, prototypes had been extensively tested and VW began gearing up for production. At the 1960 Geneva Auto Show, VW's official position was that there were no new designs in the works!
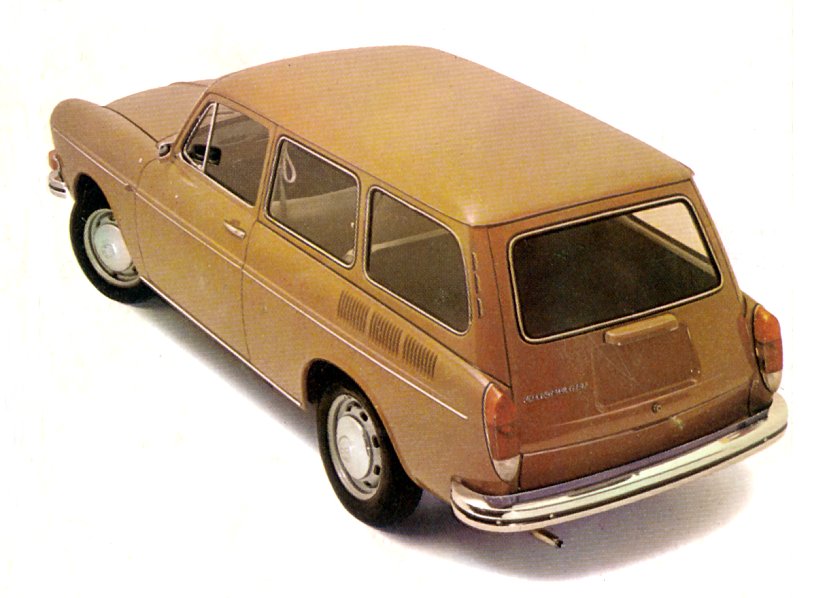
In early 1961 VW officially introduced the Type 3, which was simply called the VW 1500. (This denoted the Notchback's 1500cc engine displacement, significantly larger than the Beetle's 1200cc powerplant.) The 1500 sedan was followed quickly by the 1500 Variant in early 1962. The Variant looks to all the world like a station wagon (well, it is!), but VW was already calling one of its Type 2s a ‘station wagon’ on the US market. Furthermore, to avoid confusing the vehicle's identity with the Plymouth Valiant, VW marketed the vehicle as the Squareback Sedan in the UK, Australia and the U.S.
The Type 3 was introduced to Australia in 1963, in locally assembled 1500 sedan and squareback form. Interestingly, the Type 3 wasn't officially introduced to the U.S. until 1965, and the 1500 Sedan (Notchback) was never officially imported to the U.S. A number of grey-market 1500s found their way to U.S. shores from Canada before their official intro, but VW of America wasn't equipped to service them until '65.
VW added the Fastback to the European model line up in 1965, and the Type 3 got a 1600cc engine. The stylish Fastback was the third and last Type 3 variation to join the fleet. Australia first saw the Fastback in 1966 as the fully-imported 1600TS. This twin-carb 65-bhp model eventually proved to be the fastest air-cooled VW ever sold in Australia, as the later VW 411 was not sold here. Later Fastbacks were locally assembled, along with the Notchback sedan (sometimes called the ‘Halfback’), and the Squareback wagon.
Paralleling the development of the Beetle-based Karmann Ghia, VW had Carrozeria Ghia draw up designs for a sporty Type 3, which became the Type 34 Karmann Ghia. It was never ‘officially’ sold either in the US or Australia, but it could be purchased by special order (at great cost). This model has the dubious honour of being the first-ever Volkswagen model to be discontinued, when it was replaced in 1969 by the VW/Porsche 914. A convertible version of the T3 Ghia was unveiled at the 1961 Frankfurt auto show, but it never saw production.
The ‘regular’ VW Type 3 1500 convertible was also stillborn. Only a couple of prototypes were built in 1962, but the body stiffening was not strong enough and VW decided not to proceed with production. One remaining prototype is on display at the VW museum in Germany.
Notable landmarks in Type 3 production include an option for a fully automatic transmission beginning in the 1968 model year, and a major facelift for the 1970 models. Australian post-’70 models were unique in the world for having chrome ‘Type 3’ badges. Perhaps the most important innovation that the Type 3 had was the introduction of Bosch electronic fuel injection on some European models in 1965, the first production car in the world to have it. While mechanical fuel injection certainly existed before this date, electronic injection had never before appeared on a mass-produced car.
Volkswagen ended production of the Type 3 in 1973 in both Germany and Australia, after 2.5 million had been built. The Type 3 was replaced by the new VW Passat. In Brazil, various local versions of the Type 3 survived in production until 1980.
Type 3 Engine Mounts
By Lance Plahn
May 1997
Type 3 engine mounts are worth some consideration. The 6-volt Type 3 has a swing axle rear-end, with a gearbox mount on the torsion tube and the two horns extending to the back of the gearbox, where there are two half-moon gearbox mounts (similar to the Beetle). Bolted onto the engine fan is a tube, approximately 10 cm long and fitting into a round rubber mount, in turn bolted to a bracket welded to the rear of the engine bay and above the fan air-intake bellows. There are rubber shims inserted between the mount and the support bracket, acting as an adjustment for 1 worn, sagged or new gearbox mounts. This mount on the motor is an engine steady.
The 12-volt Type 3 usually has a double-joint CV rear-end, with a gearbox mount, again, on the torsion tube. At the rear of the motor are three holes, 10 mm diameter either side of the oil pump. The engine mount bar bolts in place via these holes and, at either end, there are engine mounts attaching the engine mount bar to the body.
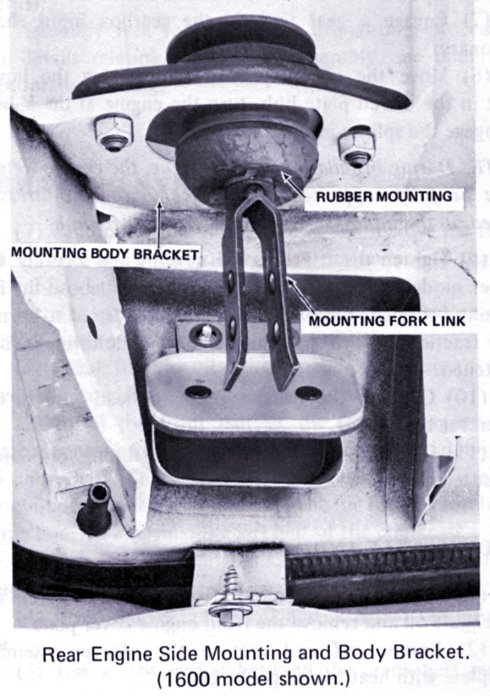
The front gearbox mount does not usually give any trouble, and neither do the engine mounts on the engine mounting bar. But the bolts attaching the engine bar to the motor do tend to work loose and the body tends to crack where the two engine mounts attach. One solution is to cut an engine steady bracket from an old 6-volt Type 3 and weld it into place on your 12-volt Type 3. This greatly reduces the tendency for body cracking to develop around the engine mounts. As we know, a picture tells a story and a quick look at the two models will clarify the situation.
But if your late Type 3 (IRS rear suspension) is to be driven hard, over dirt roads or raced, the trick is to fit horns. Remove the rear suspension from the vehicle (yes they are removable) Then obtain a rear suspension from a early (swing axle) Type 3, remove the horns, then weld into place on the late model Type 3. This does take a lot of setting up and measuring. The end result is worth the effort, as the vehicle will not have mount troubles, but most importantly the vehicle now handles much better. The motor is mounted to the floor pan now, as opposed to before when it was mounted to the body.
VR6 Notch
By Albert Meschner
January 2001
“What year is that one?” asks the grey-haired gentleman and points with his cane towards the baby-blue VW Type 3. “1969,” answers Michael and closes the door. “I had one of those myself. But the wheels were somewhat different. Not so nice and shiny like yours,” the old man corrects himself and scratches his head. He also wanted to know where they came from, the fully polished Abt wheels in 7.5x16 with 205/45 tyres. The explanation to all this would be too complicated. He also notices the offset, and asks even how they manage to fit under the stock mudguards. In between the old man swallows his memories.
He tells a tale from Italy, about the longevity of his old 1600. “You've lost the badge on the deck lid, haven't you?” asks the man and grins knowingly. Michael keeps it to a quick “yes.” The old VW owner would be very astonished if he was to know that the lazy 1584 cc VW motor no longer lives under the lid, but rather a huge 2.9 litre VW VR6 from a Corrado. And from the outside, one can hardly see anything. Even the tail pipe exits in the correct place in the rear apron. Michael politely greets the old man goodbye and drives calmly away; he does not want to rob the nice man of all his illusions.
Michael has often experienced scenes like this. People always talk about his “clean old-timer.” Many people recognise shape and colour. Under the skin, this Type 3 is sure enough rather different.
After Michael decided to do a VR6 conversion, he had to solve some definite problems. He could of course only kiss the rear luggage compartment goodbye. Via an Ahnendorp adapter plate, he stuck the VR6 to the stock 4-speed transmission. In between these two, he had to incorporate a special flywheel from DS Tuning, so he would not loose contact with the strengthened stock clutch. DS makes VR6 flywheels with Type 1 clutch specifications. That fits in the Type 3 also. Astonishingly few body mods were necessary to fit the VR6 in the engine bay. Of course the Type 3 had to sacrifice some of the engine bay sheet metal but the stock cooling air duct is still intact.
Michael also fabricated a 30 cm hole in the opposite engine bay wall. Finally, the hoses and thermostat also needed some space. The coolant pipes are fitted with hair-precision. Michael had to cut them up in 12 pieces, bend and turn them and weld them back together. Only after that was he was able to persuade the catalytic converter to take place under the car, instead of in the centre of the left rear wheel. The next act would be the engine mounts. As Michael stayed with the double joint rear end, he didn't have the frame forks to help him out and the stock engine mounts would not be sufficient. So he had to jack up the engine with wooden blocks until it sat correctly, build and weld a subframe to the underside of the body, then bolt the engine up to the sub frame. After this, he could finish the exhaust system. So far, only the DTM-style manifold is made of stainless steel.
Luckily Michael is an electronic technician. Because of this, he only offered the engine's wiring system few thoughts. “I have used the stock Corrado engine loom up to the fuse box. From there I connected it to a home made Type 3 system.” Sounds simple. In clear text it means: The battery resides in the front luggage compartment, and all the relays sit in a self-made rack on the backside of a service panel behind the rear seatback. This Type 3 has two fuse boxes.
The next problem was the cooling system. Two electric fans in the previous rear luggage compartment, and perforated sheet metal together with the tilted rear deck lid, provides enough air circulation. Two huge oil coolers and one radiator from a Golf VR6 have beet fitted in the former spare wheel well. The juice flow has been taken over by an electric pump from an Opel Omega 3.6. The pump provides fuel from a Type 3 FI tank.
Part for part, the project came together. Brackets for accessories were welded on to the engine compartment, and were complimented by a fresh coat of paint. Only after tedious testing could the car finally be run over to his good friend Robert, aka Nitro, who wrapped the car in the indefinable grey-blue colour.
In the meantime Michael concentrated on the suspension. After the test run, he quickly realized that the rear lowering was already done; the heavy engine took care of that all by itself. Up front, he simply loosened the infamous two screws and adjusted the front end. In order for the Abt wheels to fit under the stock guards, the mudguard edges had to be rolled. The brake system is courtesy of Tafel, ventilated up front, has four discs and a mechanical brake servo unit. Red Konis up front and yellow Konis in the rear has the ride under control and comfort.
Even in the interior there are several points of interest. Michael welded in three point seat rails. Those are the ones you throw out when you've got a ‘73. On the ‘three legs’ in combination with Beetle tracks, Corrado seats fits better than whatever on old seat consoles. When our Type 3 owner wanted a bit of luxury, he opted for seats with heating elements. Michael even thought of the rear seat; the old one made way for a Corrado rear bench.
When your eyes fall onto the dashboard, you notice it is smooth. In place of the radio, he has mounted additional instruments and the knobs for the heated seats. Behind the Raid 34 cm steering wheel is a speedometer modified to 240 km/h and a rpm gauge for the vee six built from a fuel gauge. Both look totally factory, but is the work of Tacho-Thomas. Michael himself stitched the liner above the passengers from Mercedes-upholstery. What one really looks for is the stereo system. “That is not needed,” says Michael.
From the outside, the Type 3 looks discrete. Flat taillights and bullet turn-signals reminds us of the look of the early models. Missing chrome strips and rear badge makes the good car stand out. Just the way the owner likes it. No one ever thought that the 800-DM car with fist-sized rust holes could turn out like this. Not even the buddies from his club Boxer Scrubbern Walldorf. But once again, it flies over the Autobahn to all the shows that Michael gets invitations to and finds time to attend.
Bryan Thomson's ‘Volksrolet’
By Paul Harrington (Australian Motor Manual, Oct 1973)
July 2001
The art of transforming VWs into wide wheeled, bellowing beasties is not exactly new, but Bryan Thomson's Chevrolet. F5000 VW Type 3 Fastback must rate as the meanest Wolfsburg in sheep's clothing yet.
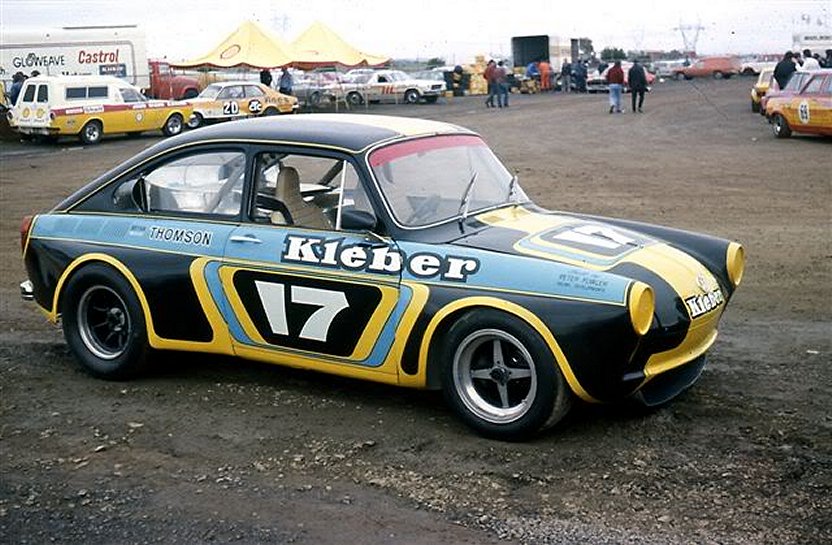
Not long ago sports sedan racing was the poor relation in Australian motor sport. It grew from the fact that owners of super-modified touring cars were barred from racing in the normal sedan class because of the continuous tightening of rules which culminated in the now defunct Series Production class.
In order to race their ultra modified machines, drivers had to resort to running as sports cars, until promoters found that there were so many such cars that they had a new racing category on their hands!
Even though the Sports Sedan movement grew quickly, it was still basically catering for the impecunious racers who could bodge up a Mini or an old Holden, transplant a more powerful engine and hope the whole thing stayed together long enough to reach the chequered flag.
Full official recognition of the class by the CAMS only came at the beginning of 1973 but it was really a matter of bending with the wind. In 1971 such cars were already getting less and less amateur in their presentation.
There was a time when super modifieds, as the sports sedans were, could still be beaten by the better Improved Touring cars from the ranks of legitimacy. Now those days are gone, and the Sports Sedan has grown up. It is now an ultra sophisticated supercar, bearing little or no relationship to its outward manifestation of marque. The pace of development, and the waves of new cars entering the class have turned it into a real professional scene. CAMS recognition was tuned to make this possible.
Both the governing body, and the Promoters were sick of the over-exposure of the top touring cars This debased the various National Championships as a Touring car title round differed very little from any other touring car race.
The coming of sports sedans has now given the promoters and the public an opportunity to enjoy the purist tourer only occasionally, feeding on a diet of super sports sedan racing the rest of the time.
Increasing prize money, such as the $1500 first place purse at Sydney's Oran Park Toby Lee Series, and many other top money festooned races, all have encouraged even greater efforts at finding the right combination of engine and bodyshell with the potential to come out on top.
An early starter in the latter sophisticated sports sedan scene was Shepparton's Bryan Thomson, a driver with many years of experience, and one who, although not a pure professional driver, has sufficient funds to employ a full time race mechanic and run his own race shop.
The man who looks after Bryan's racing affairs is Peter Fowler. His task keeps him busy looking after the injected Chevrolet powered Torana, plus a production example of the same makes.
Planning ahead, and knowing that the present performance of the Chevrolet Torana wouldn't keep it on top forever, Bryan decided to look into building a new car using as many Formula 5000 parts as possible.
Somehow a Fastback Volkswagen body shell came into his possession, and with the dominance of the very fast and nimble Porsche 911s and Carrera RSR sports sedan fresh in his mind, Bryan thought it might be fun to build a race car out of the VW and beat the Porsches with it!
Peter Fowler started work drawing up the rough plans, while another stroke of luck resulted in a five speed Hewland LG 600-gearbox transaxle coming the team's way. Mated to the 5-litre Chevrolet engine, this would easily be strong enough to take 475 horsepower as the very same axle is used on most 500-bhp Formula 5000 cars. Another advantage of the Hewland was that it could be used as a load bearer in the design of the chassis unit.
A ladder type of cross frame was bolted to the top of the Hewland with mounting brackets to take twin coil spring damper units for the all-independent rear suspension, based on Jaguar E-Type.
The rear was designed together with an upper transverse link and normal F-5000 driveshafts, complete with inboard disc brakes and inner and outer universal joints completed the rear axle and suspension.
Up front, unequal length double ‘A’ arms, fabricated out of tubing, are planned again exactly the same as any F-5000 racer.
Very little modification to the dimensions of the body unit are necessary as, with the rear passenger compartment no longer required for its designed use, it serves as the engine bay, with the Chevrolet unit fitted very low so that the injector intake stacks hardly show over the waist line of the car.
With the platform floor out, a fully triangulated tubular roll cage was welded into place inside the body, doubling as driver protection, but also serving as a strengthening space frame to retain rigidity in the body and hold everything together.
Bryan Thomson is hi favour of lightening things so long as they are not concerned with his safety. For this reason he retained the original steel doors, although the front boot cover and the rear deck were fabricated from fibreglass, while all windows, except the windshield, were made from plastic.
With the Chevrolet engine mounted amidships, access is through the passenger side door. A simple fireproof engine cover fills the area originally used by the rear seat passengers.
Surprisingly, the dimensions of the Volkswagen in respect of track and wheelbase are better orientated to the use of wide racing tyres than are those of the Torana. Only two inches of flaring was found necessary on the wheelarch openings to fully cover the 10-inch wide tyres.
The front wheel arch was opened out a link so that the front of the car could be lowered to leave a ground clearance of little more than 5 cm. Smaller thirteen-inch magnesium alloy wheels at the front and fifteen-inch diameter at the rear will give the car a definite nose down attitude on the track.
It is anticipated the fastback design of the body will aid aerodynamics to a considerable extent, giving a straight-line top speed approaching 255 km/h!
Bryan Thomson's "Volksrolet" is scheduled to make its debut within the next few weeks and when it does, there could well be a sensation at its appearance as it breaks away completely from the hitherto accepted sports sedan design.
Perhaps it would be optimistic to say that this could be the ultimate sports sedan, but we feel that it could set the pace for a whole new crop of exciting machines.
(Note – this car was raced for several seasons but sadly was stripped for parts for other projects, and scrapped in the mid-1980s – Ed.)
The VW 1600 TL Fastback
From Wheels magazine, May 1966
September 2001
As long as you can start with the basic assumption that all VW variations carry the instantly recognisable characteristics of the marque, you can begin to evaluate a particular version for its real market value. The VW 1600 TL is essentially pure Volkswagen and its change in shape and step up in power, while endowing the car with a dash of sporting flavour, has done nothing to remove the unmistakable signs of Volkswagen. The car is always immediately recognisable even to the unskilled eye.
But the 1600 TL is something more than just an ordinary Volkswagen, or more than a beefed up and restyled VW 1500. It has a distinct Continental flair and a slightly rich air about it. The fastback styling and interior ingenuity have given it a touch of class and elevated it to a level above ‘just another Volkswagen.’ When Sydney insurance broker, long standing motor race enthusiast and friend of motoring writers, Rod Blair offered his personal VW 1600 TL for road test, we were quite enthusiastic about the idea. By the time we had handed the car back we were even more impressed. Blair imported the car purely out of personal interest, and at the time of our tests it was one of only two in the country, the other being in Melbourne.
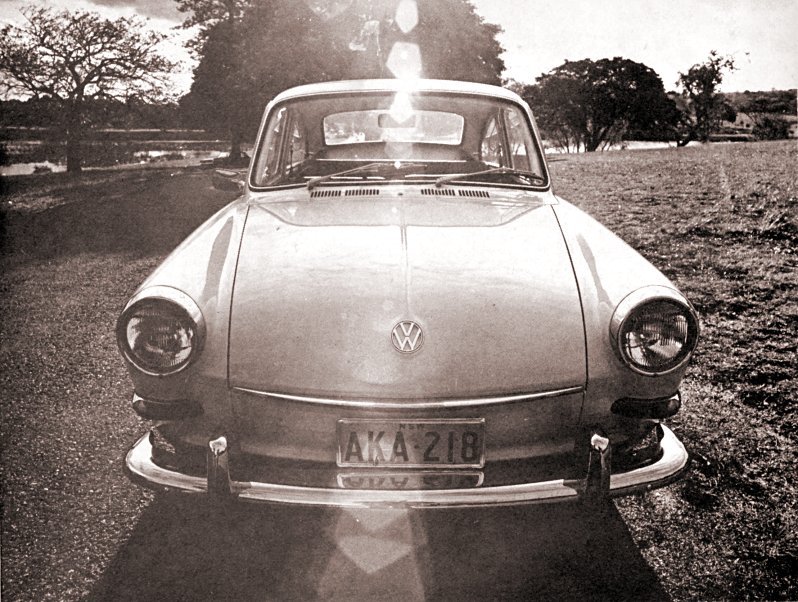
As everyone knows, VW Australia currently has two basic models on the market, the 1200 and 1500 sedans. The 1200 has only Standard and Deluxe Beetle variants and the low volume Karmann Ghia, while in the 1500 range there is the addition of a station wagon, and the Twin S sedan. VW Australia at this stage has no plans to import the 1600 TL or to tool for local assembly, but to keep in line with their present policy or retaining prestige variants like the Karmann Ghia versions on the market, it seems inevitable the car will be brought in small quantities, maybe by the end of this year (it was – Ed.) The relatively small market potential would not appear to warrant local assembly. The recent tariff decisions don't help either, as the car may well be brought into the near $4000 price range, if it is fully imported.
As with all tack on body modifications, the exterior appearance of the Fastback will always be controversial. From some angles it is quite handsome, from others a little awkward; some like it and some don't. From both outside and inside it gives the impression of being a bigger car. Staff men found the appearance very refined and tasteful, although they differed on personal appreciation of the styling. Actually the unique deep royal blue paintwork of the test car added quite a bit to its appeal, for the colour is entirely different from anything we have seen on any other car.
The airflow characteristics of the Fastback area are most interesting. During the dusty conditions of our test we noticed that the slab back remained completely free of dust accumulation, but the sides from the engine vents rearwards, along a line dipping under the tail lights and upwards to the number plate area, had a distinct dust formation. Dr Kamm's arguments would appear well supported in view of this, although the value of a sawn off tail would seem limited with the relatively small performance of the car.
From the front, low down, the car is indistinguishable as a Fastback, while retaining the exterior brightwork of the 1500 S cars. But the interior is quite, quite different. The doors appear wider, but actually aren't although they give excellent access to the rear seats. With the windows down they thunk closed with satisfying quietness, but with the windows up the normal airlock characteristics of VWs come in to play again and a fair bit of slamming may be necessary at times.
A two key system is used, with one key opening the doors and another for the ignition steering column lock system. A pull lever on the passenger's side door pillar releases the small tailgate in the fastback section below the window. It is an awkward, finicky affair, and unless it is carefully pushed back into position after the tailgate lid has been sprung it will be broken off if the door is closed. A pull ring somewhere in the rear compartment would seem a better answer. However, the rear luggage compartment is lit and this is controlled from the normal door courtesy lights.
Open those front doors and you are immediately greeted with a new look in cabin design for a VW product. The test car was tastefully laid out in all, off white trim, which looks as though it would soil quite easily. Seats are in perforated PVC and breathe reasonably well in hot weather. All other trim is in plain white PVC, except the dashboard top, which is well-padded black plastic with a matt anti glare finish. The seats themselves are very comfortable. A side fingertip control catch allows any length of driver to get straight arms at the wheel, although the tallest types may find they still have to stretch for the gearlever. This can be controlled to some degree by the adjustable rake of the squab, which gave eight positions of recline; this kept all staffers comfortable during the test.
Despite the all-new look of the interior, old VW fanatics will find a few touches to keep them at home in the new surroundings. The deep dished charcoal grey steering wheel is identical with the latest VW wheels right down to horn boss decorations, but it is the pedals which will be instantly familiar. The long, squishy throw of the clutch, with its inches of unnecessary travel before take-up is emphasised by long rubber-surrounded slits in the floor to accommodate the uncranked pedal shafts. One staff tester took particular dislike to this treatment but most people seem to accept it. The floor is carpeted with quite durable hair cord of light grey tone and it fits beautifully. All trim quality is exceptionally high.
New thoughts in the interior style are particularly evident in the doors. There is a full-length armrest stepped down in the middle to form two distinct levels, with a grab handle neatly incorporated in the step. It is covered in black vinyl to match the dashboard and extends to the back seats as well. The window winders have the normal brisk and easy VW action but the door catches are quite new. An opening lever and a piano key type press lock are incorporated in a dished chrome pan. They are easily reached and operate smoothly. A somewhat stubbier gearlever stretches down into the entirely familiar gearbox but is topped off by a largish round-topped knob that fits the palm beautifully. The gearbox was particularly tight and First is often hard to engage, but snap changes were possible on the acceleration runs. The handbrake is conventionally located and used.
Instrumentation is very simple. There is a cluster of three separate instrument shrouds directly in front of the driver. The centre binnacle holds the speedometer, scaled in sections of 10 mph to a rather optimistic 100 mph. The odometer has no decimal tumbler, and there is no trip meter. To the right a very clear electric clock keeps time accurately and the remaining binnacle to the left houses a fuel gauge (marked with reserve segment) and warning lights for other functions. These lights are cleverly designed intermittent strips set in squares. Various colours cover the oil level, generator, high beam and parking light indicators. Both the twin turn indicator lights flash when either left or right hand turns are signalled.
Switchgear is restricted to the minimum. There is a combined wiper/washer switch (press for wash, turn for wipers - single speed only) and a switch to cover all lighting facets. The ignition is key controlled by a combined steering wheel lock, mounted transversely on the column just under the steering wheel. It is quite easily reached.
The high beam/low beam switch has a very interesting operation. It is actuated by a press-strip let in to the underside of the turn-indicator stalk, and has two quite distinct functions. Pull the light switch out of the ‘parker’ position (green light in the binnacle indicates this) and the button may be depressed as a headlight flasher in poor light conditions. Once the light switch is pulled right out to the headlight position the gadget operates on a complete switch over basis - touch it and you swap beams, instead of just flashing high beam. It is a very well thought out device and easily operated at all times.
Other cockpit features show careful attention to detail. The centre mounted front ashtray has a protector lid which flaps up when the tray is withdrawn to protect the dash paintwork from ash by feel smokers in night driving. There are individual ashtrays for the rear seat passengers. A lockable lid gives access to the smallish glove box, but there is supplementary space for odds and ends, and maps in the elastic door flaps and the rear parcels shelf. A touch of the interior light glass (mounted on the side of the roof) spills a reasonable glow into the cockpit. Rearward vision in the slightly too small interior mirror is also supplemented by a well-placed exterior mirror mounted on the door.
Perhaps the key feature of the whole interior design is the meticulous attention to ventilation and temperature control. A neat little group of three sliding bars on the dashboard supplies the major airflow to the car interior. The centre bar pushes down to vary the quantity of air admitted under the dash to foot level, and the two side bars control the individual air stream to the left and right sides of the windscreen for demisting or fresh air supply to face level.
For straight through cabin ventilation or cooling the extremely deep rear quarter glasses (which are of clear Perspex with no chrome surrounds) can be opened wide.
All heating is at foot level and there are individual controls for front and rear compartments. A vertical slide lever just to the front of the doors gives individual control for the front seat passengers, while a lever on the transmission tunnel controls the opening of both vents to the rear compartment. The heat is actually turned on by a sliding lever on the transmission tunnel. Suitable delivery of heat for any condition can easily be obtained by juggling the levers to admit quantity of hot air (which is heated fresh air). Screw a window down a shade, or open the rear glasses and the air supply is immediately boosted. Temperatures in the cockpit soon reach an unbearable degree and the system would seem to be capable of dealing with even Arctic temperatures.
Access to the front luggage compartment is by a conventional pull lever under the dash. As on the VW 1500 this compartment houses petrol tank, jack and tools and spare wheels, while leaving space for one large port and other small items of soft luggage. In view of the altered nose attitudes induced by the load conditions in the front compartment it was disappointing to find that the only external adjustment provided for on the headlight rims was for lateral aim. For vertical aim - the crucial one with front boot compartments - the dress rim must be removed.
The engine bay is reached by removing a cover tray in the rear compartment. The bored out, horizontally opposed 1600 cc four has the handsome addition of a pair of downdraught Solex 32 PDSIT carburettors which are mainly responsible for the delivery of 65 bhp at 4600 rpm. The compartment looks impressively crowded and even the removal of the complicated air cleaner set up looks a little alarming.
Road gear is excellent. The TL sits on the normal big 4½” rims with 6.00 by 15 tyres. Suspension is stock VW 1500 except for the addition of another rear torsion bar. This does not noticeably improve handling except on very fast corners. Braking is by the conventional (although new to VW) disc front, drum rear set up and the performance times recorded were subject to very gentle use of the whoa pedal because of the car being privately owned. In fact the car stops as well as any VW 1500, and that is excellent all the time.
Actual road performance is just pure VW 1500, with a little more oomph. Acceleration times on the car were achieved with due consideration for private ownership and lack of mileage, but the car didn't protest at turning in some excellent times. Acceleration speeds are not noticeably better than stock VW 1500 to the occupants of the car and it takes a glance at the corrected figures to see that you are actually going faster. This is typical of the fuss free way the car operates under all conditions and its speed can be most deceiving.
To us one of the amazing things about VWs in the past has been total lack of connection between honesty in claimed speed available and honesty in speedometer calibration. VW speedos have always been wildly optimistic while handbook and factory top speeds are moderate to the point of pessimism, but the fastback is the first car in our experience to adjust this discrepancy. The speedometer's total pessimism (60 mph indicated was 65 actual) tallies up with the handbook's claim top speed of 84 as against the figure we achieved on test of 87 (into slight headwind).
Handling is another department again. It is stock VW 1500 in any situation except flat chat sweepers when the additional torsional bar at the rear keeps firmer control over this end. But don't think the traditional final oversteer is missing. VW enthusiasts will probably recognise it, welcome it and revel in its new controllability on the really quick bits, as it is never quite as vicious up high in the speed range as the old VW. The car can be tossed about with great verve in any situation and big breaks from the tail await only the clumsy fisted VW pilot. Smoothness is the keyword when handling this creature.
But despite its better performance and mildly improved handling the car will have greater appeal to boulevardiers, little old ladies with ambition and retired businessmen. Its quality of finish is in line with VW tradition.
With typical VW execution the car has been meticulously integrated and equipped, right from the good set of tools, down to the owner's handbook, which almost gives enough details to assemble a complete car from bits. The famed VW sealing system is carried right through from boot to rear compartment and finish is faultless.
With the 1600TL as a backup argument the run of the mill VW fraternity are obviously going to become a little unbearable. Could it be that they have good reasons?
Editors note – the VW 1600TL Fastback was officially introduced and sold in Australia in 1966-67, as the 1600TS. It was initially fully imported, but was soon converted to local assembly. It remains the fastest air-cooled Volkswagen ever sold in this country.
VW's Big Car - A Sneak Preview
‘Wheels’ magazine, July 1961
March 2003
Wheels gets a special, exclusive preview of the new 1500cc Volkswagen, due for release late in the year. Here are the facts from our overseas correspondents.
European VW distributors - 120 of them in all - recently converged on Wolfsburg, in the east corner of West Germany. These faithful agents, however, were not just making an ordinary visit. They had been summonsed by VW's Heinz Nordhoff to inspect the big new 1500cc car.
‘Wheels’ alone represented the press, and we were able to take part in this secret viewing.
Just 23 years ago, after a lifetime of devoted work in the engineering field, Ferdinand Porsche presented the original Volkswagen. Now it was Dr Nordhoff’s turn. In a special hall sealed off from the rest of the factory, assistants threw the wraps off the five prototypes.
There were four sedans - blue, white, black and red, and one station wagon, which is the first official variation of the new model.
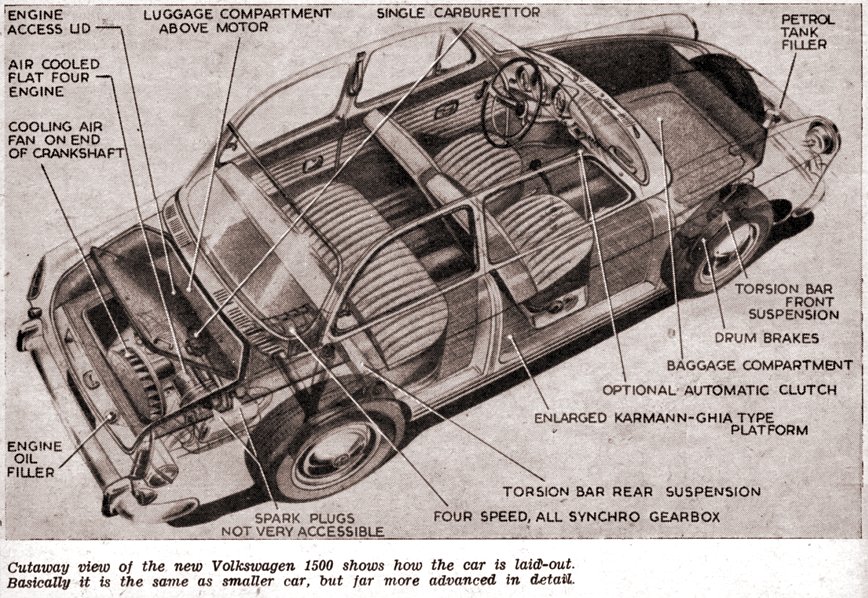
No one expected a styling revolution, but faced with the classical bodywork of the 1500, some of the dealers could not hide a trace of dismay. However, a loud murmur of approval arose from the distributors and congratulations began to overwhelm Nordhoff. The latter, not the least upset by the hesitation which he had clearly felt among his guests, went on to explain that, exactly like its predecessor, the VW stands sheltered from fashion changes.
“Everywhere a Volkswagen goes,” said Nordhoff, “everyone recognises it instantly and thinks: there goes another Wolfsburg car.”
However, with the new car this principle is largely crushed by the fact that the 1500 resembles many other models produced in the last 10 years. Some compare it with the old Ford Taunus 12M;others with the Mercedes 180 without the grille and only two doors.
In fact the idea of a two-door body, which we discussed personally with Dr Nordhoff in the course of an exclusive interview, is almost the only basic idea to which he has remained faithful. No four doors at Wolfsburg, in spite of the growing success that accompanies this type of body in Germany, where Ford, Opel and DKW include it in their catalogues.
On the mechanical side, the Nordhoff VW retains the mechanical concept of the Porsche VW from 1937 – a flat four engine, air-cooled and rear mounted, four-wheel independent suspension by torsion bars.
Even the dealers themselves were surprised at this apparent lack of imagination, but these arrangements are well proved and were responsible for the success of the old VW.
Dr Nordhoff also stressed the fact that the new car presents the minimum number of the new solutions and in consequence it should be entirely trouble-free from the word go. In these conditions, customers are not taking a risk and should obtain a car that is as reliable as the small VW, he said.
For an hour the chosen 120, and ‘Wheels’ magazine, were able to examine the 1500 from every angle, to sit inside, to raise the lid of the two luggage compartments and even to look into the third compartment - that of the motor.
Since then the cars have been hidden away again and no one has been able to see them, not even members of a long-planned visit to Wolfsburg by all the French distributors. To their disappointment, they were not even allowed to watch the prototypes being tested on the works track.
Along with the dealers, we examined the cars. The 1500 has, of course, mono construction, the platform of which is derived directly from the Karmann Ghia, which is slightly larger than that of an ordinary VW. The front end is of the transverse torsion bar type, similar to the small car but of different design; each torsion bar runs the full width of the car. The brakes remain conventional drums; disks were not considered. Rear suspension is independent by torsion bars, but the point of attachment for the shock absorbers is more outboard; that is, closer to the wheels.
The power unit retains the present flat four layout, and the gearbox, recently strengthened, is unchanged.
A great deal of research has gone into the motor at the Porsche laboratories in Stuttgart, but it remains as a flat four with the increase in capacity being gained by a bigger bore and stroke. Induction is by simple downdraught carburettor placed centrally with the air cleaner separate and on one side.
Cooling is by forced air draught as before, but to keep the engine compartment shallow the fan drives directly off the end of the crankshaft, thus eliminating the need for belts. Air is picked up from the ducts just below the rear windows and expelled beneath the motor.
The front baggage compartment holds the spare wheel, mounted vertically, with the fuel tank and its filler forward of this. At the rear, the second luggage compartment is much flatter and the floor hinges upwards to provide access to the motor. Nevertheless, the spark plugs do not seem easy to reach. Checking and topping up the sump can be carried out without lifting the luggage compartment floor, thanks to a filler at the extreme rear.
The cooling system and its positioning has obviously been a special study of VW engineers, although the rest of the car has not really come in for such drastic alteration. The space made available above the engine is extremely useful, and it is said that when the car is fully laden, the weight distribution is equal front and rear. The performance is not brilliant, but should be adequate, with top speed of something like 120 to 125 km/h.
One of the prototypes was fitted with a Saxomat automatic clutch, which only recently became available on the small car.
The proving grounds at Wolfsburg are a scene of activity 24 hours a day. The cars run around the speed bowl, over the rough tracks and up the steep grades continually. The place is virtually spy-proof. The first obstacle an intruder would have to overcome is a moat 4 metres wide, followed almost immediately by a wire netting fence draped in barbed wire. Between the two, uniformed guards and their dogs are on patrol. After the first fence there is 100 metres of open ground criss-crossed with ditches full of water as further obstacle to anyone before they get to the second fence, which is more than 2.5 metres tall. On the other side of that is the test track. A high jungle of bamboo obscures vision of this inner sanctum, and the nearest cars come to it is 300 metres.
From what we observed at the track, there were several 1500cc prototypes - painted grey - under test. One of them was shaped to look something like a DAF 800. There was also a Ford Taunus under test—the 1500's closest rival.
Just a mile from the test track the huge factory churns out VWs at the rate of over 4,000 a day. The furnaces can be seen glowing and the rumble of railway trucks taking away the products is occasionally punctuated by the hoots of a collier in the Mittelland Canal.
On its present cost structure, the 1500 could never be a replacement for the existing model. In Australia, it would cost at least as much as a Holden or Falcon.
(Note – the VW 1500 eventually debuted in Australia in 1963, not as a ‘replacement’ for the 1200 Beetle but as an additional line. It was locally produced in the Volkswagen Australasia factory in Clayton, Melbourne. The Sedan was £1199 and the Wagon was £1249, which was indeed more than the most basic Holden or Falcon. In 1963 a Holden Special started at £1111, and a Ford Falcon £1070. A Deluxe Beetle was £954 – Ed)
History of the Type 3
By Robert K Smith (Australianised by Phil Matthews)
May 2004
In the late 1950s, as the Volkswagen Beetle was becoming well established, the people at Volkswagen were looking to expand their product line. The ‘Type 1’ series Beetle saloon (sedan) and Cabrio (convertible), as well as the Karmann Ghia Coupe and Cabrio, were sharing the spotlight with a new range of passenger cars. ‘Type 2’ was the designation given to the Commercial vehicles (Microbus, van, pickup, etc.), and the new line was therefore named the Type 3.
Work began in February and March of 1959, starting with a 1300 model (which was considered inadequate), and scrapped in favour of a 1500. First drawings of the new VW 1500 were done in 1959, and a regular VW chassis was given to the VW styling staff to come with an exterior package. The first results proved too cramped for a ‘larger’ car, so a wider Karmann Ghia floorpan was used. The first handmade prototype sprouted in late 1959, but it ran into heating problems. Four other test cars were put together, utilising various engine air intake locations. Louvres under the rear window worked the best, and by January of 1960, the improved VW 1500 was circling their banked test track. In the spring of the same year, ten more 1500s emerged, five of which were built from production parts.
Much of the prototype work on the Type 3 was pretty secretive. Many media spies knew something was happening at Wolfsburg with a brand new car, but they couldn't come up with as much as a picture or description. A fire caused extensive damage to a large building at the Wolfsburg facility, which necessitated massive repairs before the building could be put back into operation. The burned-out building was boarded up during repairs, and the VW directors ordered the boards to be left in place, even after the interior damage was repaired. You guessed it - this was the building where the VW 1500 prototype models were assembled, and all visitors (and the majority of VW plant personnel) didn't even know what was going on behind the doors of this boarded-up building.
With Volkswagen's daily production schedule of 4,000 units (3400 Beetles, 600 vans, buses and pickups), the VW 1500 projected output was set at 300 units a day. With this low production, the sedan (Notchback) and Karmann Ghia Type 3s were aimed at Europe and not exported to the United States. Volkswagen’s boss, Dr. Heinz Nordhoff, explained the philosophy of his organization: “Before we export any cars, we first must have a service organization set up, then a sales organization, and after these have been established (including spare parts), we then send the cars.”
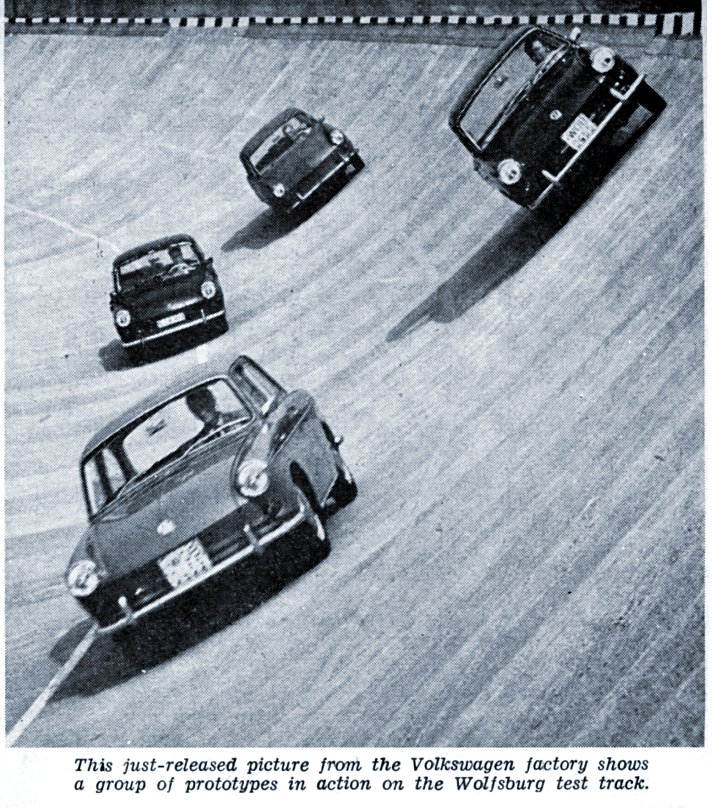
At the beginning of September 1961, the new VW 1500 was officially released in Europe, offered initially in two-door Sedan and Karmann Ghia coupe models. Technically speaking these were 1962 models, as like the U.S. car manufacturers, the model year was introduced in the autumn of the previous year. When the media got wind that Wolfsburg was definitely debuting a new ‘peoples’ car,’ quite a few speculative stories went around. Some thought the new VW would just be a much-modified version of the Beetle, while others heard it might be a larger, four-door, luxury model. Well, they were all wrong as the VW 1500 featured a totally new concept in design, featuring improved riding and handling qualities, without drastically changing overall dimensions.
Besides innovative body styling, and the newly designed 1500 engine, other changes included one-piece torsion bars for the front suspension, and a whole new dash arrangement, as well as a roomy interior. Also, in addition to the front boot, under the rear bonnet was another boot, thanks to the ‘pancake’ 1493cc 45 DIN hp powerplant.
For a lower engine profile, the VW engineers successfully reduced the height of the motor. It measured no more than 40 cm from sump to air cleaner, since the old style fan housing was eliminated and the carburettor was set off to one side. All new sheet metal was required, as well as a new fan housing, which mounted to the rear of the engine. A large fan bolted directly to the rear of the crankshaft, which meant cooling was not dependent on a fan belt like that of the Beetle engine.
Until 1963, there was only one basic version of the Sedan. The car was characterized by the absence of upper body mouldings; only rocker mouldings and side marker lights on the front guards, near the belt line, were utilized. Also, only single carb engines were offered in these first years. Front turn signal lenses were bullet shaped, and the taillight lenses were flat, mounted in painted bezels. Black, Ruby Red, Gulf Blue, and Pearl White were the paint colours initially offered, but in 1962, Anthracite and Birch Green were also available.
In February 1962 the VW ‘Variant,’ the third member of the Type 3 family, went into production in Germany. This one featured a two-door station wagon design, running the same front-end sheet metal and doors as the Sedan, but the quarter panels were different because of the engine air intake louvre locations. ‘Variant’ was the normal word for ‘station wagon’ in Europe, while ‘Estate’ was used in the UK. For the USA, ‘Variant’ sounded too much like Detroit's Plymouth Valiant so U.S. marketers used the term ‘Squareback Sedan’ to identify the new German import.
Australian magazines such as Wheels reported on the new Type 3 as soon as it was revealed, and drove some of the early examples in Germany. There was immediate speculation about when it would be released in Australia, and how much it would cost. By 1961 the Melbourne factory was already stamping body panels for the Beetle and Kombi, and local content was well over 50%. VW Australasia imported the first trial examples in 1962, and got prepared to produce the Type 3 in the Melbourne factory. The ‘1500 Sedan’ and ‘1500 Station Wagon’ went on local sale in early 1963, for £1,119 for the sedan and £1,249 for the wagon. The 1200 Beetle started at £799.
In Germany the ‘64 model range was widened by the introduction of the simplified basic ‘1500N’, which had painted window frames and fixed rear windows. A number of items were dropped, such as the bumper overriders, parking lights, right door lock, side and centre armrests, door pockets, one sun visor, beauty rings, clock and intermittent wipers. In addition, there was also the new ‘1500S’, the deluxe model. The ‘S’ came with dual carbs as standard equipment; side and front hood mouldings, wheel beauty rings, side markers on the body belt line, wraparound front turn signals, and pointed taillight lenses. The engine was still 1493cc, but twin Solex carbs and increased compression raised the power to 53 DIN hp, giving a 135 km/h top speed.
For Australia the equivalent ‘1500 Twin S’ sedan appeared in mid-1965, locally made in Melbourne and with similar trim and extras to the German model. It went on sale for £1,199. The normal 1500 sedan continued on, but didn’t use the German ‘1500N’ name. It was still called the ‘VW 1500 Sedan’, and had the same level of trim as before.
Like the sedan, the Variant also had only one trim level available until 1964, when European buyers could choose between the basic 1500N or deluxe 1500S wagons. In Australia however, there was only one model of wagon.
For Europe there was also a Type 3 Van (M265), based on model 365. This used the Variant body shell but with no rear side windows, a tough plywood floor in the back and basic ‘working’ vinyl trim. These were also made in Australia, where the ‘VW 1500 Panel Van’ went on sale in mid-1965 for £995 (or $1990 in the coming decimal currency).
August 1965 was the German introduction date of the fourth member of the Type 3 family, the Fastback, which appeared as the ‘VW 1600 TL’ (for TourenLimousine, or touring sedan). The long sloping rear with large rear side windows increased luggage capacity from the sedan’s 200 litres up to 290 litres. Not all the critics liked the shape, which some said looked like a Porsche with the passenger area too far forward. But the new engine drew praise. Bore was increased to 85.5 mm, giving a capacity of 1584cc. Twin Solex carbs but reduced compression (7.7:1) meant power output was unchanged at 54 DIN hp, but torque was increased and at lower revs. The VW 1600TL had a higher top speed, 140 km/h, and fuel economy was also improved over the 1500S.
In addition to the new 1600 TL Fastback, in Europe the 1600L replaced the 1500S sedan, while the 1500N Sedan and Variant was now the 1500A. The new Fastback, with its 1600 engine, didn’t make to Australia until mid-1966 when it was released as the ‘1600 TS Fastback’. Unlike the 1500 Sedan and Station wagon that were made in Melbourne (and continued on), the 1600 TS Fastback was fully imported from Germany. It went on sale for $2,415, compared with $2,198 for the 1500 Sedan and $2,430 for the Station Wagon.
In 1966 the German 1500A was discontinued, and replaced with the 1600N (which was fitted to the sedan and wagon). This was the same 1584cc engine, but detuned to 45 DIN hp. Thus all three German Type 3 models now used the 1600cc engine, and in addition were now 12-volt. However in Australia the local 6-volt 1500cc sedan and wagon continued on, with only the imported 1600 TL Fastback getting the latest updates; however the local 1500cc engines now came with a choice of either single or twin carbs for both the sedan and wagon. In fact Australia wouldn’t catch up with Germany until 1968, when the Melbourne factory stopped local production of all models and reverted to assembling German CKD kits.
Some neat changes applied to German Type 3s from August 1966 on, apart from 12-volt electrics. The 1967 models had front disc brakes, making the Type 3 the first Volkswagen to have them. They also had a more powerful generator, more fuses and improved wiring. In early 1967 the brake disks and crankshafts were improved further. In August 1967, the 1968 model was given the choice of a three-speed fully automatic transmission (the first Volkswagen to have one), with new Porsche-style double-joint rear axles and CVs, longer torsion bars and improved shock absorbers.
For the US market, the 1968 Type 3 became the first production car in the world to have electronic fuel injection, which became optional on German market models the following year. The 1969 German cars also did away with the swing axles on manual cars, replacing them with the Automatic’s double joint axles.
The 1970 model received a new larger nose, with extended sheet metal and reinforced bumpers to meet US safety laws. All models got the new nose, which increased the length by 120 mm. There were also larger front directional lenses, and larger taillights with integral reversing lights. A laminated windscreen was fitted as standard. Australia saw the new body shape a few months later, once the new CKD kits arrived. The three models were now officially promoted as the ‘VW Type 3’, with locally assembled cars having unique ‘Type 3’ badges on the front guards. In US-style, the three models were now called the ‘Fastback’, the ‘Squareback’ – and, uniquely, the ‘Halfback’ – although this name never caught on.
The 1971-73 models received more detail improvements, such as improved ventilation and wiper/washers; diagnostic engine socket; 411 front brakes; better door locks; four-spoke steering wheel; indicator stalks for wipers; emissions controls; improved seats with headrests. Most of these improvements worked their way to Australia too, although they were usually 6 months or so after Europe.
But times were changing at Volkswagen, and production of the Type 3 range finally came to an end in July 1973. They were replaced by the completely new, modern front-drive water-cooled VW Passat range. Australian assembly of the Type 3 was also wrapped up in the latter half of 1973, and its Melbourne assembly line converted over to the assembly of the Passat.
One unusual Type 3 model that has received a lot of press over the years is the Notchback Cabriolet, a prototype that came very close to series production. Prototypes are generally crudely finished as far as body detail goes, but in the case of the Notchback Cabrio (model #351) and the Type 3 Karmann Ghia Cabriolet (models 341, 342), both cars were fully competed and detailed by Karmann, and showcased at the Frankfurt Auto Show in 1961.
Further testing after the show, however, revealed previously unrecorded body panel flexing and other problems. Because of these and other reasons, the Type 3 Cabrios never reached production. Examples of both still exist however, as there is one Notchback Cabrio at the Wolfsburg museum, and one of each at the Karmann Museum at Osnabrück. VW printed sales brochures for both Cabrios, and copies were available in several different languages in 1961, but the cars never reached the production line. These brochures are now very collectable.
The Type 34 Karmann Ghia coupe did make it into production, and was model 343. This rare Ghia featured a Type 3 chassis, drive train, and suspension, but its body was styled by Ghia of Turin, Italy, and built by Wilhelm Karmann at Osnabrück. It, too, was introduced at the Frankfurt Auto Show in '61, with a price tag of US$2,198.
The body design was quite a departure from the curvy Type 1 Ghia, featuring razor-edge bodylines, and a whole new front with four headlights (the two inner ones were actually fog lights). The rear was very like the Chevrolet Corvair. The interior sported a simple dash with speedometer, fuel gauge, and clock, and to the right of the radio was another gauge (clock) hole, usually with a blank face if the car was not ordered with a tachometer.
The Type 3 Karmann Ghia received praise from the press, saying the “big Karmann” was the best Volkswagen ever. The Ghia’s low centre of gravity gave better handling and less crosswind sensitivity than the Type 3 sedan, its steering was easy and precise, and its performance was very similar with 110 km/h in third gear easily done. The fun ended at the petrol station though, as the Ghia drank almost 13 litres per 100 km at 135 km/h.
And while it was a high quality vehicle for build quality, equipment and handling, it was not a true Volkswagen in terms of price, not at DM 8750 (DM 2400 more than the Type 3 sedan). That hurt sales, and the fact that the Ghia was not sold in the USA, VW’s biggest export market, didn’t help. The Type 3 Ghia was sold in Australia, but only by special order and less than a dozen were sold before imports ended in 1968.
After a production run of just eight years, the Type 3 Karmann Ghia has the dubious distinction of being the first-ever Volkswagen model to be discontinued. The last one was made in July 1969. It was replaced on the Karmann production lines by the VW-Porsche 914.
VW 1500S - four world records
By Peter Krackowizer
July 2005
At the beginning of the 1960s, Dr Helmut Krackowizer was the public relations manager at Porsche’s Austrian office in Salzburg. In those days Porsche Austria were also the Volkswagen importers and distributors for the country.
He was always on the search for interesting contributions or actions for the press. In 1964 he discovered in his archive that the long-distance record for 1.5-litre series automobiles was still held by an Adler-Trumpf, made way back in 1935 and driven on the famous AVUS circuit in Berlin. Therefore he thought it was time to break this record.
The Adler-Trumpf’s record from 1935 was made over 10,000 km, with an average speed of 126.3 km/h. There had already been a record attempt by Ford in January 1964, but over the distance of 15,000 km with an average speed of 119.73 km/h so the old 1935 record still held.
So in April 1964, 12 Austrian journalists got ready to break this record on the racing course at Monza (Italy). Naturally, they didn’t organise this without asking the FIA beforehand whether ‘national records’ were also recognized when achieved abroad.
Two completely standard VW 1500S (Sedan and Variant) were used. The cars were driven around the clock, about 80 laps between each driver change. The time ran along when refueling, with the oil change, with the driver change and with the tyre changes, evenly from start to finish. There were moments of shock and moments of entertainment - as the singing of the race track caretaker, ‘Mr. Caruso,’ who searched the 4.259 km-long race track each morning on a bicycle for stones or lost screws or squashed rabbits.
But despite many smaller and larger obstacles, despite the mental difference of the 12 driving journalists, and despite one car failure - only the second got through - when all is said and done, it was announced:
World record!
4 days (96 hours) - 12,096.103 km at 126.001 km/h
5 days (120 hours) - 15,132.082 km at 126.100 km/h
15,000 Kilometres - 118 h 57.57 min at 126.086 km/h
10,000 Miles - 127 h 19.51 min at 126.390 km/h
Altogether the last car drove 3,793 laps, which corresponded to a travel time of 127 hours 47.40 minutes, and a distance of 16,154.500 km! The fastest lap with the winning car, by the way, was driven by my father at an average speed of 143.832 km/h in the 10th lap.
Unfortunately this record of the Austrian journalist team and the VW 1500S could not be kept for a long time. Just one month later, between 14th and 20th May 1964, Ford fetched back the records over 15,000 kilometres and 10,000 miles with a Ford Corsair GT, also using the Monza circuit.