
Ignition
009 Hesitation Blues
Installing a Distributor
Choosing the Right Distributor
009 Hesitation Blues
By Bob Donalds
July 1999
When your original Bosch distributor fails, or if you just want to get the latest and greatest, you reach for the fully centrifugal 009 distributor or one of its cousins. When the 009 is used with the 30-PICT-3 or any 34 PICT carburettor, problems begin to happen faster than you can turn the adjustment screws. Where do you time the new distributor? Do you use the old timing mark? What does the old timing mark mean? Why won't my engine idle?

First, most original distributors in the late ‘pollution control’ dual port engine were designed to run with an idle timing of 5 degrees ATDC (After Top Dead Centre). The 009 should be timed at 10 degrees BTDC (Before Top Dead Centre). Setting the 009 at a timing mark of 5 ATDC would give you an inadequate advance of about 17 degrees total. Now your engine may idle nicely but you risk melting a piston. The air-cooled Type 1, pre-’72 Type 2, and Type 3 VW engine needs a total advance of 32 degrees BTDC. This number is often disputed but it works for me.
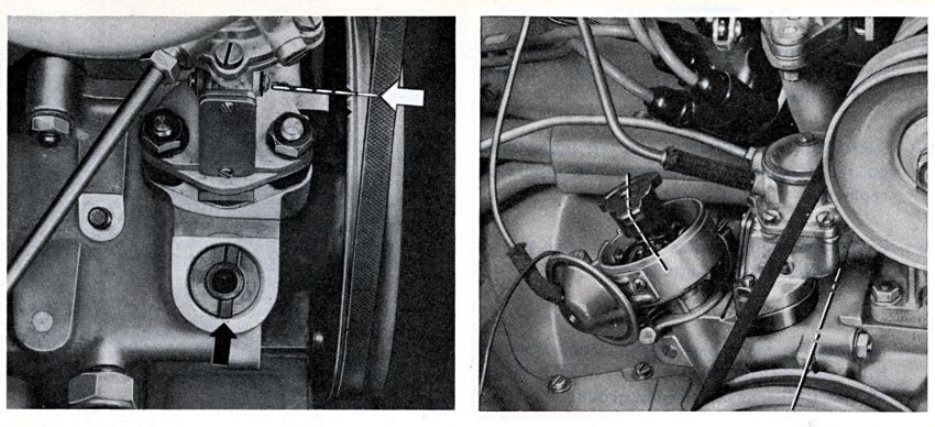
To check total timing, I rev the engine with my timing light connected. The 0 degrees mark should now end up at the fan belt where it lifts off the pulley. When the 009 is set at 10 degrees, this timing change of 15 degrees raises the idle so high you need to lower it by turning the idle speed adjusting almost all the way. Naturally this shuts down the idle circuit. The engine is now getting so little fuel; it barely idles. If it does idle, it won't transition to the next carburettor circuit without massive hesitation even with a good accelerator pump. Also, the throttle plate if not closed at warm idle, will create the same effect.
On the dual port crank pulley there is a dent on the opposite side of the original timing mark and slightly to the right. I take the middle of this dent as 0 degrees. Take the points of an open-end 15-mm spanner and lay the left side of the spanner in the middle of the dent and the right side will fall at approximately 10 degrees BTDC. File a new notch at that spot. I also like to mark it with red touch-up paint.
The next step to a proper idle is to install a pop rivet in the hole of the throttle plate. Trust me, it works. This is the brass plate at the base of the carburettor that opens when you press the accelerator. Now all the air the engine draws in at a idle must come through the idle circuit. You can now back out the idle speed adjusting screw, restoring the idle by allowing enough air into the carburettor idle circuits thereby picking up the fuel needed to obtain an idle. You can now set the timing at 10 BTDC with your 009 distributor and have the fuel needed for a stable idle and smooth transition to the high-speed circuits.
When rebuilding engines, I lower my compression ratio to prevent pre-ignition and overheating with a semi-hemi cut in the combustion chamber. This allows me to run 2 to 4 degrees more timing without the engine getting too hot. The carburettor might also need a larger main jet.
Does the engine run out of power just past the idle at 1500 rpm or so and putting the pedal to floor isn't much help? I find larger, main jets commonly needed to help with this mid-range hesitation and additionally can increase top end. My best guess for main jet size on an otherwise stock engine is #135. The carb comes stock with a #127.5 unless it's a ‘71 Type 2, in which case it's a #125.
Changing the main jet to a larger size can improve economy because less throttle is needed to get up to speed. Re-jetting is also common when running a non-stock exhaust. These exhaust lower the backpressure and tend to lean the motor out.
Of course before re-jetting, be sure you have reviewed the basic tune-up. Check your valve adjustment and make sure you have enough compression for the motor to idle. Any cylinder with less than 100 pounds compression will not fire at idle. Tuning for performance is done one change at a time with a fully warmed up engine, and the test drive is the measure of success.
Installing a Distributor
By Steve Carter
April 2000
You are either in one of two situations. Either your engine runs, and you need/want to replace the distributor, or your engine does not have a distributor installed and you need to put one in.
We'll start with an engine that does not have a distributor in it. The first thing we need to do is put the engine in a firing position for #1 cylinder. Take the valve cover off the right side of the engine, which is the #1 and #2 side. # 1 is the cylinder on the right, towards the front of the car (the flywheel end). Rotate the engine clockwise by hand until you see the exhaust valve open up. Continue rotating until you see the intake valve open, then close. NOW YOU ARE ON THE COMPRESSION STROKE. Look at your pulley, and continue rotating until the pulley notch is straight up, OR until the pulley's woodruff key is in the 9 o'clock position. Now you are at TDC for #1, which is where you need to be to proceed. If your engine already runs, you can simply remove the distributor cap, and rotate the engine until the rotor is pointing at the plug wire (in the cap) that runs to cylinder #1. Double check your pulley, and it should be notch up, or key at 9 o'clock, as in the previous description. You are now at TDC for #1.
Note - you can’t just line up the pulley and go from there, because the VW engine is a 4-stroke engine, and the pistons come up TWICE over the four-stroke series – Intake (down), Compression (up), Power (down), Exhaust (up). So, if the notch is up, you could be at TDC for #1, but you could also be at TDC for #3. Be sure you have it right.
Remove the distributor and distributor clamp. Slide the distributor clamp onto your new distributor. Now, install the distributor o-ring onto the distributor. If you put the o-ring on before the clamp, you will find out why I'm telling you to put the clamp on first! :-)
Look into the distributor hole in the engine, and see how the drive notch is lined up. This lets you get the new distributor's drive close as you put it in. Oil up the distributor shaft and o-ring area (you don't want to tear the o-ring up). Put it in. It may take some light tapping on the rim of the distributor to get the o-ring started into the case. Slide it all the way down, and it should bottom out on the clamp. If it does not, the drive gear is not properly engaged. You need to rotate the rotor back and forth while GENTLY pushing the distributor down. When you find the slot, it will drop the rest of the way.
The rotor SHOULD be pointing to the little notch in the distributor body, which is the marking for #1 cylinder firing position. If it isn't, you are either NOT at TDC for #1, or your distributor drive pinion is indexed wrong, and needs to be removed and rotated to the proper position.
If you are re-using your distributor cap, CHECK that the rotor is aiming towards the #1 plug wire (remember, we are at #1 TDC). If not, remove the wires from the cap, and rotate them to the proper position, so that #1 is now the wire the rotor is aiming at.
Time the engine as normal, either static or running. 009s can be set dynamically at 30 degrees BTDC at 3500 rpm or higher, OR at about 5 degrees BTDC static or at idle; they are equivalent. Hope this helps!
Choosing the Right Distributor
By Steve Carter
May 2000
Air-cooled VW owners have an assortment of options when choosing a distributor for their engine. If you only look on the surface it seems simple: the ‘obvious’ choice is the Bosch 009, right? Not necessarily. Once you do a little research, you'll find a variety of stock units (including the SVDA unit), as well as the Bosch 009, 010, and 050 series, and finally the Mallory, MSD, and the age old Magneto. So which one is ‘best’?
Each of these units is excellent - for the right application. In this article, I will clarify the right time and application for each option available.
Stock Engines – the Stock Distributor (Vacuum Advance)
We will start at the obvious place, which is the beginning. Up through the late ‘60s, VW supplied their engines with the stock distributor, which was a non-smog distributor (emissions were not an issue). These vacuum advance distributors do their job well, and all are dependent on a vacuum signal from the carburettor (with the exception of some early Type 2s, which were chronically under-powered and used a centrifugal only distributor). Stock units work VERY well when installed in stock or near-stock engines with PICT-28 or 30 carburettors. Most complaints are related to a defect of some sort (bad points, condenser, worn out distributor), or a problem that is giving symptoms of a bad distributor, but is actually fuel system related.
One of these two modifications are the most common:
1. The carburetor is changed to something other than stock, and it is almost always missing a vacuum port for the vacuum advance distributor to operate properly
2. The high performance engine does NOT have a proper vacuum signal due to a long duration camshaft. Cam overlap will cause a drop in vacuum, and obviously, the vacuum advance won't work properly.
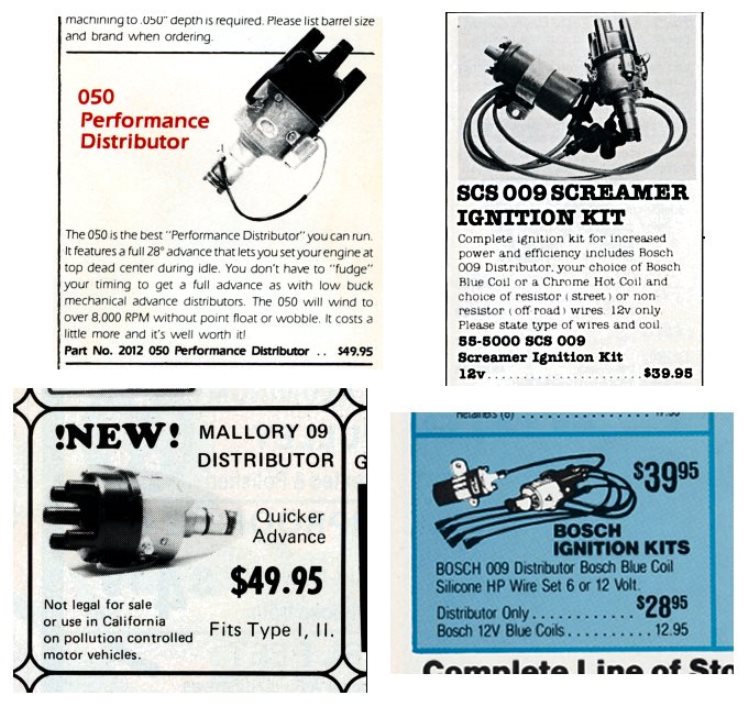
The 010 Distributor
Bosch came to the rescue with the 010 Distributor for early hot-rodders. This distributor eliminated the vacuum advance system, and used ONLY engine rpms to dictate the ignition timing. For high performance engines of the time, this was the perfect solution, since these engines were usually run at idle or full throttle! :-)
The 009 Distributor
For the USA market, in 1971 VW engines were shipped with a ‘smog’ distributor, which had a vacuum retard in addition to the vacuum advance. The engines were also changed to the dual port configuration, along with a change in carburettors from the 30 PICT series to the 34 PICT series, which had the additional port for the vacuum retard. These new carbs were also LEAN in their operation, since they had to conform to the new tailpipe standards.
The 009 distributor was introduced, and was a very inexpensive ‘replacement’ unit for VW engines, and it was almost a duplicate of the earlier 010 distributor.
These 009 distributors were (and still are) sold by the ton. Early VW engines (pre-’71) had no problem, but the smog engines when equipped with the 009/010 distributors had a pronounced and annoying ‘flat spot’. A flat spot is a hesitation just off idle, and can range from being almost unnoticeable to getting broad-sided or rear-ended by approaching cars!
Many 009/34-PICT equipped owners mistake this hesitation for POWER. They don't notice the hesitation, but they DO notice the kick in the back of the seat once the engine catches and it starts accelerating! They mistake this for ‘more power’ since there is such a difference between the stumble and actually operating properly.
The vacuum advance distributors do not have this hesitation since they advance the timing when the throttle is opened as part of their operation. Obviously, the 009/010 is only rpm based, and this vacuum advance doesn't happen. When a 009/010 is combined with the lean smog operation of the 34-series carb, the flat spot is the result.
Current ‘solutions’ are all modifications to the carburettor, which richen up the fuel delivery in various forms, whether it's the idle circuit, the main jet, and/or the accelerator pump circuit.
The error with these ‘fixes’ is that they are curing a symptom, not THE PROBLEM. The problem is the lack of additional advance just off idle, not lean operation. The stock distributor/34 carbs didn't have a hesitation!
The SVDA Distributor
Enter the SVDA distributor. A production VW distributor with the 009 advance curve (close enough), and a vacuum advance unit! Believe it or not, there is an additional advantage to the vacuum advance (on engines that have the proper vacuum port - 34 PICT series carbs), and that is the gain of at least 1 litre/100 km fuel economy over the 009/010 distributor! Same performance, plus improved mileage, and NO FLAT SPOT. The drive-ability of the SVDA/34 carb has to be experienced!
30-PICT carbs CANNOT use the SVDA distributor since the vacuum signal is not correct, and won't pull the advance in on the small canned SVDA. You’ll notice the early distributors use larger vacuum cans than later distributors because the vacuum signal is different. These early carbs should use stock VW/Bosch distributors.
Modified Engines
When the carburettor is changed to something larger than stock, the vacuum signal is lost, so the centrifugal advance units ARE the proper distributor for this application. Fine – but now you are lost in a multitude of choices: 009, 010, 050, Mallory, MSD, and Magneto. Which one to use?
What you want is to set your ignition timing about 4 degrees retarded from the point where detonation begins. This setting means the flame front will meet the piston at the top, maximizing cylinder pressure and the time (crank degrees) to push the piston down, making the most power. If you ignite the charge too late, the pressure doesn't build until the crank has rotated some, and you lose precious crank degrees of work – and hence power. If the charge is ignited too early, the flame front will hit the piston ON THE WAY UP, and this is a sure-fire way to destroy your engine very quickly.
What is needed is to find the timing point at EVERY RPM point where you are around 4 degrees retarded from detonation under full throttle, since this is the ‘ideal’ time for our spark to occur. Obviously, you would leave yourself a safety zone of 3-4 degrees of timing at all points to CYA in case of bad fuel, clogged main jet, vacuum leak, abnormally hot engine, etc. The power difference between detonation and 3-4 degrees of retarded timing from this point is negligible, so riding the ragged edge of timing is not worth the risk. Detonation does NOT have to be audible for it to turn your expensive mechanical marvel into junk in short order.
Finding the Advance Curve
Ideally, you would remove all advance from the distributor, and run a locked timing. You then put the engine on a dyno, and play with timing across the rpm band from idle to redline at full throttle (finding the timing where you are 4 degrees from detonation) and then chart it. Then, you remove the locked timing from the distributor, set your initial timing to match what you found was best at idle. Next, match the distributor's curve to match what you found to be best on the dyno by changing weights and springs in the distributor.
If you have the patience and time to set up this custom curve, and have a heavily modified engine, your patience will be rewarded! Get yourself a Mallory/MSD distributor. You will find they are VERY adjustable. The easiest method to follow is very straightforward. Find the MAX advance point your engine tolerates (between 30-40 degrees BTDC) above 3000 rpm. Now find the place where it responds best at idle. It may be 15-24 degrees BTDC. You may find that this much advance causes starting difficulties when the engine is hot, so be sure to check this out! Ignition before top dead centre causes ‘negative torque’ and that's what suddenly STOPS your engine from cranking. Avoid this, or use a retard that is activated during cranking.
Now, you know the two critical points in your advance curve. You only need to figure out how FAST you want the advance to come in. I recommend being conservative, and kick the advance in SLOWLY and see how the engine responds. Keep adjusting it (it requires distributor disassembly) so it comes in quicker and quicker, until you detect detonation (problem). Back it to the previous setting, and you are done. PHEW!
Frankly, though, finding the advance curve using this method isn't practical for most of us. The 009/010 is best used for stock rod ratio engines, where you do not want to do all this customer ignition curve work. Let me first say that I'm not a fan of the 050. The 050 has a different advance curve, and it's more suited for short rod engines (like the Type 4), or engines with a bigger crank and shorter rod (such as 78 stroke with Porsche length rods, etc).
If you are using an out of the box distributor (009/010/050), you have to set the timing as advanced as you can, but at the same time making sure it doesn't detonate at full throttle (where you would have a problem with a centrifugal only distributor).
Problem with this is, you are setting the WHOLE CURVE BASED ON THE MAX TIMING AT ONE PLACE. This in itself is significant. You are finding the point in the rpm range where you can't advance any more, even though at many (all) other rpm points you are probably too retarded! THIS is exactly why setting up a custom distributor advance curve is the ideal solution, but not everyone has the time/patience to set it up. Obviously a fully adjustable setup like a programmable Haltech makes this very easy on a dyno since you just tap a few keys and you are on your way, not like changing springs and weights in the distributor every time you have to make a change.
Ignition Basics
Now I want to cover one MORE ignition topic that is important to consider. The ignition is separated by Primary and Secondary parts. The primary ignition is the low voltage side; points, condenser, etc. The secondary ignition is the high voltage side; coil, cap, rotor, wires, and plugs. The primary side of the ignition is responsible for the triggering of the spark, and the secondary side is responsible FOR the spark.
Primary Ignition
In my opinion, points are obsolete (sorry to be blunt). Unless you like messing around with them, replace them with some sort of magnetic triggering device (Compufire, Pertronix, etc). These do not increase your spark quality (like some claim), compared to a properly operating points triggered ignition. However, they do not deteriorate like conventional points/condenser ignitions. They are exceptionally reliable, and they will be rock steady at all rpms, which cannot be said for points. Basically, the magnetic pickup assures optimum triggering all the time. Simply buy the magnetic pickup points replacement unit and throw the points in the glove box in case you have a problem with the magnetic unit. The MSD distributor comes with the magnetic pickup as part of the distributor, so you don't have to worry about it on that model.
Secondary Ignition
This is another place where large improvements in engine operation can be gained. Frankly, the stock Bosch coil is only adequate to about 2500 rpm, and the spark quality deteriorates from this point and up. The problem is with the coil's primary voltage (12-14V). As engine RPMs increase, there is less time for the primary voltage at the coil to create the required magnetic field that generates the high voltage spark we need at the plugs. There are two solutions: 1) Increase coil current. The problem with this is that you will burn out points (if equipped) much faster, since the coil's current is passing through the points. 2) Increase the coil's primary voltage. This is the solution that Jacob's, Universal, MSD, and other companies have decided to use.
There is no drawback to this solution other than cost. Once the secondary ignition is improved with a GDI or Jacobs, the spark plug gap can be increased to 1.0 mm. Be aware that you may have to re-set your timing, since the larger plug gap and better spark can speed up the time the flame front reaches the piston (detonation). You will find smooth running at all temperatures and INSTANT starting (not like before), with a 10-15% increase in mileage. This savings in fuel will pay for the GDI quickly!
High Output Engines
Another issue that you must be aware of is that high output ignitions MAY have a problem with the small diameter distributor caps on the Bosch units. There is a reason the MSD and Mallory distributors have a large cap, and that is to minimize the possibility of the spark jumping to a contact that it is not intended for! Another problem is that the Bosch rotor has a resistor in it, which WILL burn out in a short period of time if used with a high output ignition. You can dig it out, and solder a solid piece of brass in its place (it's between the tip and the cap contact area).
The Magneto
A last option for ignition system is the Magneto. A magneto is basically a generator, coil, and distributor in one unit. Watch out, they're heavy! These are wonderful products, but they have a VERY limited application. In my opinion, a magneto should ONLY be used in applications that do not have a battery, or that are required to have self-supporting ignition systems (such as aviation). Computer ignition systems have better sparks than magnetos, and magnetos are very heavy and they draw power off the engine to generate their spark. If you have a battery and a computer ignition, the computer automatically steps up the battery voltage to whatever the engine needs even if battery voltage drops to a low level. Having a magneto AND a battery/ generator/alternator is redundant, in my opinion. If the vehicle has no battery, and is externally started, the magneto is the obvious choice.
Distributor Application Summary (the article in a nutshell, without all the details).
Stock Distributor - For stock engines.
SVDA Distributor - For Solex 34-PICT equipped engines.
009/010 - For modified engines, where no ignition fine tuning is desired.
050 - For engines with a relatively short connecting rod. (I personally don't like these distributors).
Mallory - For modified engines where the owner/builder wants to customize the ignition curve.
MSD - For modified engines with a custom ignition curve, magnetic pickup, and that can be easily connected to a MSD ignition unit (5, 6AL, 7AL2/3, etc).
Haltech/Electromotive - For the computer/high tech junkie that wants infinite adjustability in their ignition timing.
Magneto - For engines with no battery or source of electricity (generator/alternator).