
General Volkswagen
Volkswagen’s G-Supercharger
International Beetles
Adapt, Adopt and Improve
The Beetle – What’s In a Name?
VW German Production Plants
You Know What Burns Me Up?
Detailing For Beginners
Photographing Your VW
Mixed Blessings
Car Of The Century
Under Pressure
Understanding Power and Torque
Sticky Moments With Plastic Sheeting
Measuring Fuel Consumption
VW Car Care – Part 1
VW Car Care – Part 2
ETKA for VW Parts
What is NSRR?
In Memory of Gene Berg
SSSSSSteam Heat
Volkswagen W12
Door Handle Key Change
Buying and Restoring a VW
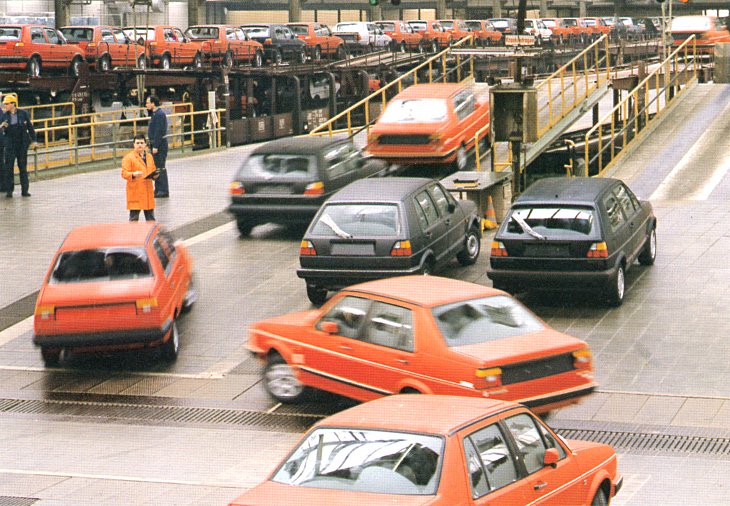
A Volkswagen Factory Tour
Old and New VWs compared
A Short History of Puma sports cars
Power vs Torque
The 100 millionth Volkswagen
Canberra Volkswagen A-Z
Phil’s Volkswagen A-Z
Volkswagen’s G-Supercharger
By Steve Sagud
May 1986
The Frankfurt Motor Show has latterly become a ‘look how clever I am’ contest between the technically more responsible members of the German motor industry. Volkswagen, today one of the foremost among Germany’s interesting and often ingenious car makers, launched its bid for the technical prize 12 days before the show with something expected – the Golf Syncro 4WD – and something unexpected, an intriguing new way of supercharging.
VW is undeniably very bright as carmakers go, yet as a marque it is noticeable for not having a single turbocharged petrol car in its range. For its performance cars it has, since venturing into the hot car class with the Golf GTI, always done the job the classic way with fitting a big enough, powerful enough, healthily breathing, normally aspirated engine. That philosophy has been steadfastly followed, even in the latest Golf/Scirocco GTI 16V where the performance was increased with a ported, free-flowing, better breathing head.
For the performance variant, exhaust-driven turbocharging has taken over in so many other cases, not least at Audi with the brilliant quattro. There is so much to be said for the turbo, especially if the engine to be boosted is of 1.5-litres or more, and/or the amount of boost is high. But turbos have some disadvantages, some of which become more significant on road cars, particularly with small engines.
In nearly every turbo, lag and the lack of bottom end power spoil response and enforce or encourage wasteful down-changing, or driving in one gear too low. For the engineer, there are the considerable problems of extra under-bonnet heat, more expensive manifolding, a more space-consuming engine, turbo controls, and extra weight. Turbo engines are not efficient at low speeds, because the full effective compression ratio is not realised.
Remember that turbocharging is just another way of supercharging, or forcing induction. There are earlier methods which are well known, and which usually get labelled as ‘supercharging’ when today they ought to be called direct-driven superchargers. Talking of mechanical supercharging is not strictly logical, as exhaust-driven turbines are no less mechanical than gear trains or belts.
The Roots type of direct-drive blower, originating before the war and used extensively today in drag racing, has two paddle-like rotors that revolve closely meshing inside a casing. Another type, the vane supercharger, uses radial vanes on a drum turning inside an eccentric casing, the vanes retracting or extending into or out of the drum to allow movement, and create a rotary piston effect.
There was a host of other types of compressors, but these two predominated. They worked, but they had their drawbacks. Both could be noisy aerodynamically, because of the sharp changes of volume, and sometimes mechanically as well. The Roots type’s efficiency fell off as speed mounted, because of the necessary gap between the rotors themselves and the casing, although mechanically it has less excuse to be unreliable. The mechanical side of the vane type was usually its downfall, depending on the lubrication which, if too frugal, affected compressor sealing and, if too liberal, could mean oil in the inlet air, and other mechanical problems. As a general rule, the engine power needed to drive superchargers could become self-defeating.
The strength of the turbo is that although it takes engine power to drive it (via the energy of the exhaust gases), it compensates to some extent in the low friction of its rotor bearing, and in the more ideal cases, with a degree of recovery of the exhaust gas heat energy.
It is a combination of the traditional failings of turbos and their particular drawbacks with smaller engines, allied to Volkswagen’s very understandable preference for a wide torque engine, that prompted it to persist with direct-drive blowers. VW worked with both Roots and vane blowers, confirming their good and bad points, which inspired a further look at something which could be as mechanically reliable as a Roots, and effective in pumping as a vane. VW found it in an old idea – the spiral blower.
A Frenchman, Leon Creux of Paris, patented the principle in 1905. He primarily saw his spiral engine as just that, an engine, driven by an external source of pressurised fluid such as steam. Here the word engine was used in its original sense, for any moving mechanism. Creux’s idea doesn’t seem to have gone anywhere beyond his original patent, probably because of the difficulty of making some of the parts at the time. It is significant that of the five new patents applied for by VW, one concerns the high-speed milling machine developed to finish the spirals.
VW is not the only one to examine the spiral blower. Hitachi of Japan has a spiral-type air conditioning compressor, and others have proposed something similar. But it is Volkswagen who have first applied the idea to a car. And they have done so very thoroughly.
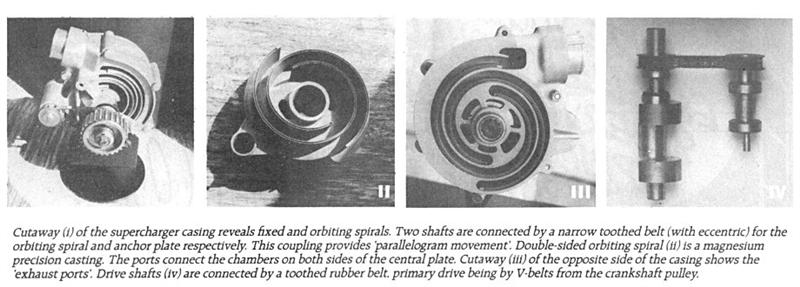
Here’s how it works. Imagine a round cake tin. Cut part of the tin’s side so that it can be pulled away from the round to form a tangential opening into the inside. Cut a strip of, say, aluminium sheet, wide enough to just fit inside the cake tin, and long enough to be wound into 1½ turns of a spiral, which you can then fix into the bottom of the tin.
Find a sheet of Perspex, and cut a disk out of it big enough to cover the cake tin like a lid. Cut a small hole in the centre. Make another slightly smaller spiral, which can be placed inside the cake tin’s spiral, and fix it by one side to the Perspex lid.
Now put the Perspex disk on the open side of the cake tin, so that the one spiral fits inside the other, and the disk rests on the tin, covering the open side and sealing the edge. Arrange the spirals so they just touch each other at their outer ends, and also about 90 degrees around from those ends.
To make this work as a mover of air, the lesser spiral of the Perspex disk – the moving part – has to be moved eccentrically without turning. It’s the same movement as placing your open hand down on the table, and moving your hand in a small circle. Your hand moves in a circle, but it doesn’t rotate.
This causes the two points of contact between the two spirals, and the air space between them, to move around the fixed spiral (the cake tin one). When the air enclosed is moved to the centre, it is forced out of the hole, having passed from the outer opening to the middle.
VW makes this weird-sounding contraption into smooth reality by using precision die-castings, aluminium alloy for the fixed portion and magnesium alloy for the moving spiral, and multiplying by a factor of four. This is done by having what you might call a two-start thread – two spirals within each other on both the fixed and moving components, and also having a second ‘cake tin’ on the other side of the moving part which, of course, has another two spirals on the second side.
To move the inner magnesium alloy set of spirals – called the displacer – eccentrically, it runs on two sealed bearings, the bigger one at the centre, and the smaller outer one in an arm cast on one side. Each of these bearings sits on its own counterbalanced crankshaft, with the two shafts running at the same speed, linked by a cogged belt. The bigger central shaft is twin vee-belt driven off the nose of the engine crankshaft, geared up at 1.7:1.
Since the coefficient of expansion of magnesium and aluminium alloys are not too different, and since there is no great rubbing speed between the two spirals, if they are made accurately enough, they can be run very close at their contact points. The air seal here will tend to be good anyway, because of the long, tapering down gap between the spirals. To minimise the air escaping at the sides, the displacer spirals have grooves in their sides carrying un-lubricated bronze-teflon sealing strips backed by a 0.9mm wide spring. Seal life is likely to be prolonged by the low rubbing speeds, not more than 90mm per second at 10,000 rpm.
VW calls its spiral supercharger the G-Lader.
International Beetles
By Rod Young
May 1987
Specifications of cars vary, depending on the wishes and requirements of customers in different markets, and also depending on local car design regulations. What this means for us is that, wherever you go in the world, you will find Beetles with some very interesting bits that you don’t find at home.
We all know that in countries where VW factories were located, the local product differed substantially from the Wolfsburg variety. You only have to look at Beetle Wreckers’ 1986 Brazilian Beetle to realise that, but German-built VWs also had some diverse parts fitted for various markets that you can find on cars when you travel.
Most of the differences are found on Beetles produced for the US market, due to its stringent safety and exhaust emission laws. I will not concentrate on US vehicles in this article, as it’s a whole story in itself. Let’s look at some other countries.
Cars destined for countries with rough road conditions (including Australia) could be ordered with front axle stiffeners and stiffer rear torsion bars. Quite a few markets received low-compression pistons with a dished crown to cope with low-octane fuel.
On some markets, cars were available with all normally chromed pieces painted black, and that’s not just on VW 1200s but on 1302 and 1303s too. If you want black door handles and blinker housings, as well as windscreen rubbers without a chrome strip, get them off a 1970s 1200 Beetle.
In 1961, Beetles sold in Australia and Italy had small, yellow-blinker taillights that were halfway in size between the pre-1960 red taillights, and the common larger three-part taillight used worldwide after 1962.
1976 Beetles in Australia and Japan had a charcoal canister and throttle dashpot, and Japanese Beetles had fuel injection and exhaust gas recirculation.
Beetles for the Austrian market had a relay that turns on the number plate light whenever the headlight flashers are used.
Italian Beetles had a catch for the front seat back, a parking light warning lamp in the speedo and special front blinker housings with a white lens at the front and an amber lens at the side in a little window.
Denmark and Norway got special add-on front blinkers (which were quite ugly). Some Danish Beetles had a special blinker cover with a wrap-around lens, and very late Beetles for Norway had a catch on the back seat.
Sweden had quite a few oddities. 1967 Beetles had larger reflectors in their brake lights. A convex right-hand mirror was available. The windscreen washer bottle had a reduced air space and an additional air tube. Why? Headlight washers are mandatory, and Swedish Beetles have a huge container, electric pump, and all the appropriate plumbing. Swedish Beetles also have the headlights permanently on with the ignition, and, wait for it, self-adjusting rear brakes!
Beetles for France had yellow headlights and special radio interference suppression.
Swiss Beetles could be had without slits in the engine lid, presumably to keep the snow out, and because cooling is unaffected in such a cold country.
1975 Beetles had a safety steering wheel in Australia, Austria, Switzerland and Japan.
It makes you want to go on a world trip just to get bits for your Beetle, doesn’t it?
Adapt, Adopt and Improve
By Rod Young
November 1987
The Volkswagen-Audi group has never lost that virtuous German way of thinking in that when a new car is developed, as many components as practicable should be taken from the parts shelf. Because of this practical philosophy, early VW models, and I'm thinking mostly of Beetles and Type 3s, can be updated and improved with parts from later, water-cooled cars that fit!
On my own cars I've got rather carried away with this philosophy. Any modification I make, I try to carry out using later VW parts. For example, my Type 3 has a Kombi gearbox and fuel injection. The front oil-cooler grille is modified Kombi, the seats are Passat TS and the instrument panel is Golf! I don't expect many people to go to the sort of trouble that I do, but there are a lot of simple parts which it is possible for anyone to adapt without too much trouble.
Starting with the mechanical bits, the oil filler cap from water-cooled models fits Beetles and Kombis and is easier to remove and install, especially when it's hot and oily. Some distributor caps are the same; most water-cooled motors have neat 90° terminals on the high-tension leads that work well on air-cooled motors, and a plastic dust cover for the distributor that you can pinch too. Type 4 engines, as used on late Kombis, have a wider oil cooler that can be fitted to upright "dog-house" Type 1 motors if the tinware is modified.
Front wheel bearings are the same for ball-joint Beetle, Superbug, Type 3 and Passat rear! Type 3s and Superbugs share the same brake discs, by the way. The Porsche 924 was supposed to have been an Audi originally, and was designed with a lot of VW-Audi off-the-shelf items. This is why it has a Superbug/Type 3 rear end. I am told that a 924 rear sway bar will bolt on to a Superbug or Type 3, and having seen one, I can say that it would work very well, as it bolts on to the trailing arms with no intervening rubbers to deflect, squeak or wear out. You should be able to borrow the entire trailing arms, including disc brakes, from a 944 (if you can afford it!).
Moving inside, a Passat rear bench seat fits Beetles, which is surprising but true. Mirror heads and necks are interchangeable among all models after 1968, so if you want a day/night mirror, get one from a Passat TS, Audi Fox or late Type 3. Inside door handle pulls from Golf fit 1968 and-on air-cooled models and are much nicer. Even brand-new Audi 100 door handles and surrounds are the same parts as Beetles use! Late Type 3s have easily-fitted long arm rests and early Audi 100, Audi Fox and Scirocco have elegant one-piece arm rest/grab handles which look really crash hot on my Type 3. You can use a plastic Golf handbrake cover instead of that difficult, ugly rubber bit on Beetles and Type 3s. You have to cut it away to make room for the heater levers, but then it will last forever instead of being perforated after a short time by the handbrake cables. Ideally you should use the handbrake pivot pin from the Golf too, as it helps to hold the cover in place. '76 Beetles had their own cover. Porsche 924 interior bits reflect the car's VW/Audi origins in the area of switches, door handles, ventilation outlets (Passat) etc., but I will admit that they're not freely available. By the way, those same Passat ventilation outlets fit late-model Transporters. Golfs have the same grab strap/coat hook as later Beetles, but they're black, so if you're going for that all-black interior look...
Electrics offer much scope for improvement with bits from other VW/Audi models. Golf headlight switch and hazard switch are the same as Superbug, and when extra switches are added, such as rear window demist, fog lights, and even the fan switch from an LT truck (!), they pop right in. The Golf cigarette lighter matches 1972 and on Beetle and Type 3 switch knobs. If you can get your hands on any Type 4 parts, they have an illuminated fog light switch and heater switch with the appropriate symbols. A Golf steering wheel fits '76 Beetles, and for those who know what they're doing with wiring, the top part of a Golf steering column can be built into other models, or else 1976/7 Golf blinker and wiper/washer switches can be substituted for late-model Beetle and Type 3 ones (on Type 3s it's much harder, as the levers have a different shape.) I know of an oval-window Beetle which has a Golf steering column which is bolted right in, giving dip switch, windscreen washers and intermittent wiper, and you can even wire up the European parking light system where you can leave on either side parking and tail light together when you park the car.
The Passat TS had some nice bits that have found their way onto many a modified Beetle. For those who dislike Australian VDO gauges, this Passat had a proper German oil-pressure gauge and voltmeter. The oil gauge has a sender unit which incorporates the switch for the warning light - very neat. Golf provides the clock, the early version of which is not VDO but which matches perfectly. And Passat TS seats are some of the nicest which VW has made, though they ain't ever easy to swap to most other cars. Golf seats are good for putting into Beetles with a bit of work, but slot right into '73 Type 3s!
When modifying cars, if you look in the right places and use the appropriate bits, you can make the car look like it came that way from the factory!
The Beetle – What’s In a Name?
By Rod Young
December 1988
We all know Volkswagen's first car as the ‘Beetle’ or ‘Bug’, but have you ever wondered what it is called in other parts of the world? After all, the Beetle was sold in at least 140 countries, more than any other car in history. It has equally endeared itself to the population of all these places, and you can expect to find that people have called it after something cute, though it's certainly not ‘Beetle’ in all languages. The VW's unique and instantly recognised shape is obviously what sets it apart from all other cars. How many other cars are there which are known on everyone's lips by a nickname wherever you go in the world?
The name ‘Beetle’, of course, originated in the US during VW's incredible rise to popularity and the status of a household name. It is fairly obvious, also, that it refers to the insect-shaped appearance of the car. Volkswagen in the US capitalised on the name and used it in their advertising, even going one better themselves with 'Super Beetle' in 1971 (and the very similar 'Superbug' in Australia).
What is less commonly known is that the name, or at least its translation, was re-exported to Germany, where it became known amongst the populace as ‘Käfer’. Volkswagen, in their conservative way, only acknowledged the name relatively recently, persisting for many years with the model names of ‘VW 1200’, ‘VW 1300’, etc., or the more official ‘Type 1’. Such was the popularity of ‘Käfer’ that Volkswagen eventually used the word for their own promotional purposes, and ousted the official names almost completely.
Once ‘Käfer’ came back to Germany, it was only a matter of time before it spread from there, giving rise to the Dutch ‘Kever’, which is obviously similar.
Scandinavia, not too far geographically or linguistically from Germany, coined three new names, all still on the ‘Beetle’ theme. The Danish name is ‘Boblen’, the Norwegian is ‘Bille’ and the Swedish name is ‘Bubla’.
In Czechoslovakia, still close to Germany, ‘Beetle’ is ‘Brouk’.
In France the word is ‘Coccinelle’ which doesn't mean ‘Beetle’ but ‘Lady-bug’, which I think is rather cute. The French were never a nation to be dictated to by the Germans (not for very long anyway), so they had to be a bit different. The word looks a lot like our 'cochineal', which is a red dye extracted from the dead bodies of certain beetles that live on Mexican cactuses. In France, 'Coccinelle' is often shortened to 'Cocc', which sounds like 'cox'.
‘Maggiolino’ is the Italian word for a bug of a different kind - the maybug or cockchafer, but don't ask me exactly what sort of creatures they are.
Spanish has used ‘Escarabajo’ to describe the VW. If you look hard enough, you can see the word ‘Scarab’ in there. You know, the Scarab Beetle.
In Portugal the Beetle is called ‘Carocha’ which unfortunately means ‘cockroach’, though I suppose even cockroaches are likeable to some people. They're certainly running around everywhere and will always be with us.
Portuguese is spoken in Brazil also, but down there in South America, where Beetles really proliferate (VW has about a 50% market share and is the country's largest manufacturing industry) the name is quite different to that of the old country. The word there is ‘Fusca’. Preliminary enquiries in a Portuguese dictionary produced the meaning of "muzzle-loading rifle" which doesn't quite seem to make sense. But they speak a different brand of Portuguese in Brazil, so you could expect the derivation to be something else. It turns out that when the Volkswagen was first introduced to Brazil, people had difficulty pronouncing the foreign-sounding German word. ‘Volkswagen’ was shortened to ‘Volks’, which sounded like ‘folks’. This soon changed to ‘Fusca’ with further usage.
In Thailand, where a few Beetles are to be found, the word used is pronounced "Volk-tau", or something like that. The second part of the word means ‘Beetle’, believe it or not, and just so that nobody got it mixed up, they put ‘Volk-‘ on the front.
In many languages the VW Beetle is known as a turtle. The analogy is obvious - a slow moving, long-lived creature with a rounded, hard shell. All the following languages have assigned "Turtle" to the Beetle. Note that all these countries are also quite some distance from Germany.
The Greek word, then, is χελόν'α, which sounds like ‘helona’.
In the Philippines, where the predominant language is Tagalog, the word for turtle and ‘Beetle’ is ‘Pagong’.
In countries where Arabic is spoken, the Beetle is also a turtle, and the word the locals use (and I can't spell), is pronounced ‘sulhafat’.
In Turkey, the word is ‘Vos Vos’, which also sounds a bit like ‘Volkswagen’, I suppose.
Finally, Bahasa Indonesian is out on its own in calling the VW Beetle ‘kodok’, which means ‘frog’.
If you know the name in any other language, please tell me, I'd like to know.
VW German Production Plants
Translated by Rod Young (1980 VW leaflet)
December 1988
Wolfsburg
The parent plant and administrative headquarters of Volkswagenwerk AG. The Wolfsburg plant produces passenger cars (Golf, Jetta, Polo, Passat) and some of the parts used by other plants in the integrated production process. More than 17,000 machines are used in production. The power station, with a total installed capacity of 365MW, supplies heat and power for both the VW plant and the town of Wolfsburg.
The factory's frontage extends for about 1500 metres along the Mittelland Canal. The continuous-flow conveyor belts of the Wolfsburg plant alone would extend for some 200 km, if placed end-to-end, roughly the distance from Wolfsburg to Berlin. The company’s Research and Development centre, which includes a wind tunnel and a test track, is located at Wolfsburg. The test track is supplemented by another proving ground at Ehra-Lessien in the southern part of the Luneburg Heath.
About 70km of roads connect the various production halls and warehouses with one another. The plant itself has about 67km of railway track on which ten diesel-shunting engines (the most powerful has an output of 1,000kW) make up the trains composed of two-tier cars on which new Volkswagens leave the factory.
A train with a total length of 700 metres can carry a maximum of 300 Volkswagens. Most incoming materials (sheet metal, tyres, raw materials, etc) are sent to the plant by rail, as are engines from Salzgitter, transmissions from Kassel and front axles from Braunschweig. The Volkswagenwerk receives only coal and oil by water (via the Mittelland Canal).
Hannover
All the various models of the VW Transporter have been manufactured here since 1956, and since 1975 the LT Commercial has also been produced here. In 1959 production of all air-cooled engines was moved from Wolfsburg to Hannover. Nowadays Hannover produces some of the water-cooled engines and the M.A.N. trucks as well. VW s Hannover factory is the largest industrial plant in the capital of Lower Saxony.
Kassel
Since 1958 transmissions and service parts for all models have been produced at the Kassel VW factory, and this is also the factory where engines and transmissions are reconditioned.
Braunschweig
Axle units are produced here for all VW models as well as special tools and equipment for use in other plants. The Braunschweig VW plant began operations back in 1938.
Emden
The plant, which began operations in 1964, assembles the Passat and Audi 80 models that to a great extent are destined for export markets. More than 55 million new vehicles have already been shipped from Emden Outer Harbour.
Salzgitter
After a construction period of only one year, the youngest VW factory in Germany was ready for production in the summer of 1970. The water-cooled engines, required by the whole VW group, are produced here.
Audi NSU Auto Union AG, with its main plants in Ingolstadt and Neckarsulm, is the most important subsidiary company within the VW Group in Germany.
The results of the partitioning of Germany after World War Two saw all of Auto Union's production facilities in Russian-controlled territory, and therefore unusable. In 1945 a central parts depot was set up in Ingolstadt to service existing Auto Union vehicles. Today Ingolstadt is the seat of Audi's administration and the production centre for the Audi 80, 90 and 100.
The origins of Audi's Neckarsulm plant go back to 1880. Originally a timber and gypsum mill, it became a knitting machine factory, then a bicycle and motorcycle production facility and finally, in 1906, a motor-vehicle-producing plant. The factory was eventually to become the source of all NSU cars. In 1969 NSU became part of Audi NSU Auto Union AG. Today the Audi 100 and Porsche 944 are made there.
Production in Volkswagen plants is carried out on a two-shift basis. Machines and conveyor belts are at a standstill from 10:30 pm to 5:30 am when maintenance may take place. There are only a few sectors (power house, foundry and hardening shop) that are exceptions to this rule.
You Know What Burns Me Up?
By Rod Young
July 1989
A funny thing happened to me today – I caught fire. Now this isn’t an everyday occurrence, except when I eat Mexican food, but it has happened to me enough times in the past while using oxy-acetylene gear on VWs that I’ve had to wonder if I was doing something wrong. Has anybody else experienced spontaneous combustion?
I had just welded up a flange on an exhaust system and had started to weld the opposite flange, so the red-hot bit I had just done was close behind me. My back must have been just that bit too close, because I started smelling burning cloth. “Strange,” I thought, “what could that be?” The answer soon became available in an acutely painful fashion and no amount of brushing the flames on my back could extinguish the smoking overalls.
Fortunately a tap was nearby and I managed to put myself out fairly quickly. I don’t let these things worry me, and thirty seconds later I was welding again. The mild burn on my back I can put up with, the bruise on my thigh where I slipped in my haste to quench the flames will heal, but what really burns me up is that I was wearing my favourite Club VW sloppy joe underneath.
What I have learnt from this episode, even though not everyone would agree with the advice, is that thick protective clothing is not necessarily the way to go when welding. If you’re wearing shorts and a T-shirt, you know it when you get too close to a source of heat and can react immediately. Also, flimsy clothes are easy to rip off, and we’re not talking flames of passion here.
Another anecdote illustrates my point equally well. Many years ago I was doing some brazing on a Beetle. I had only just started learning the technique and tended to load too much brass on. Consequently, a big blob of molten brass rolled off and dropped right into my steel-capped boot. I tried sitting down and putting my leg in the air, hoping the molten metal would roll back out the way it went in, but by this time my nylon sock had melted and was stuck to the flesh of my ankle. I had that boot off as quick as the ring pull off a tinny. Actually, a tinny would have been quite handy right then. I was walking around barefoot for a few days after that. If I had been wearing thongs, it would have been much less serious.
I’ve been equally as silly on a number of other occasions. The following advice is the product of experience: don’t weld fuel tanks! You can never clean out the vapours entirely. The first time I did so, I had left the tank of my Beetle in the sun all day with the fuel gauge sender out, and it was dry. I wanted to braze a fitting into it to use as a fuel return. As soon as the temperature was hot enough for the brass to flow, BOOOF! – a big blast of combustion gas shot through the sender hole past my head. I managed to complete the job, and the tank is still in use, though the top of it bulges up a bit due to the rapid rise in pressure, so when the fuel gauge shows empty I still have a little bit in reserve.
The second time I tried it, I was a bit more wary. I wanted to put a second tank into the back of my Type 3, and had to relocate the filler. This time I filled the tank to the brim with water, and each time before attempting to braze, I played the flame into the cavity of the tank, the result being an impressive flame blowing out each time. This worked quite well, and I thought I had finished the job. On closer inspection there was one little porous spot, and I wanted perfection. I only wanted to apply the flame for a few seconds, and it was hard to see, so I put my head close. This time another impressive flame shot out, right into my hair. The smell of singed hair is stomach turning, and lasts for quite a long time. It got pretty boring explaining to people how I came to lose my fringe, and the barber thought it was a great joke. If you have to modify a fuel tank, solder it!
Be careful when welding exhaust systems too, as there is often a combustible mixture left inside. Point all holes away from your body.
The final precaution to be aware of is when welding gear levers. I wanted to lengthen the gearstick on my Type 3 and had to weld the pieces together. VW gearsticks are hollow, and some grease must make its way inside. The end of the lever was pointing towards my chest, and when the joint heated up, the gearstick went off like a gunshot, right through my T-shirt, leaving a hole, a large black stain, a sore spot and a terrible stench.
Be careful, and I hope I can learn to follow my own advice.
Detailing For Beginners
By Boris Orazem
April 1990
By the time you read this issue of your club magazine, the Nationals will be over for another year. Did you just miss out on that trophy you really wanted? Here are a few tips that will help win it for you next time you show your VW.
A few assumptions have been made; that you will enter the correct category, that your VW is already more like a silk purse than a sow's ear, and that it has the correct parts and accessories for its year model.
This is one situation where cleanliness really is next to Godliness. Judging is usu¬ally based around equally weighted marks for engine, underbody, interior and exterior, with a smaller fifth mark for overall imp¬ression. A ‘hard’ judge will be equally hard on everyone, so this is not a factor. An imm¬aculately clean but slightly ‘lived in’ car will always score better than a dirty one which has just undergone a ground-up restoration.
Set yourself aside a couple of hours for this job. A tip from Dave Birchall is to put those tinnies in the 'fridge now because you will need them by the time you are finished! Results in this case are definitely proportional to the time spent.
Begin with the two dirtiest tasks. Thoroughly soak the engine, top and bottom, with your favourite gunk remover, be it kerosene, degreaser or whatever. Use a paintbrush to work the cleaner into all nooks and crannies. That ‘shaggy dog’ toothbrush you were about to throw into the garbage may come in handy for areas such as the carby and the fins in the sump. Don't for¬get the valve covers and the heat exchangers! While the degreaser is soaking in, jack each side of the car up in turn. Remove each wheel, clean the inner rim, and dress the inner tyre sidewall with Armorall or a similar product. Use a long handled brush or an old broom to wash the underside of the floor pan and the suspension components with warm soapy water. If your wheel wells are painted the same colour as the body of the car, scrub each one with a stiff brush. Do this until all road grime is washed away. Remove any tar spots with kerosene or tar and bug remover. Later, you could polish this ar¬ea when you wax the rest of the car. No kid¬ding!
If the wheel wells are painted in under¬body sealer, remove any caked-on mud, and at a later stage spray with matte black. The areas to be sprayed must be completely dry to do this, otherwise the paint will dry to a light grey, looking very much like the road grime you are trying to hide/eliminate. Watch overspray!
When the under-carriage is completely clean, wash the engine down (protect distributor and coil from water) and hose under the whole car, including the wheel arches. Did you remember to clean inside the engine lid? Now wet the whole car in preparation for washing.
Wash the car from top to bottom, a panel at a time, using as little soap as you can get away with, as detergent encourages rust! Be sure to wash under the windscreen wipers, the inside of the bumper bars, the lips of the wheel arches, and the underside of the running boards on a Beetle. When the job is done, chamois the car dry. Use a different chamois on the glass to avoid getting old wax from the body on the windows.
Inside the car, the first thing to do is vacuum the carpet or clean the rubber mats. This is best done with the seats removed. Then clean the headliner, seats and door tr¬ims with soapy water or a ‘spray and wipe’ cleaner. Do not wet things too much though, as stitching may rot at a later date. Sham¬poo any spots on the carpet. Break out the Armorall again, and treat the steering wh¬eel, dash knobs, padding, pedal rubbers (do not make these too slippery!), floor matting and inside window rubbers.
Open the glove box and remove everything, then clean it. Clean the door jambs, paying special attention to the hinges, inside and out, and the door latch area.
Back outside, remove all tar and bugs. Now the car is ready for waxing. You will also need a ‘No.2’ or mild cutting polish to remo¬ve scratches from under the door handles, and any kick marks around the door frames inside. Also polish and/or wax inside the boot lid, any visible painted metal inside the boot, inside the engine lid, and the pa¬inted metal inside the car. Avoid letting wax residue lodge in fender beading or body seams, but use a clean paintbrush to remove it if you do.
Did you buy a large bottle of Armorall? Now you need it again! With a rag wrapped around the index finger, use it on all exterior body rubber, keeping it off both paint and glass. Use it on the boot and eng¬ine compartment seals, bumper grommets, tail light seals etc. Now go to the engine comp¬artment and dress any plastic or rubber parts (NOT the fan belt!) While you have it out, also do the tyres, including the spare. Did you think to clean the spare tyre comp-artment?
If the metal parts of the engine look a bit dull, try some metal polish, mag wheel cleaner, or cutting compound. Tail light len¬ses that have gone matte will respond to ‘Brasso’. Paper/aluminium heater tubing will come up like new with matte tyre black. Wir¬ing harnesses can be cleaned with a rag slightly wet with lacquer thinners.
Finally, clean the windows inside and out with methylated spirits and newspaper (the best!), or any window cleaner.
Your car will now look very impressive indeed and you will be a serious contender for that trophy. You will also find that once a car is this clean it will be easy to keep it that way.
Photographing Your VW
By Michael Rochfort
September 1990
You've finally got your VW looking its best. Now you would like to record the moment for posterity, or perhaps you would like a nicely framed poster above the mantelpiece. Let's assume two things:- (1) You have a basic knowledge of photography, and (2) You have read your camera's instruction book.
Cameras are like cars: The less automatic they are, the better. The minimum requirement for good, sharp photographs would be a 35mm single lens reflex or range finder camera capable of manual focus and exposure adjustments. Auto focus cameras sometimes have trouble with shiny objects such as highly polished cars, and compact cameras using this system sometimes only pick a focus ‘zone’ - not very accurate. Similarly, auto exposure camera can't tell the difference between a white subject and a black one, but ‘average’ everything to grey. This works for most subjects, but in about 15% of cases you will have an ‘average’ result. Turn your auto exposure, auto focus camera onto manual, if it has this facility, and interpret the meter readings.
If your camera has interchangeable lenses, stick to one around the standard range (50mm lens on 35mm camera, or a 200m which includes this focal length). Only use wide-angle lenses (35, 28, 24mm etc) if you deliberately want the perspective distortion they provide. A Beetle, for example, is such a familiar shape to most people that a distorted one will look strange. Shorter telephoto lenses (85, 100 or 135mm) can be used for a flattened perspective, and work particularly well for a full side profile or full frontal photograph.
The exposure to light that the film receives is one factor that determines the quality of the photograph. Exposure consists of how much light (the lens aperture, or ‘F number’) and for how long (the shutter speed). For any given light level there are a number of equivalent combinations available. The shutter speed should be kept about l/125th sec. to reduce camera movement during exposure, or better still, use a tripod even at this speed. For a subject that has depth, such as a VW, as previously mentioned the lens aperture is best kept to a number of f8 or smaller (f11, f16 etc). This will ensure that the whole car is in sharp focus, especially if you focus on a point 1/3 into the depth of the subject.
A light meter will under expose a (white) light subject and over expose a dark one if your subject fills the frame (which it should!), so make adjustments of 1 ‘stop’ in each case.
Your choice of film is dependent on the ultimate size of the required photograph. For prints up to 8” x 10”, 100ASA film is fine. For larger prints or ultra sharp smaller ones, use a 25ASA film such as Ilford Pan-f in black and white, or Kodak Ektar 25 in colour. Slow film will probably require the use of a tripod, as the shutter speed will be very low to obtain the right depth of focus in the best lighting. For transparencies, go the whole hog and use Kodachrome 25 with the camera on a tripod, releasing the shutter with a cable or the camera's self-timer. For action shots, you will need a higher speed film to obtain the required shutter speed, especially if a telephoto lens is used, but don't be surprised at the grainy results!
The best light for photographing your VW is in the open on an overcast day or in complete shade. As our recent VW events have been damp affair, this should cause no problem. Rain on a well-waxed car can look very good! The worst light is a cloudless sunny day. In this light, shadows are too dark for any film to record with detail and reflections are worse. If you have no alternative, use a polarising filter. Full sun will result in an exposure of 1/ 250th sec @ f11, on 100ASA, while overcast or shade will be about 1/ 30th or 1/ 60th.
After you have found a nice setting to photograph your VW, watch the background. No poles sticking out of the middle of the roof or dogs cocking their legs against that background tree! Fill the frame as much as possible unless you want to show more of the surroundings. Most VWs look best from a slightly high angle in a front view. Have the car (you may need a step ladder for a Kombi) pointing from left to right, as a subject looks more dynamic this way, believe it or not. Next time you see a car ad on TV, watch the vehicles overtake uphill moving left to right. Don't they look fast?
When your prints are collected from the lab, don't be surprised if the colour is not entirely perfect. The person who printed the photographs does not know the exact colour of your car, and has to take an educated guess. There are also some limitations with the photographic process, with yellow being a particularly hard colour to print. Pastels can also cause problems. Do not automatically assume that bad prints are necessarily your mistake, however, because some labs will adopt a ‘Just Bang ‘em Through’ policy if they are lazy or busy. Most will be only be too happy to re-print them, though.
For enlargements, pick very sharp negatives as any fault will be magnified as the print size is increased. If you have the choice, do not select glossy surface prints for display. If you have no choice, display glossy prints in frames with non-reflecting glass.
These few points should result in your obtaining some great pictures of your VW. They can also be of course applied to any subject, such as the house, your family and even non-VW cars!
Mixed Blessings
By Rod Young
October 1990
The VW Beetle must be one of the cheapest cars to keep on the road, due in part to the fact that cheap replacement parts are available from a variety of outlets.
Many of these inexpensive parts are of Brazilian origin, which is understandable when you consider the number of Beetles that have been made in Brazil - VW has had around a 50% market share in Brazil.
Brazilian parts have gained a reputation for being of not the highest quality - a case of ‘you get what you pay for’. I'm not talking about the genuine VW variety of parts here - these have to conform to VW’s own quality standards, and some dealer-supplied parts available here are in fact made in Brazil. Rather, it's the after-market parts, which come with a wide variety of brand names.
By the way, the way to spot the country of origin is not hard. ‘Made in West Germany’, or more recently ‘Made in Germany’ is self-explanatory, but the South American part has "Ind. Bras." stamped, embossed, moulded, painted or otherwise marked on it.
I've often been amazed how some of the more awful Brazilian parts have managed to stay on the market here, considering that we own German cars and presumably bought them because we value German design, engineering and quality. That must only be a minority of us, because I've heard it said from a number of sources that VW owners are the most ‘tight’ of all and will most often go for the cheap part, even when it may only last weeks or months, proving to be a false economy. So, like the cheapest of Taiwanese tools, these parts are still around because there is a market for them; even if a customer buys one product and then finds it's junk and doesn't buy more of them, it has been sold, and in enough quantity to make it worthwhile for more to be brought in.
The other thing sustaining sales of Brazilian parts is where car yards or owners go for the cheapest possible parts in order to make repairs before the car is sold. Then it's the new owner's responsibility.
On the other hand, some parts are so much cheaper than their German equivalents that you could afford to replace them a number of times and still have paid less, as long as you don't count your time.
Not all Brazilian parts are undesirable, of course, and I would like to try and make this article into a public service by informing you of which parts to go for and which to steer clear of. There is a danger in this, because:
1. I may be wrong.
2. The quality may have improved since I last came up against them.
3. Sometimes it's difficult to ascertain the longevity of certain products.
I think I'll make this list alphabetical:
Bumper bars: Thinner than stock, both in the steel and the chrome. You'll need regular wax to keep these looking good, unless you like brown spots.
Carburettors: Kadron carbs are Solex-licensed, I think. The kits are very complete, the linkage well designed and they run really well. No brickbats!
Clutches: Driven plates seem to be OK, but I have run up against shuddering from Brazilian pressure plates.
Distributors: I'm not sure if they're still available, but the Resolit 009 copies wear out their bearings pretty quickly.
Door Mirrors: These are rather nice black plastic which look more modern than German stainless. Unfortunately, on at least one brand the plastic gets affected by ultra-violet and goes chalky, so would need regular protection.
Door Rubber Seals: One type I've seen last a matter of weeks, then break up. Avoid like the plague. Another Brazilian type is much better. Buy the more expensive ones.
Engine Mounts: Very soft, which is not desirable, as engine and gearbox move around too much. Go German, but expect to really pay for gearbox mount.
Engine Seal Rubbers: These last about six months before they crack up from heat.
Exhaust Systems: Some standard-type mufflers are very thin and don't last long. Kadron brand are nice and heavy and last better. The Kadron four-into-one extractors have a collector where exhaust gases have to do a 90 degree bend, but they do last.
Exhaust Valves: TRW are OK.
Floorpan Sections: These work well, but are very lightweight. Beware - the paint is for protection during shipping only.
Fuel Pumps: A few different brands here, one a straight copy of the early stocker and one a weirdo-looking pump. They seem to work all right, but I once came across one which dropped an inlet valve, with frustrating consequences.
Gasket Sets: Not as accurate or elegant as German ones, but, they work, except for pushrod seals, which leak after a while. Not worth it!
Hubcaps: See bumper bars.
Oil Pumps: They seem to last OK. My Schadek dry-sump pump is still going strong after nine years.
Pistons/Cylinders: Cofap make standard sizes and these are OK. Cima are under license to the German Mahle, use forged pistons and most people have had good results.
Running Boards: There are at least two types - the thin ones which bend when you put your foot on them and the heavier, but dearer ones, which are perfectly acceptable. If you can't ride around on a running board with a sub-machine gun, what's the point?
Shock Absorbers: Good results have been reported with Cofap ones.
Steering Boxes: The TRW ones have given good results, as far as I know.
Tail Lights: The Polimatic ones look good and last, but the reflectors do not work! My Beetle was involved in a hit-and-run accident at night last year, and I partially blame the tail lights.
Car Of The Century
By Dave Long
February 1991
The original 1938 Beetle has been elevated by an international panel of specialist motoring writers to the position of 'Car Of The Century’!
Zeitschrift usually manages to keep Club VW members and all its readers informed of happenings in the world of Volkswagen and its Audi partners, though it isn't often we can bring you news of this magnitude.
There are those who will say that a different panel of experts could well have voted differently, but the fact remains that a majority of this particular 100 writers, many eminent in their field, did.
The Beetle topped the poll with 22 votes, followed by Model T Ford 19 votes, Citroen DS19 12 votes, Mini 11 votes, Porsche 911 6 votes, and 1886 Daimler, Light 15 Citroen and Citroen 2CV, three votes each. After that, with two votes each were Bugatti 35, Chevrolet Corvette, Mercedes SSK, Mercedes 300SL, and Volkswagen Golf GTI.
Down on one vote each among the finishers were the BMW Z1, NSU Ro80, AC Cobra 427, Duesenberg J, Bugatti 57, Citroen XM, Renault Espace, Cisitalia 202, Ferrari F40, Lancia Lambda and Honda Civic.
The voting field consisted initially of 100 cars, nominated arbitrarily by the sponsor of the poll, Auto Moto magazine of France.
This quest was the brainchild of Lionel Robert, Editor, Auto Moto of France, a leading motoring publication; journalists took part by invitation in 1990, and had until 5th November to get their nominations in.
There were three categories to be decided: Popular Cars (the main category), Technological Discoveries, and Glamour/Sport.
Auto Moto chose the Hundred cars from which selections were to be made, by following only two major guidelines - that they should be mass-production passenger vehicles, and had been for sale to the general public.
Pedr Davis, who syndicates motoring information to a wide variety of journals throughout Australia via his organisation, Automotive News Service, first alerted us to the fact and kindly supplied detailed material, which formed the basis of this report.
Though an obvious Volkswagen enthusiast, judging by the affection evident in any of his references to the model, his vote was given to the Ford T, with Beetle second, and Mini third. Shame! Shame!
The international jury was drawn from 37 countries around the world, in North and South' America, Europe and Scandinavia, Africa, South East Asia, the Soviet Union, Asia and Australasia.
They also chose 'Car Manufacturer of the Century', won by Citroen, with Volkswagen fourth (and Ferrari ninth!)
In the Popular Car section (as distinct from Car Of The Century), Volkswagen was edged out by the T-Model Ford, with the Mini third. Exactly as Mr. P Davis voted - he must be stoked! The Golf GTI came sixth in this contest.
In 'Technological Events', our ‘Family’ achieved second with the Audi Quattro, and fourth the NSU Ro80. Joint 25th (last) was the Meyers Manx beach buggy, if you count that as usually having a VW engine.
We drew a blank in the ‘Prestige et Sport’ category, although cousin Porsche was declared Winner.
I asked Pedr Davis for his opinion of the ‘status’ of this achievement for VW, since it could easily be argued that the conclusions of an ‘unofficial’ poll by a magazine little-known outside France could hardly be acclaimed as a consensus of world opinion.
He pointed out that the panel included some big names from many of the most respected international publications.
The only criticism, he said, could be that the group of 100 was top-heavy with Europeans, so it could be assumed they would be more likely to vote for a European car.
By the way (since this is an after-thought, and the only place I could squeeze it in), in the details of his nominations for the contest, Pedr Davis gave as his reason for choosing the Beetle, that it had “made the ownership of small cars fashionable and desirable.”
So make the most of it, guys, not every year is your pet car’s ancestor chosen as the greatest since the birth of the automobile!
Under Pressure
By Phil Matthews and Steve Carter
March 1992
Anybody reading the August 1991 issue of VW Trends would have been made aware of the new programmable EFI system available for the VW flat-four, and sold by C.B. Performance. The article went into great lengths to explain the benefits of the new svstem: its rugged and compact design, ease of installation and, of course, much improved performance over carburettors.
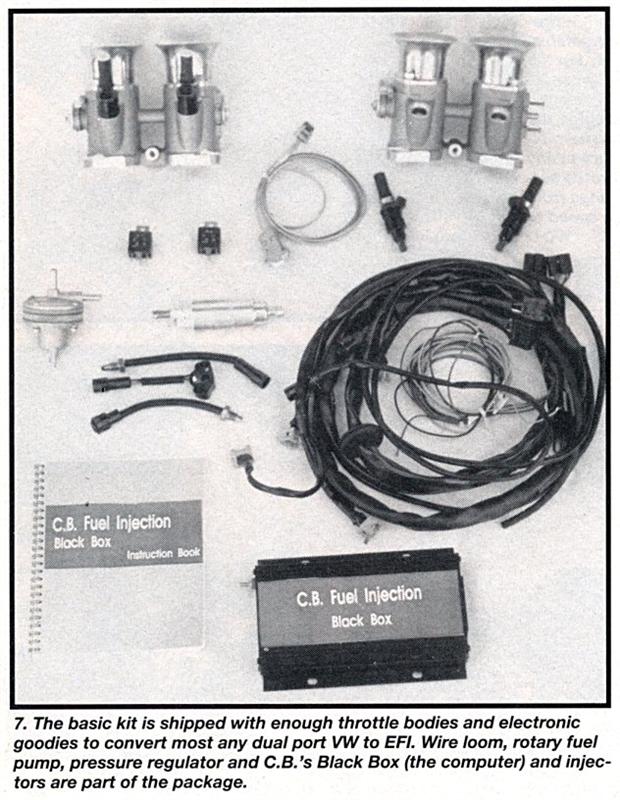
The basic kit is shipped with throttle bodies and enough electronic goodies to convert most any dual-port VW to EFI. Wire loom, rotary fuel pump, pressure regulator and C.B.'s black box computer and injectors are part of the package.
What the article did not say was that the ECM (Electronic Control Module) or ‘black box’, controlling the system was actually designed and developed right here in Australia, and is known locally as the ‘Haltec’.
Simply put, the Haltec system (and most factory EFI systems) utilizes a constant supply pressure of fuel available at the injector. The volume of fuel delivered to the engine is adjusted over the rev range by varying the length of time the solenoid on the injector is held open.
The article was, however, slightly misleading when it said the method of rating fuel injectors is by, “measuring the flow through them over a 60 second period at a base pressure of 40 psi,” and arriving at an answer in kpa (??). According to the writer Jack Napier, “Kpa is a method of rating fuel injectors.” (?!) For example, at a rated system pressure of 40 psi, he gives an ‘injector rating’ of 275 kpa.
Typical nonsense from the Americans, the last bastion of anti-metric thinking! In reality, both psi and kPa are simply different units for measuring the same thing - pressure. 40 psi IS THE SAME as 275 kPa.
To eliminate some of the obvious confusion surrounding pressure and its use in today’s metricated society, it might be timely to discuss some of the different units of pressure you may come across. In case there are any Americans reading (Howdy, guys) this is a good chance for you to get with it and get up-to-date!
Pressure, firstly, is simply defined as a force per unit area acting on a surface. The SI (System International standard) unit of area is the square metre, as you’d expect, while the SI unit of force is the Newton (named after the great scientist, Sir Isaac Newton). But hang on - in old measurement, force was measured in pounds, so shouldn't force now be in ‘kilograms force’?
No! This was one problem of the unscientific imperial system. The kilogram is a unit of mass, which is the quantity of matter in a physical body, and reflected by its inertia. The more massive something is, the more matter it contains and the harder it is to move. Weight, on the other hand, is just a measure of the gravitational force by which something is attracted to the Earth. This is NOT the same as mass.
Remember what the Apollo astronauts found? Their weight on the moon was only 17% (about one-sixth) what it was on earth, because the moon’s gravity only pulled them down 17% as strongly as the Earth does. But their inertia - their mass - was exactly the same. On the moon it was much easier to lift a heavy toolbox up against the weaker gravity, but it was just as hard to push it sideways. The inertia – the mass – of the toolbox hadn’t changed.
Remember the old rule, force = mass x acceleration? Well, when you drop something on earth it accelerates at 9.8 metres per second per second. Therefore, if you have a mass of 60 kg you actually ‘weigh’ 60 x 9.8 = 588 Newtons. You don't ‘weigh’ 60 kg! Scales are calibrated in kg purely for convenience - they will actually vary, depending on your altitude above sea level. Gravity decreases with the square of the distance from the centre of the earth. Something ‘weighing’ 100 kg (980 N) at sea level will actually only ‘weigh’ 99.72 kg (977 N) on top of Mount Everest, because it’s further from the Earth’s centre. Its mass, of course, is still 100 kg.
OK. Now we know that force is measured only in Newtons, we can see that pressure should be measured in Newtons per square metre, and it is. However, for convenience one Newton per square metre is called a Pascal (Pa), the SI unit of pressure. It’s named after the French scientist, Blaise Pascal (1623-1662), who did pioneering work in hydraulics and fluid pressure.
Unfortunately, one Pascal is a very small unit of pressure. One Newton is the weight of a 102 g apple at sea level, and if you imagine that apple pulped and spread over a square metre it gives you some idea of how little 1 Pa is. For day-to-day pressures, we need to use kilopascals - kPa - or lots of 1000 Pa. Thus, a typical atmospheric pressure is 101 kPa (101,000 Pa), or you might pump up your Kombi’s tyres to 250 kPa (250,000 Pa). Once you start getting into still higher pressures - millions of Pascals - then you use MegaPascals (MPa).
Atmospheric pressure used to be measured in bars or millibars, which is an older, now-obsolete metric system where one bar equals one million dynes per square centimetre. One bar equals 100,000 Pa, so they are easily converted. For convenience, we now say that 1016 millibars is 1016 hectopascals (hPa), where hecto is the metric prefix meaning 100 x. Which means of course there are 10 Hpa in one kPa.
Speaking of atmospheres, that brings us to another couple of old units. One 'standard atmosphere' is defined as 101,325 Pa, or 1013.25 hPa, but this is also the amount of pressure that will support a column of mercury 760 mm high (29.92 inches) at sea level, and also a column of water 10.33 m (33.9 ft) under the same conditions. A further subdivision is that one torr equals 1/760 atmospheres, or 1 mm Hg. Finally, there’s our old friend the lonely pound per square inch (psi), of which there are 14.72 in one atmosphere. There are 0.145 psi in 1 kPa. Multiply psi by 6.895 to convert to kPa.
There's one more unit we nearly forgot, which is the kilogram per square centimetre (kg/cm2), which you might spot on some German oil pressure gauges. They really should know better. Remember you can’t use kg for a measure of force. This misleading unit is simply a kPa adjusted for gravity and smaller area, so that there are 98.06 kPa in 1 kg/cm2.
One more thing to remember with pressures is that absolute pressure is measured up from zero pressure. Gauge pressure is the pressure measured with a gauge in excess of the pressure of the atmosphere.
Here's a conversion chart to convert the old units to kPa, and vice versa. Eg. to convert 26 psi to kPa, multiply by 6.895:
psi x 6.895 = kPa
kg/cm2 x 98.06 = kPa
bar x 100 = kPa
atm x 101.32 = kPa
torr x 0.133 = kPa
To go back the other way, divide the kPa figure by the factor above to revert to old measures.
One interesting thing you might notice - one atmosphere is approximately equal to 1 kg/cm2 (1.033); 100 kPa (101.32) or 1 bar (1.0132). Isn’t that a useful thing to know! You'd imagine it was designed that way, but it's purely a coincidence, since as we've seen they're all worked out differently. And. of course, the Americans are out of step with their 14.7 psi.
Here’s a slight digression on the subject of imperial v metric measurements. I was at the gym the other week, and was discussing with a 20 year-old friend how much weight he was using on his barbells for a particular exercise. He replied such and such ‘El Bees’. It seems he did not know that ‘lbs’ meant pounds; well, why would you? Thankfully it isn’t taught any more at school, and there's no ‘L’ or ‘B’ in the spelling of pound. In fact, the ‘lb’ comes from the Latin ‘libra pondo’, meaning pound in weight, as used by the Romans. Ounce (oz) also comes from Latin, uncia, meaning twelfth part, and became unce in Olde English. The word inch comes from the same Latin word, but changed to ynce in Olde English. At least an inch still means ‘twelfth part’, which is more than you can say for the ounce, which got changed to a sixteenth part of the pound somewhere along the way. Makes you feel a bit old, does it not?
Understanding Power and Torque
By Phil Matthews
June 1992
You probably have a good idea what we mean when we talk about a car engine’s ‘power’. But what does ‘torque’ mean? Is it the same or different from power? Are the two connected? If so, how is it worked out? If you’ve ever wondered about any of that, hopefully this article will make things clearer.
If you didn’t study physics at school you might be feeling a bit lost, so we’ll start at the beginning. We always use the basic metric (SI) units for mass, distance and time, and you already know them. It's easy to picture what a metre, a kilogram and a second is in your mind, isn’t it? That's all we need to move on.
Speed is simply the distance covered by a moving object, divided by the time taken; that is, the rate at which the distance is travelled. It is measured, not surprisingly, in metres per second (ms-1). There is a subtle difference between speed and velocity; velocity is speed in a specified direction, and is therefore called a ‘vector’ quantity - but we don’t have to worry about that.
Similarly, acceleration is the rate at which speed, or velocity, changes. Thus, it is simply the change in speed divided by the time taken for the change. It is measured in metres per second per second (ms-2). For example, an object dropped on earth accelerates at 9.81 ms-2 due to gravity. Every second it is going 9.81 ms-1 faster than it was before.
The great scientist Sir Isaac Newton (1642-1727) tells us that nothing can accelerate by itself. To do so, something always has to act on it - a force - to cause the object to either speed up or slow down. This is Newton's first law of motion. Furthermore, a force of a given strength acting on a certain mass will always give a proportional acceleration. This is Newton's second law of motion.
Put simply, Force = Mass x Acceleration. From this little rule, we can see that 1 kg having an acceleration of 1 ms-2 must have a force of 1 kgms-2 acting on it. To simplify things, this amount of force (1 kgms-2) is defined as 1 Newton (N), the derived SI unit of force. A force if 1 Newton, applied to a mass if 1 kg, will make it accelerate at 1 ms-2. So, that 1 kg object falling to earth at 9.81 ms-2 must therefore have 9.81 N of gravitational force acting on it.
So straight-line stuff is pretty easy. A force acting on something results in acceleration. Car engines are a bit more complicated, as the internal parts rotate, rather than travel in straight lines. Your VW's engine does create a straight-line force when the piston is pushed downwards on the combustion stroke. But that force is then transferred into rotation of the crankshaft by the connecting rod. To measure the amount of force your engine is creating, we must measure the ‘rotating force’ on the crankshaft, which is called ‘torque’.
Consider what happens when you tighten a bolt with a spanner. You apply a force to the end of the spanner, not over the bolt head. Because the force you apply is some distance from the bolt, you’re applying a rotating force - a ‘moment’ of force, as it is known. If you apply 1 N of force at the end of an imaginary 1 m-long giant spanner, then you are applying 1 ‘Newton-metre’ (Nm) of torque (turning force) to the bolt. Similarly, you could apply 5 N to a 200 mm-long spanner; the result is still 1 Nm at the bolt.
Of course, if you still think in terms of lb-ft torque (shame on you), then that's like a one lb force acting on a one-foot spanner. Multiply lb-ft figures by 1.356 to convert to Nm.
It's important to realise that torque can be applied both to objects that are either locked, or able to be turned. Imagine you have two bolts, one good one and one that is rusted tight. You can apply the same torque to both, but the frozen bolt doesn't turn. You could apply more and more torque to the frozen bolt until you exceed its mechanical strength and it breaks off. The good bolt, however, will turn when enough torque is applied to overcome the small resistance in the thread.
Machines like steam traction engines and gas turbines are able to produce maximum force (and thus torque) when their output shafts are stationary. The effect is similar to an auto transmission being held in gear at high RPM against the brakes. Car engines have a different behaviour. They don’t produce a smooth ‘continual’ force like a turbine does, but instead produce pulses of power as each cylinder fires in turn. The engine actually free-wheels around between each of the separate combustion events. The more cylinders the engine has, the closer together the individual firings are and the smoother the engine will be. A VW engine for example has four cylinders, and all four of them fire in turn over two rotations of the crankshaft. One every half-turn. The firing order is arranged to maximise the balance and smoothness, and the weight of the flywheel helps too. An eight-cylinder engine has twice as many separate pulses per rotation, and a twelve-cylinder three times, so they are inherently smoother.
All piston engines, no matter how many cylinders, produce their power in pulses as each cylinder fires in turn. Because the force applied is not constant, we can’t work out piston engine torque as easily as we did with spanners. We need a dynamometer.
A dynamometer is a braking unit that attaches to engine, and has a calibrated scale attached to it. Varying amounts of braking force can be applied. Starting at 1000 rpm, for example, the dyno brake is applied to slow the engine, and the throttle widened to compensate. Eventually you can apply enough braking so that full throttle is needed just to maintain 1000 rpm. Any more braking, the engine will slow; if it’s reduced, the revs rise. The maximum load the engine can handle at 1000 rpm becomes the maximum torque output of the engine at that speed.
You can repeat the test throughout the RPM range, which is usually done in 500 RPM increments. You'll finally finish up with a torque performance graph, which will show a curve shaped like a hill that rises to a peak at some rpm level, then drops away again. Every engine is different, with the size and shape of the torque curve depending on how the engine is designed and built. ‘Good’ engines have a torque curve that is flattened at the top, rather than a sharp peak.
Now we’re ready to think about power. Remember that torque is force multiplied by a distance – Newtons x metres. Therefore, we can also say that torque is a measure of the WORK done by an engine, since in physics work = force times distance.
The SI unit of work is the Joule (J), which is defined as the work done when 1 Newton is applied through 1 metre in the direction of the force. Thus, 1 J is the same as 1 Nm (or 1 kgm2s-2).
Power is the measure of the rate at which work is being done. Thus, power equals work divided by time. The SI unit is the Watt (W), the power expended in exerting 1 Joule (or 1 Nm) per second. Thus, 1 W = 1 Js-1 (or 1 kgm2s-3).
OK, here's the connection. Power is the RATE at which torque is produced. We know how much work our engine is doing, because we’ve measured the torque over the rpm range with a dynamometer and come up with the hill-shaped graph. We don’t have to measure anything else. All we have to do is calculate the rate of work from that torque graph, as we now have enough information to work out power. How?
1 Nm torque effectively means that in one revolution of the crankshaft, 1 Newton moves a lever with a radius of 1 metre; or a circumference of 2 x pi metres - that equals 6.2832 m approximately. If this distance is multiplied by the engine's RPM, the answer comes out in metres per minute. Divide by 60 and the figure is now metres per second. Multiply by the Newtons (from your torque figure, which are the same as Joules), and you now have an answer in Joules per second - or Watts. Divide by 1000 and you have the power output in kilowatts at that RPM.
Confused? Let's use an example. Suppose we put our VW Golf on a dynamometer and measure that it produces a torque of 155 Nm at 3800 rpm. To work out the power from that, the calculation goes:
6.2832(m) x 3800(rpm) / 60(s) x 155(Nm) / 1000 = 61.7 kW. Easy!
Actually there's an easier way. Simply multiply the torque figure by the related rpm and divide by the constant 9550:
155 (Nm) x 3800 (rpm) / 9550 = 61.7 kW
In case you're wondering about this piece of mathematical black magic, 9550 is just the inverse of 6.2832 / (60 x 1000). It means you don’t have to confuse yourself with three different constants.
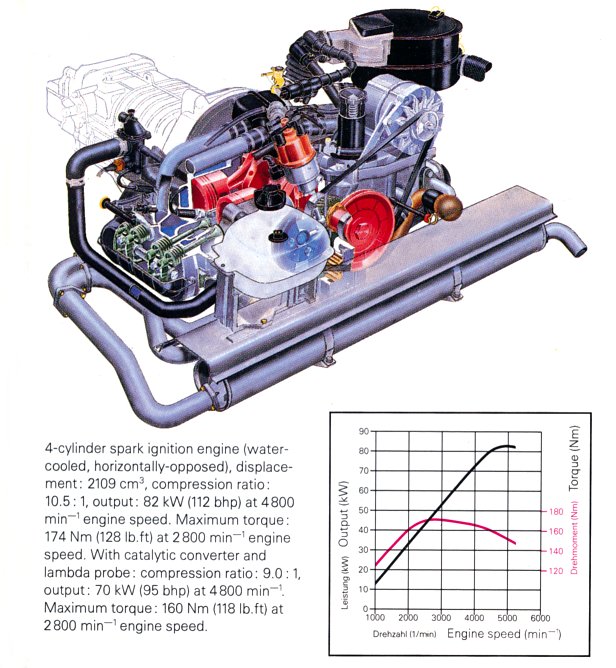
Of course, that's only the power produced at that particular rpm. There’s no guarantee that 61.7 kW is the maximum the engine is capable of. In fact, our VW Golf does best power-wise at 5400 rpm, when it churns out 77 kW. But if you work it out backwards, you'll discover it’s only producing 130.2 Nm torque at 5400 rpm. See how power and torque are related? The only way to discover the true character of the engine is to make graphs of both torque and power over the entire operating range. And that is what the dynamometer guy will do when you have your VW dyno-tested. He measures the torque, and the dyno computer calculates the power graph automatically, using the formula we’ve just worked out. You'll see that in the torque / power graph for the Transporter engine above - the torque curve in red, and power curve in black.
Of course, many dynos might give the results in ft-lbs and bhp, but it works the same way and should be able to convert at the click of a button.
So what about horsepower? It’s the British unit of power that owes its origin to James Watt, who established that a draught horse could work at a rate equivalent to moving 33,000 lbs a distance of one foot in one minute, which is 550 lb-ft per sec. Knowing the torque in lb-ft from your braking dynamometer, you could then calculate brake horsepower in the same way - with a constant this time of 5252.
Brake horsepower could be expressed two ways. The SAE (Society of Automotive Engineers of America) figure means gross bhp, which is an ideal figure in a perfect world with no extra loads on the engine. VW outputs were once expressed in SAE hp; the 1200 40-bhp engine is an example.
A more useful figure is net bhp, which takes into account the fan, generator, exhaust; all the normal fittings you would expect an engine to have. The 40 bhp (gross) Beetle suddenly becomes 34 bhp (net)! This is what the British use when they talk about horsepower. Another way of referring to net bhp is bhp (DIN), which stands for Deutsche Industrie Norm. The Germans call their bhp (net, DIN) ‘Pferdestarke’, which means, literally, horsepower, and is abbreviated PS. Thus, whenever you see PS, you’re also looking at bhp (net).
To convert PS (or net bhp) to kW, multiply PS by 0.746. Australian style guides say to always use metric units, which as Editor is my belief also, so we report engine outputs in kilowatts and Newton-metres today. However it is often interesting to leave old period road tests with their old measurements, as it adds a certain historical flavour to them. But that’s what imperial measurements are – historical!
Sticky Moments with Plastic Sheeting
By Rod Young
July 1992
If, like me, you've worked on quite a few old cars, you would probably have noticed that the plastic sheeting which VW and Audi so meticulously apply to the inside of door panels is either hanging in shreds or has disappeared altogether.
The culprits are most likely panel beaters, car radio installers or mechanics who have had to fix a rattle or a tight window; doing the job from their point of view does not extend to mucking around with plastic and glue, and the customer doesn’t notice anyway. Owner/workers are probably just as much to blame, though lack of proper materials and ignorance of what the sheeting is for are what probably guides them.
What are the consequences of not properly sealing the door cavity? Rain water, which is able to get past even brand new window seals, will go straight onto the door trim, which, being made of flimsy pressed fibre board, will buckle, tear and generally flop about. This same water can also leak through the door and inside the car onto the floor, where it sits for years underneath carpet and sound deadener promoting the dreaded iron oxide.
If the car has had speakers installed in the door skin (as mentioned above, a prime reason for the seal having been broken in the first place) water will go straight onto the membrane, which, usually being made of thin cardboard, will beat itself to slush. Reasons enough to do something about it?
The factory hasn't helped very much with their design, unfortunately. Some other makers use a neat and durable plastic moulding that reinstalls without glue. The glue that VW/Audi uses works very well; so well that it is easy to rip the plastic when attempting removal. After that it doesn’t stick again. So the conscientious person would need to have at hand the following: sturdy plastic sheeting, which is expensive stuff and not normally lying around; paint-on contact adhesive and brush, scissors, knife and about half an hour per door. Now perhaps it’s hardly surprising that this job rarely gets done.
The point of this article, apart from making me feel better for directing a diatribe against shoddy workmanship, is that there is a slightly easier short cui to reinstalling the plastic sheeting. The hardest thing is with the glue. Contact adhesive is expensive and goes off in the pot, can't be re-used, is hard to apply and hard to clean up, smells bad, needs lots of time and the solvent depletes the ozone layer. In fact it probably causes male impotence too, and I don’t particularly like the colour.
What is needed is some environmentally friendly substance which sticks like the proverbial to a blanket again and again, has a long shelf life, is easily and quickly applied and removed, has no smell and doesn't cause reduced sperm count. Also, it must be a nice blue. This wonder stuff does in fact exist and is called Blu-Tack. You know, the stuff you use to put Audi Sport and VW Nationals posters up on your bedroom wall.
You can roll it up in your hands into a long snake and push it into place exactly where it's needed. Be especially generous with it at the bottom of the door aperture, as this is where water tends to run into the gap between the door skin and the panel and go on to do its dirty work. Next time you remove the door trim and plastic sheet, just roll the Blu-Tack up again into another snake and re-apply when necessary. It's even recyclable!
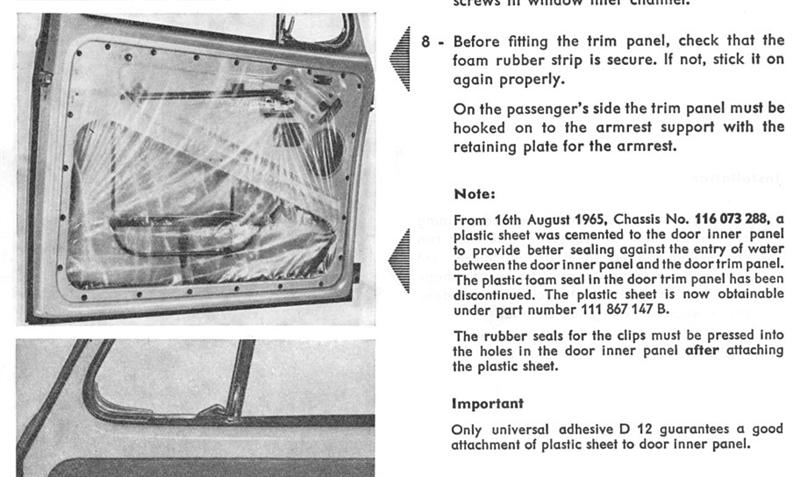
Now, let’s say you’re putting speakers into your door trim, or re-applying the plastic sheet and speakers are going to go back on with the door trim. The magnet will push right through the sheet, right? So you'll have to cut a hole around the space that the speaker occupies, thus defeating the whole purpose. My solution: get out your Bosch heat gun, which has hundreds of uses apart from burning off paint. Briefly heat up the plastic behind the speaker without letting it melt through, then push it with your fist to stretch it. You might need to do this a few times so that the correct clearance is created and will definitely burn your hand, but it's better than the alternative, isn't it? Then poke a small hole in the bottom of the indentation you have created, feed the speaker wire through and let it hang out.
An observation: if you can afford German Blaupunkt speakers, you would have noticed that they have a protective covering preventing water from above from impinging onto the membrane. Also Bose, an expensive U.S. brand, and probably others, have a waterproof membrane.
It really would be nice to find a car that somebody had treated with the above procedure. If you ever do it, please write this plastic was put on by ... and your name so that somebody in future will know how far sighted you were.
Thanks to John Frizza for the ‘Blu-Tack’ idea.
Measuring Fuel Consumption
By Phil Matthews
October 1992
While most people have grown to like metric units like metres, kilograms, litres, degrees Celsius and so on, many still feel that fuel consumption is best measured in miles per gallon. So we’ve been a metric country since 1973. Pfft, who cares about litres per one hundred kilometres!
Well I'm going to shoot holes in that comfortable attitude, and I’ll also show you a really easy way to work out your own VW's performance when it comes to using precious petrol.
OK, so you know your VW gets 25mpg in town and 40mpg on the expressway and why think any other way? Well, here's something to think about for starters. Miles per gallon is actually a measurement of your VW's ‘economy’, not its ‘fuel consumption’. What’s the difference? Look at your figures. As your VW moves from the city to the country it starts to use less fuel, doesn't it? And yet your ‘fuel consumption’ figure increases to 40! Same in reverse. You drive back into the city and use more fuel, but your figure drops down to 25. Hmmm, never thought about that before.
The reason here is that with miles per gallon, you're saying, “I can go X miles on one gallon of fuel,” - you're dividing distance by a fuel volume. To measure fuel consumption, we need to do the reverse, divide the fuel volume by the distance. You need to think, “I consume X gallons per mile”. That way, if you use more fuel, the figure gets bigger too and everything is logical - except that no one thinks in gallons per mile.
This is where metrics come in. Most older people can picture a mile in their minds; it's 5,280 ft, or 1,760 yards. Younger people might know a mile is 1,609.3 metres. Fine and good, but how big is a gallon? The more senior readers might be able to answer me, as they would remember gallon mower fuel tins and so on. But what about you youngsters? If I wanted to make a cubic box containing one imperial (not US) gallon, how long would each side be? Care to guess? The answer is 165.6 mm, or 6.522 inches.
Just like the 1000 m kilometre is so much easier to calculate with than the 5,280 ft mile, so too the 1000 cm3 litre is easier to work with than the 277.42 cubic inch gallon. I have no idea why the mile evolved as 5,280 ft. Something to do with the Romans perhaps, or is it a combination of yards, chains, furlongs, rods, poles or perches? Who cares? But at least the imperial gallon is supposed to be the volume of ten pounds of pure water. Big deal - it still comes out as a box 6.522 inches cubed.
A litre, on the other hand, is not only a neat 10 cm cubed, but if you filled it with pure water at 4°C it would weigh one kilogram - isn't that neat! (1 kg H2O actually occupies 1000.028 cc, due to more precise modern measurements of the indium alloy kg standard in France, but you get the idea).
Anyway, you buy all liquids in litres - beer, Coke, milk, petrol, oil, water etc etc - so a litre, like a kilometre, should be very familiar and comfortable. If we know how many litres of petrol we buy and use, that's half the problem.
All VWs sold in Australia from 1973 should have a metric speedo, so you’ll know how many kilometres you've travelled. If your VW is older and is calibrated in mph, then it is possible to buy a European metric speedo for your model, or stick a metric conversion disk over it. Otherwise, no problem - you should already know about multiplying miles x 1.61 to convert to kilometres.
Right, so we know how many kilometres we’ve travelled, and how many litres we bought. All you have to do, then, is calculate:
LITRES divided by KILOMETRES then x 100
and the answer is in litres per 100 km.
Let’s use an example. You fill up your Golf and it takes 41.72 litres at the pump. Note the speedo - 754,486.2 km. Away you go until refuelling time again next week - when you buy 42.02 litres and the speedo now reads 754,944.7 km. You could also use the trip-meter of course, but however you do it you know you've travelled 458.5 km on that first tank of 41.72 litres of fuel.
So: 41.72 / 458.5 x 100 = 9.1 L/100 km. That means that for every 100 km you drive, your Golf is drinking 9.1 litres of fuel.
But I know what you're thinking. You don't like L/100 km because you can't compare it with anything - at least you know 15 mpg is shite, 25 mpg is better, 35 mpg is good and so on, right? Well, it only feels this way because you’re not used to the new way of doing it. If you leave a little notepad in your glovebox, and you write down your odometer figure and litres every time you fill up, then work out your fuel consumption for each tank, you’ll start to get a very good idea of what’s good and what’s not very quickly.
Look at the table below and you'll see some typical performances by modern VWs and others, in increasing order. See how diesels are the best, followed by the mid-size petrols and the Kombi and Passat G60 are worst. See how a Beetle gets around 10 L/100 km; use this as your benchmark.
There's more. A final comparison once divided mpg by the weight of the vehicle and came up with a 'ton-mile-per-gallon', or something. This belongs in the dark ages, but we can still use the principle. Obviously a Kombi using fuel at the same rate as a Beetle is doing better on a per mass basis, but how do we measure it?
Simple. We can ignore the ‘100km’ bit because it's always constant. So take your consumption figure and divide it by the mass of your VW, which you'll find on your rego papers. Multiply by 1,000 to get a result in litres per tonne. Using our Golf example, if it weighs say 950 kg, then we simply go: 9.1 / 950 x 1000 = 9.58 litres per tonne (over 100 km). That means that your Golf drinks 9.58 litres to move one tonne (1000 kg) over 100 km. Again, look at the table (far right column) to see how this compares.
| CAR | Engine | L/100 km | kg | L/T |
| Polo CD | 1.4 | 5.3 | 805 | 6.58 |
| Golf GLD | 1.6 | 5.5 | 905 | 6.08 |
| Passat Umwelt | 1.9 | 6.3 | 1225 | 5.14 |
| Polo CL | 1.0 | 6.5 | 765 | 8.50 |
| Golf GL | 1.6 | 7.8 | 880 | 8.86 |
| Golf GTI | 1.8 | 8.4 | 885 | 9.49 |
| Golf GTI 16V | 1.8 | 8.7 | 965 | 9.02 |
| Golf Cabrio | 1.8 | 8.9 | 1015 | 8.77 |
| Corrado VR6 | 2.9 | 9.9 | 1210 | 8.18 |
| Beetle | 1.6 | 10.1 | 820 | 12.32 |
| Transporter | 2.1 | 12.8 | 1440 | 8.89 |
| Passat G60 | 1.8 | 13.3 | 1320 | 10.08 |
VW Car Care - Part 1
By Philip Lord
June 1993
In this, our first part in a series on VW car care, we look at cleaning the interior, boot and engine bay areas of your VW.
The most valuable asset you can have when washing a car is common sense. Endowed with this quality, you really don’t need to have us explain how to it. This article is intended to prompt your common sense, really only reminding you how to clean your car, and what to use when you're doing it. It is not intended for cleanliness-obsessed, concours-winning VW owners, who probably know a better way anyway, nor for those who think hosing out the Kombi once a year is too much effort already.

As part of this series on Car Care, we will be looking at the factory recommended products by Votex (the accessories division of VW/Audi) that are available from your Volkswagen/Audi dealer. Muller & Muller Volkswagen of Lakemba have given us current prices of their stock items, which appear in the text below. Prices are for the most part very competitive, so why not try some of the products approved by the people who made your VW so well?
1. Cleaning the mobile lounge
If you drive anywhere in Sydney, chances are that you spend a lot of time inside your people's car. This area can soon look like a mobile tip with hardly any effort at all, and if you're spending time sitting in there it will be lots nicer looking clean. Get this part over with and you will be inspired to clean the outside later. You will need:
i) The basic common sense ingredients: suitable clothes (not the dinner suit, not metal belt buckles or overalls with exposed studs which can rip cloth and scratch paint), a fine light still day if working in the open (not 5.30 pm on a windy winter afternoon), at least one hour of time allocated to the job (not the 2 min 36 sec ad break during your favourite Saturday morning TV show) and you'll need to feel a modicum of good karma (i.e. if you're tired, pissed off, can't see - no glasses - or are suffering from a hangover, STOP now!) Also take time out to READ INSTRUCTIONS on any cleaning products you buy. Some product instructions are implied below but we can't stress how important it is to look at what instructions and warnings the manufacturer gives. Some cleaners are flammable, toxic, etc. etc., so some precautions may need to be taken before you use them.
ii) A vacuum cleaner. A good domestic unit will be enough in most cases, or a wet and dry industrial type only if cloth/carpet badly soiled, or in desperation, obtain a pan and brush.
iii) Basic cleaning materials: clean lint-free cloths (at least three); the Chux brand cloths are often good, a kitchen sponge (non-abrasive both sides), household detergent, a bucket, and a soft-bristled cleaning brush, an old soft toothbrush, and a couple of plastic shopping bags.
iv) A socket set (optional)
Now you can start! First off, empty the car of larger garbage into your plastic bag (or re-cycled paper bag if you have it), like that pristine half-eaten hamburger under the seat, cig butts from the ash tray, parking vouchers, the mother-in-law etc. Kick over the vacuum cleaner and re-claim Bondi from the seats and floor. Vacuum any other sand, dust, filth, defecation, sordes, recrement, guano, feculence or dirt you see from the dash area, rear parcel shelf and any other nooks and crannies. If your vacuum has a brush attachment, use this on plastic/painted metal parts like the dash. Move on to the boot/cargo area and do the same. If you have rubber floor covers inside the cabin or boot, lift them up if possible and vacuum underneath. If you have the time and inclination, remove the mats altogether (this may involve unbolting seat belt stalks and other hardware - see just exactly what will impede removal before trying to yank out the mats). Now put your vacuum cleaner away, and get your bucket filled with warm soapy water (using, say, 2 to 5ml, or to be less pedantic, a smigin to a dollop, of household detergent).
Using your wet, squeezed-out kitchen sponge, (1) wipe down the vinyl areas beginning with headlining and dash and (2) wipe dry with a dry lint-free cloth. Do the same two steps with all vinyl/plastic parts, a section at a time, making sure to not lose count. Here you use your initiative - is a wipe down and dry enough or is the grime sticking? If it is sticking, and the sponge mit detergent just isn’t going to move it, get a can of ‘Upholstery Cleaner’ (Votex no. 000 096 401 001, 300 ml aerosol, $9.75) and shake container thoroughly. Spray the upholstery cleaner foam on to the vinyl/plastic parts to be treated, then rub it in, using a soft bristled brush for stubborn dirt, or a toothbrush for small, hard to get to spots. Wipe clean with a sponge, then wipe dry with a cloth. For cloth/fabric seats or carpet surfaces, apply the upholstery cleaner, rub in with a dry sponge and leave for two hours. Then vacuum or brush off the treated areas.
If your car does not have many cloth or carpeted areas, you might want to get a bottle of ‘Plastic Cleaner’ (Votex no. 000 096 403 001, 250 ml flat bottle, $7.80). To use the plastic cleaner on grubby vinyl or plastic parts, pour some onto a moist sponge and thoroughly rub the soiled area. Rinse out the sponge and wipe off the area. Then rub dry with a clean cloth.
If you have leather seats, invest in some ‘Leather Care’ (Votex no. 000 096 400 001, 250 ml flat bottle, $9.55) This will clean and protect all smooth and fine pore leather, so you can even do your leather shoes with it. Pour some of the leather care onto a cloth and rub evenly onto the surface. Allow it to dry for a short time before rubbing with a clean cloth, and polish with a soft brush, if necessary. This cleaner is not for use on suede or velour.
By now your headlining, dash, console, seats, carpets, door trims and pillar trims should have received attention. Now wipe the door rubber seals with your wet sponge and then dry. Protect the rubber seal from deterioration with some ‘Rubber Care’ (Votex no. 000 096 506 001, 300 ml aerosol, $7.95) by spraying it on in an even, thin coat onto the cleaned rubber.
Finally, clean the inside glass and rear vision mirror. Finding a cleaner that doesn’t streak the glass is difficult; so try the VW stuff (Votex no. 000 096 404 001, or 000 096 454 001, 500 ml plastic bottle, $20). Spray the cleaner directly onto the glass, rub with a dry, lint-free cloth, and wipe the surface clean. If necessary, wipe over finally with an almost dry synthetic chamois.
2. Cleaning the engine
Now the interior is spotless, you can start on the engine. The engine bay area can be the most fiddley to clean; it really depends on how fussy you are and how much time you want to spend to the results you achieve. I'll assume that the result you want is a basically clean and neat engine bay area, but one that is not going to win shows. Let's assume you've got only 10-15 minutes left for this task. If you don't want to risk getting grease on your clothes, either abandon the whole idea now or go and get changed.
To start, get a plastic bag and cover the distributor, and another covering the alternator or generator. This is to avoid water getting into these components, which generally don’t like getting wet. Make sure you have access to a hose, preferably one that allows a high-pressure stream of water. Obtain some engine degreaser, such as the VW ‘Engine cleaner’ (Votex no. 000 096 411 001, 300 ml aerosol, $59.70). Make sure that the engine is not hot (not running for the last half hour, at least). With the handbrake on, the car firmly chocked, but not raised from the ground in any way, spray on the under-engine area, either lying or kneeling down on the ground. Don't attempt getting under the car close to the engine as the degreaser will spray back on to you, and perhaps into your eyes. Keep clear, but direct the jet of degreaser onto dirt or oil deposits. Then do the same from the top. Spray onto deposits on the under side of the hood, but only if there is no felt sound absorption material fitted there, as it usually absorbs water as well, and takes forever to dry. Be careful not to spray anywhere else you see this material, often fitted to firewall areas too. Use a paintbrush or toothbrush to help remove stubborn grease or dirt. Finally, rinse off with a strong spray of water onto underneath the engine, then approach the upper side. Here more caution is needed. Be aware of electrical parts and try to avoid spraying water directly onto these, or onto sound absorption material.
Finally remove plastic bags and use a sponge to remove pools of water, if any. Start the car and let it run for a few minutes. Turn off the engine and wipe completely dry with a cloth, taking care not to burn skin on now hot parts such as the exhaust manifold. Leave the engine to get cold, then spruce up the engine with some ‘Engine Preserver’ (Votex no. 000 096 412 001, 300 ml aerosol, $18.90). This provides lasting protection against corrosion, gives a new gloss to treated parts and makes wiring less prone to dampness. Don't spray this onto the exhaust, carb inlet, battery or brake fluid reservoir.
Now, you've finished! It wasn't that hard, was it? Next month we look at cleaning the exterior of your VW.
VW Car Care - Part 2
By Philip Lord
July 1993
This month we will explain a fuss-free way to make your Volkswagen's exterior gleam. As we suggested in part 1 last month, there is no black art involved in cleaning your Volkswagen. Just a liberal dose of common sense, combined with the correct cleaning equipment will do the trick. Oh yes, and as you would have discovered after following the guide last month, you will also need a bit of the old elbow grease.
We continue using the Volkswagen approved cleaning products in this second part of our series. If you want to try out the Volkswagen car care products, they are available at all authorized Volkswagen dealers, who may not carry all the products but can order them. However Muller & Muller Volkswagen of Lakemba have stock of all priced items mentioned in this article. Like all things Volkswagen, these products are thoroughly tested and have to be good to display the Volkswagen name. Surprisingly for an imported car manufacturer's accessories, they are very competitively priced, both with local and imported car care products. To give you an example, the highly reputable German polish, Porzelack ‘Clean’ and ‘Diamond-O’ Wax, cost $5-$8 more than the Volkswagen ‘Paint Cleaner’ and ‘Hard Wax’. While the Porzelack products are excellent, the Volkswagen products provide just as good a shine and paint protection, only cheaper.
1. Washing the paintwork
That dull-looking colour stuff on the panels holding the rust together. Yep, that's what we' re talking about here. Well, one would hope that your VW is not that bad, and even if it is you'll feel much better about it when it’s shiny. Shiny cars always make one feel better. Very therapeutic really, washing a car. To start getting to know yourself with car-washing therapy, you will need:
i) Common sense things mentioned last month for cleaning the interior and engine bay are perfectly reusable this month. Wearing appropriate clothing, working in good light with plenty of time in a good frame of mind all help. Do not wash and polish your car in hot sunlight as the washing/waxing products end up baking onto your car's paint, sometimes leaving a permanent mark. Perhaps most important for cleaning the exterior is to work in an environment free of wind and dust. No, flatulence won't hurt the paintwork, but if there is a wind gusting outside you will find that dust settles on the surfaces of the car, which you will end up rubbing into the paint when you start polishing. The results can be as disastrous as if you used a Brillo pad, so STOP! Do it another time. Best of all is if you have a draught-free garage with good lighting, where you can polish and wax to your heart's content.
ii) Basic cleaning materials: a bucket that doesn't leak, a couple of sponges, a chamois and an old toothbrush.
iii) Car detergent and window cleaner.
Start off by adding some detergent to your bucket. Make sure you have some car detergent, as washing-up liquid has salt in it which helps rust. Most car detergents have some wax added to them, which helps paint protection. The Volkswagen detergent (‘Paint Shampoo’, part number 000 096 407 002, 1000 ml bottle, $7.60) is very good, providing excellent dirt-clearing properties and plentiful suds in the 1 capful to 10 litres of water measurement. Plenty of other car detergents can't seem to raise more than a few bubbles of suds, and don' t have much more effect than plain water on the dirt, and that's when using half a bottle of the stuff.
Continue by filling up the bucket with water. You may find that warm water helps lift dirt even more easily, but do not use hot water as this can damage paintwork - as it is hot, the detergent ends up drying on the panels as if you' d been washing out in the hot sun. Next, hose off the loose dirt on the car's panels, making sure you get all the dirt off and that the panels are all nice and wet, ready to be scrubbed up. Try to hose under the guards to flush out any accumulated mud. Make sure your sponge is free of grit (wash it out under the tap if necessary) and plonk it in the bucket full of detergent and go for it. Don't scrub too hard, dipping the sponge in the bucket to keep it soaked reasonably well in the detergent solution. Do a section at a time, hosing off the detergent solution before it dries.
Avoid washing the glass areas of the car with the detergent solution as it contains wax, which will make wipers chatter and stain the windows. Spray on some window cleaner and wipe it over the glass with another sponge. Use some ‘Plastic Cleaner’ (part no. 000 096 403 002, 250 ml bottle, $7.88) for plastic exterior parts that are ingrained with dirt, pouring some cleaner onto a moist sponge and rubbing it in. Hose off with clear water. Alternatively this step can be done after the car is dry, only remember to rinse out the sponge after rubbing in the ‘Plastic Cleaner’ and wipe over the area before rubbing dry with a cloth.
To best clean alloy wheels, invest in an alloy wheel cleaner that is acid-free, like the Volkswagen ‘Wheel cleaner’ (part no. 000 096 410 002, 500 ml bottle with spray pistol) and spray onto a dry wheel. Rinse off after waiting one minute, using a sponge to remove remaining dirt if necessary. Give the car a final rinse with clear water and then wipe dry with a chamois. If you have a second chamois or an old cloth you might be inclined to dry off around the door jambs and boot aperture, which can accumulate quite a bit of dirt and grime over time.
2. Polishing and waxing the paintwork
If your paintwork is dull and weathered you might wish to polish the surface with an abrasive type polish. Care is needed to not cut through to the undercoat. The Volkswagen ‘Paint Cleaner’ (part no. 000 096 500 002, 250 ml bottle, $9.50) is suitable for non-metallic paintwork. Shake the bottle, and of course don't use it in the sunshine or on hot paint surfaces. Apply a thin coat of ‘Paint Cleaner’ onto clean, dry paintwork with a cotton wad or cloth. Allow to dry to a white film before polishing to a gloss with a lint-free cloth. For metallic paint surfaces ‘Metallic Paint Cleaner’ (000 096 502 002, 250 ml bottle, $9.80) can be used. Shake the bottle and then apply to clean paintwork with a moist sponge. Repeat this several times, depending on the condition of the paintwork. Wash off the matt film that remains with water, and chamois dry. You may need to clean the windows with some window cleaner after this operation.
Either after washing and drying good paintwork or after polishing dull paintwork, proceed to the waxing stage. This gives long-lasting protection to your Volkswagen' s paintwork. It seems like much more work to have to go over your car again with wax, but the results are outstanding. Even quite ordinary paint can appear glossy after waxing. Although it is not a panacea for bad paint, it will help to keep not-so-good paint from deteriorating further and maintain good paint. There are a few canuba wax products which are by anecdotal evidence the best type, but if you want to go the factory way try Volkswagen's ‘Hard Wax’ (part no. 000 096 504 002, 250 ml bottle, $9.75) which can be applied in a thin coat onto the paintwork, using a soft cloth. Allow the wax to dry to a white haze before polishing with a lint-free cloth.
If you want a polish and wax combined, Volkswagen make a ‘Paint Polish’ (part no. 000 096 503 002, 250 ml tin with sponge), which will do the job in an easy two-step process. First moisten the sponge and apply a thin coat of polish on a clean and dry paint surface, wait for the polish to dry to a white haze, then polish off with a lint-free cloth.
If you have stubborn tar that won't come off the paintwork with polish, try some tar remover. Volkswagen have a product that they predictably call ‘Tar remover’ (part no. 000 096 501 002, 250 ml bottle) which will remove tar and bituminous residues. To use this product, soak a cloth with tar remover and rub soiled areas vigorously before rinsing thoroughly with water.
To clean chrome and aluminium that is not badly corroded, there are many chrome cleaner products available, such as ‘Brite Shine’. Volkswagen have a product called ‘Chrome and Aluminium Cleaner' (part no. 000 096 505 002, 250 ml bottle) which cleans and preserves metal parts and protects against fresh corrosion. It removes rusted and dull layers and restores gloss. To use this product, shake the bottle first and then apply a thin coat with a cloth and rub in. Allow the polish to dry and then rub it off with a lint-free cloth.
To brighten-up the exterior rubber surfaces you can use any of the plastic/rubber restorer products, although try to avoid those which have silicone. Some products now mark their products as being 'silicone free'. Just about all of these products will provide a gloss finish. To apply, spray some rubber restorer onto the surface, or a cloth, and rub into the surface. If you want a matt finish for rubber parts, Volkswagen sell ‘Rubber Care’ (part no. 000 096 506 002, 300 ml aerosol can, $10.88) which is best used at room temperature only. Simply shake the can and spray a thin, even coat onto the rubber part. If the rubber part is next to windows, spray the ‘Rubber Care’ onto a cloth and then apply to the surface.
To give your car the finishing touch (or should that be touch-up?) and to avoid corrosion, you may wish to repair unsightly stone chips that at some time or another afflict our cars. To do this does not require a trade certificate in spray painting and panel beating. All you need to do is get some touch-up paint which you can apply yourself with a steady hand. You won't achieve factory-finish results, but the chip will be far less noticeable. If your car's paint has faded (they all seem to, its just knowing when they no longer colour-match their original specification) then you can get the paint ‘hand matched’ at some automotive paint suppliers. This will make sure that you do not make the chips look worse by touching-up with an inappropriate colour, but often it means buying the paint in large quantities, which can be rather expensive when you want only a few drops of the stuff. If you think the paintwork fade is negligible (check an area like behind the door panel - is it the same colour as outside?) and your Volkswagen paintwork is original, then you can order a touch-up bottle that comes with an applicator brush and a rust-remover (wire brush). This factory paint is colour-matched to new paint of the official Volkswagen hue. You need to know your paint code (found on the vehicle details sticker in late models), and a Volkswagen touch-up bottle costs around $15.
Now your Volkswagen is finished. What to do now? Either put it away in its pristine glory and never use it again, except to admire on special occasions (a temptation after all that work) or do what it was always built for - driving. Even if it is raining.
ETKA for VW Parts
By Rod Young
July 1993
The knowledge that a car is only as good as its service has led Volkswagen and Audi to establish, right from the beginning, one of the best equipped customer service networks. Since this is all dependent on a well functioning parts supply, VAG has maintained the lead in this area also.
While the rest of the industry was still leafing around in telephone book-like parts catalogues, VW had already switched to microfiche by 1972. Each page of the catalogue was microscopically reduced so that one complete book could be contained on a DIN A5 transparency, which could only be read by a specialised microfiche-viewing machine.
With the steadily growing range of models, and the proportional abundance of listed parts, the microfiche system has reached its limits. Nearly 370,000 various VW and Audi parts are listed on 150 microfiche sheets, in text and diagrams. Approximately 139,000 can currently be ordered, for current and older models. The searching for and writing down of a particular part number can therefore be frustratingly time-consuming. A major limitation of the microfiche system is the fact that part numbers may not be up to date. Since new editions appear only four or five times a year, there is a problem of keeping up to date with part number changes, which are only increasing in frequency. And demanding customers have little patience for incorrectly ordered parts and overstressed parts salesmen.
Parts ordering proceeds much more quickly and smoothly when the VAG dealer has the new ‘ETKA’ system installed. This abbreviation means Elektronik Tiele Katalog (electronic parts catalogue), a microcomputer system that will replace the old microfiches. The first versions are based on the DOS computer operating system, while future versions will use Windows.
The significant thing about this PC is its considerable storage capacity. Its hard disk can hold 520 megabytes of data. The CPU is a 386 with 16 MHz clock speed, soon to be upgraded to 40 MHz. The fast processor certainly reduces searches for parts numbers to a matter of seconds. The rest of the system consists of a 5.25-in. disk drive, a high-resolution 19-in. monochrome monitor, and keyboard. A dot-matrix printer is also attached, in order to print out details of the desired parts.
Details of part numbers and their illustrations from nearly all the available microfiches are stored as data on the hard disk. ETKA can search for every spare part for VW and Audi models, from a Split-window Beetle from 1947 to the latest Audi V8.
In future, no mistakes due to incorrect part numbers should take place, as the data records in the ETKA are kept up to date every 14 days. This occurs regularly through disk updates, whereby the new information is simply transferred to the hard disk through the floppy disk drive. Newer versions will update electronically if the dealer’s computer is hooked up with a modem.
So that each ETKA user gets his updates on time, the VW/Audi factories at Wolfsburg, Ingolstadt, Hanover, Kassel, Brunswick and Neckarsulm are in constant communication with the software developer, Lexcom in Munich, via dedicated data lines. With the help of EPIS (parts information system) variations in parts information are processed at their source, sent directly to the central database, then delivered by Lexcom via update disks to users.
The user-friendly software requires no special automotive or computer knowledge on the part of users while a search for a part number is made. After switching on the system, you are shown the complete catalogue selection after one key press. When the listed abbreviations for the appropriate model and year, main group and sub group are keyed in, the diagram with the appropriate parts becomes visible. The object under search can then be specified by locating the cursor directly in its field, and the exact part number can be read off. An even quicker method: the cursor jumps directly to the correct field when the number over the illustrated part is keyed in.
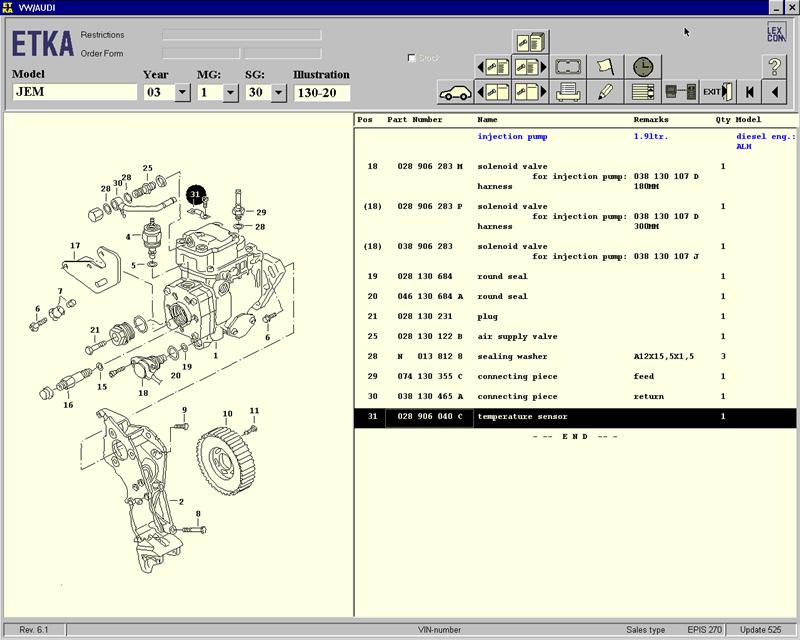
The search for a required part is very straightforward when its name is specified. This is helpful for the beginner who is not able to categorise the parts according to main and sub-groups. Instead of inputting the required groups, a menu of functions becomes visible after pressing the Escape key. The part under search appears on the screen as soon as its correct term is typed in. So that a match can be found for as many terms as possible, the computer reacts to several synonyms. For each of the approximately 12,000 different terms, up to ten different names of the same meaning have been programmed in.
On-line help for the initial stages of the program is given by help menus. The help windows, which give further explanations, can be opened at nearly every level by pressing the Fl key.
Of special benefit to the customer is additional information available from the screen. Included are current factory messages if, for example, due to ongoing changes, special tools need to be ordered for installing the part. Such references appear in any case in a data window as soon as the required part has been entered from the keyboard.
Included in the data base are so-called good-as part numbers. These are similar parts with the same function that can be used in place of the original if, for example, it is no longer available. Furthermore, the computer user has the opportunity to include notices devised by himself into these windows, for example where it is more economical to carry out repairs than to replace the item. Special prices and shelf locations within the shop can also be added, and these appear each time the part is called up. Time-robbing looking up and leafing through bulletins or ones own notes can be done away with completely.
Usually the customer at the spare parts counter is interested only in the cost. This is shown by ETKA in its ‘ordering form’ window on the screen. The computer not only adds the prices of all individual parts, it also works out the necessary value-added tax. Even the tax rebate for the retained value of an old part is calculated, in the case where a factory exchange unit is bought.
Writing out of the data is no longer necessary, as this work is carried out by the attached dot-matrix printer, without mistakes due to misreading. The customer can take the printout home as an absolutely up-to-date quotation, or the salesman can take it with him to the parts shelves. The order form can be printed as many times as necessary.
Progressive Audi and Volkswagen dealers have already coupled their ETKA to their VAUDIS or VAUDIA. In this way, data from the electronic parts catalogue can be incorporated, with no further keying in, into their internal data processing system for the purposes of invoicing and stock control. Version 3.2 of the software should become available about the middle of 1993. Along with further enhancements, the missing parts catalogues for standard parts as well as for camper vans and accessories will become available as updates.
Research has shown that each ETKA computer system bought per year saves approximately 500 man-hours. A great deal of time, which is to the benefit of a more friction-free workplace and to the customer. And whoever doesn't measure his time in monetary terms has the advantage of being served by a more friendly, less stressed spare parts salesman.
What is NSRR?
By Phil Matthews
September 1995
You have probably heard this term applied to various newer model cars, as in: "Yeah, well mine's got NSRR." Owners of all water-cooled VWs can boast it, as well as owners of later Superbugs. But what is it?
Negative Steering Roll Radius (I'll call it NSRR from here on to save my typing fingers), is an arrangement of the front suspension components that places each front wheel's pivot point outside the centre of the tyre's axis. Huh?
Consider your front wheels pointing in a straight line (we'll assume no toe-in for simplicity). The central axis of the wheels, the one they revolve around, passes through both wheels and should be exactly 90 degrees to the direction of the car's motion, just as if they were joined by a solid axle all the way across.
Now think about what happens when you turn the steering wheel. Traditionally the wheels pivot around the steering knuckle as they start to point left or right, and of course the steering knuckle is closer to the centre of the vehicle than the centre of the tyre is. The effect is that the tyre will actually follow an arc as it moves from left to right.
You can visualise this by thinking of the little circlip on the end of the speedo cable on a link-pin Beetle's left front wheel. As you turn left, the circlip (and the wheel too, of course) will move backwards and in towards the inner mudguard. Centre the steering wheel and turn right, and the circlip comes out and forward, reaches maximum outer position at the straight ahead, then continues forward and in towards the headlight bucket as you turn right. In effect, our circlip is the very outer marker of the arc the wheel is describing.
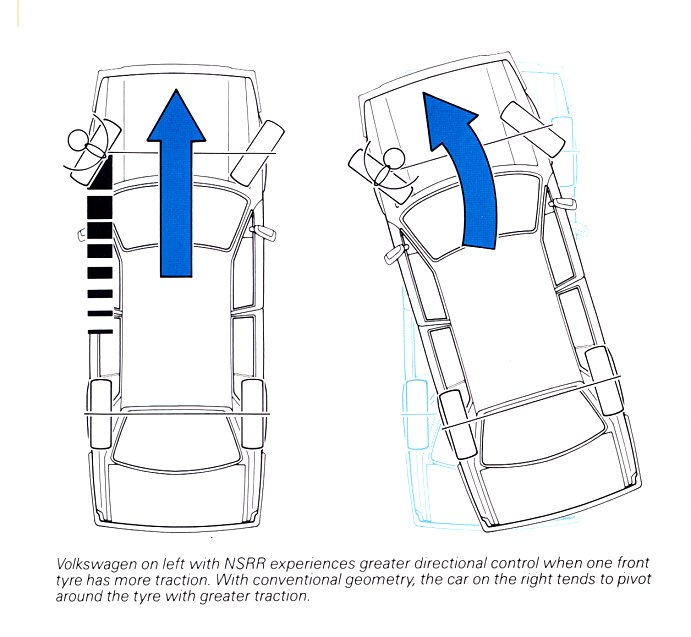
NSRR is exactly the opposite. The suspension components are arranged in such a way that the circlip now becomes the CENTRE of the wheel's turning arc – it’s outside the tyre's axis rather than inside at the steering knuckle.
OK, now imagine turning left with NSRR. This time, the circlip stays where it is and the wheel moves around it - the front of the wheel comes out and the back goes in.
What does all this achieve? NSRR helps the driver maintain control when one front tyre has significantly poorer traction than the other. This might occur when braking hard while turning a corner, when one wheel drops off on the road, or when one front tyre blows out.
When a conventional car encounters such a situation where one front wheel has much greater traction, that wheel will also have the greater stopping power. If this occurs, the car will tend to pivot around that tyre. NSRR makes the front wheels want to return to centre - to oppose the pivoting force, helping the driver maintain directional control, even though one wheel has much greater traction than the other. The result is a tendency to stop in a straighter line.
One other clever design trick used on front-drive VWs is a special type of ‘uniaxle’ unidirectional front lower bushing. This gismo is designed to absorb road bumps in the fore and-aft planes, but without permitting changes in wheel angle that would affect steering. Like most good ideas, the bushing is simple: a disc with strategically placed openings that control its motion.
In Memory of Gene Berg
By Lex Cowley
March 1996
Where does one start when talking about Gene Berg? His impact and dedication to the VW industry is phenomenal. Gene can really be said to be the father of the VW performance industry, which has grown exponentially to the level we see today. It is practically impossible to pick up a VW magazine with VW performance vehicles, or talk to about VW performance, without Gene Berg products and engineering being mentioned. This is how much of an influence Gene Berg has made.
Gene Berg was involved with Volkswagens for almost 4 decades, since the purchase of his first Volkswagen, a 1956 Beetle. The way in which Gene got involved with VW mechanics and performance, was that he couldn't get his car fixed properly, so he ended up doing it himself. Then, in a friend’s machine shop, Gene bored the carburettor venturi out, re-curved the distributor and increased the compression, and had the VW going quicker.
In the following years Gene worked on VW engines and incorporated other vehicles’ pistons and rods to increase the power of the air-cooled flat four motor. The interest in drag racing was from when he raced his 1961 Bug for fun and got hooked. From then he only wanted to go quicker, and quicker he did. It was this eagerness to go faster that resulted in Gene Berg starting to manufacture equipment/parts, as those readily available could not stand up to the work needed and simply broke. Early items that Gene developed and made were carburettor manifolds, deep oil sumps, close ratio gear sets and dual carb linkages.
Several years later with Hob Dixon, Gene developed and made the first counterweighted VW crankshaft, and along with Mahle developed and produced 90.5mm pistons. Other new products that Gene Berg developed were high ratio rockers, exhaust systems and stroked crankshafts. These products described here are only a handful of what Gene has performed. It has been through Gene’s extensive research and development that he has produced superior quality performance products that are used by everyone worldwide today.
It was earlier this year (on 4th January) that Gene Berg passed away. He was an innovative, dedicated and brilliant man, who always had time to talk with you. Gene and Dee Berg made several trips to Australia to attend VW events, where we have been able to attend Gene's Tech Talks, which were always overflowing with eager listeners and question askers, to find more out about our beloved VWs. Gene will be sadly missed by all of the Australian VW fans and friends. Gene is survived by his wife Dee, and his 3 sons Gary, Doug and Clyde, who will carry on Gene's innovative and dedicated work at Gene Berg Enterprises.
SSSSSSteam Heat
By Simon Matthews
June 1996
One of the great things about the VW engine is that there are so many ways that it can be modified. It seems that some people are always trying to use it in a different way from that Dr. Porsche intended. One such person is Bill Britton, a tinkerer par excellence. He has modified a Beetle motor into a two-cylinder steam engine.
Bill's extraordinary engine came to my attention through Bob Hickman, who asked me if I was interested in seeing a VW motor that was a bit different. The offer was too good to refuse! We met Bill at John Pride's residence in beautiful Picnic Point. John is a friend of Bob Hickman and is also an avid car nut. He owns not only a Model A Ford but a 1921 Stanley steam car in perfect working order. As an appetiser we were treated to a spin around the block in the Steamer, and after riding in the car, it was obvious why this method of power was so popular in early part of this century. The smoothness of the power delivery had to be experienced to be believed. It was quite eerie accelerating away from a standstill in a car with no clutch or gearbox and an entire lack of vibration.
Simplicity of construction and operation were the trademarks of the Stanley steam car. A kerosene-fired boiler produced 500 psi (3450 kPa) of steam pressure, which was used to drive the horizontal single cylinder engine, located below the rear seat as a unit with the rear axle. A spur gear on the crankshaft drove the differential gear directly, with valves able to reverse the engine rotation and provide a reverse gear. The Stanley was throttled by a lever on the steering column, and for extra speed the boiler pressure could be increased up to 1500 psi (10350 kPa)! After leaving the engine, the steam goes to feed the water heater, then to the top of the radiator, upon passing through which it condenses into water and this water flows back to the main tank. The 76-litre water tank beneath the car frame gave a range of about 320 - 400 kilometres. The thought of an accident with another car while carrying a pressure vessel beneath the front bonnet, however, doesn't even bear thinking about -drivers then must have had more respect for each others' cars than they do today.
After the very impressive demo in the Stanley Steamer, Bill showed us his steam engine in greater detail. Having converted the engine over 30-odd years ago, a lot of the specifics were a bit hazy, however the actual layout of the engine is very straightforward. A 1200 industrial case (we think - there was no tapping in the left front case half for an oil pressure switch) simply had cylinders 1 and 2 removed and a blanking plate installed on the case. Cylinders 3 and 4 were used to provide the power. The cylinders themselves are made of pearlite, with cast aluminium 70.2 mm pistons being used to withstand up to 1000 psi (6895 kPa) of steam pressure. The pistons use 2 compression and 1 oil control ring, as in a petrol engine. These, combined with the standard 64 mm stroke, gave 495 cc.
Unlike most steam engines, which utilise the double-acting cycle (where steam is introduced into the cylinder above and below the piston to push it up as well as down), Bill's engine uses a single acting cycle for simplicity. The cylinder heads contain the inlet valve gear connected to the high-pressure steam supply. As a piston approaches TDC it operates the inlet valve to allow steam to enter the cylinder. The tuning is fixed on 3 degrees before TDC. As the piston is driven down the expanding steam is exhausted out the bottom of the cylinder, much the same as a two-stroke engine. The process is known as a total loss cycle, as the exhausted steam is discharged directly to atmosphere and is not reused. A simple ball valve in the supply line is used to throttle the engine. Proper lubrication of the engine is critical after running on the wet steam, so screw plugs in the cylinder tops allow oil to be squirted into the barrels. The original camshaft is also retained to drive the oil pump.
The engine was set up on a test stand with a gutted split-case gearbox used as a mounting point for the starter. A temporary steam line was run from the Stanley's boiler and the starter battery connected. The engine fired into life with a roar typical of a Volkswagen and revved out quite sweetly, issuing massive clouds of steam from the zoomie exhausts. Without a tachometer it was hard to tell how much it was revving but it sounded great. The engine was fitted with an alternator and a 3-piston compressor for a water pump, but this was not required.
Many thanks to Bill and John for a fantastic day.
The Volkswagen W12
By Phil Matthews
November 1997
Or, as Wayne Webster of the Daily Telegraph put it, “That's not all, Volks!”
Volkswagen seems out to shatter its favourite family car tag, and move into the big league. Intent on showing that it can build more than Polos, Golfs and Passats, the ambitious German giant has unveiled the sports car that it hopes will not only be an image enhancer, but give it the racing weapon to tackle the likes of Mercedes Benz and Porsche on the race tracks of the world.
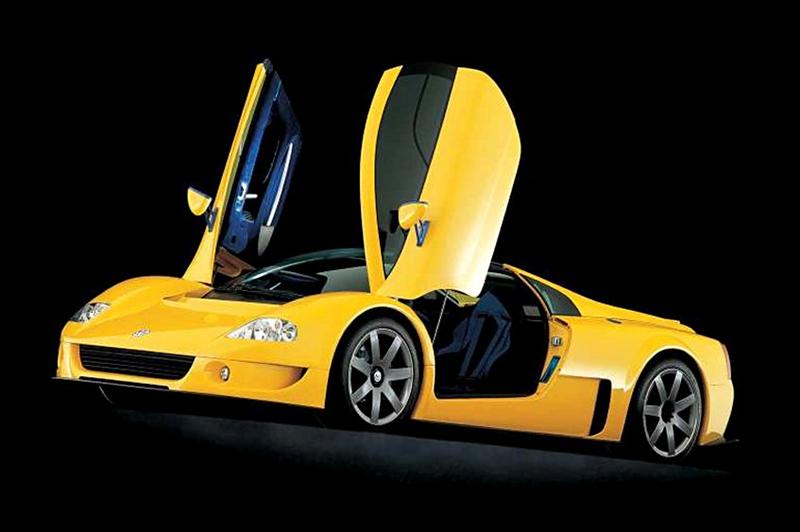
Unveiled at the Tokyo International Motor Show, the new Volkswagen W12 is a racecar that could also be used on the road. It's the centrepiece of a long-range plan by VW chairman Ferdinand Piech to shift the focus of the company away from just 'people's cars' and into the stratospheric supercar scene.
Mercedes Benz is scoring big image points thanks to its CLK-GTR racers, which dominate the world sports car scene. Piech knows that to beat Mercedes on the showroom floor, beating them at the racetrack in their own game presents the perfect showcase for VW technology.
Not only will the W12 become the new flagship of the VW range, it is also the basis of an all-out attack by Volkswagen on the most prestigious sports car race in the world, the 24-Hours of Le Mans. The plan is to take the W12 to Le Mans next year and win - nothing less will be accepted.
I hope they do well, but to my mind this sounds unfortunately like arrogance, no matter how good the W12 may or may not be. The young VW marketing gurus would do well to remember that it took Porsche 19 years of trying to win Le Mans, their first effort being two Gmund-built 356 coupes in 1951. Later Porsches including the 550A, Type 718RS, 904, 906, 908, 910 and 917 represented years of technical development, racing experience and big financial outlays. Even so, Porsche failed to win until the 917 of Hermann and Marko succeeded in 1970. Even the mighty 917s had failed the previous year, their first, when both Stommelen and Elford's 917s blew their clutches. Ickx's Ford GT40 beat Hermann's 908 that year. I suspect the W12 will not even race, let alone win, and will just end up in the Wolfsburg Museum (I was right – Ed).
The W12's heart is a new 12-cylinder engine of 5.6 litres, producing 310 kW at 5800rpm and 530 Nm torque. Basically the powerplant is two 2.8-litre VR6s joined together, so that it has four banks of three cylinders each. A normal VR6 has a 15 degree Vee, and two of those are joined in an additional Vee of 72 degrees. The overall effect is what VW describes as a ‘W’ configuration. The result is an unusually compact motor of its size, being only 510 mm long and 700 mm wide.
The cylinder blocks are aluminium with plasma-coated cylinder liners. Magnesium is used for valve covers and timing chain guards. An elaborate engine control system with stepless hydraulic camshaft adjustments achieves a powerful and even torque spread, which is transmitted via a seven bearing crankshaft with offset crank pins, to a six-speed gearbox. The engine is mounted longitudinally ahead of the rear axle, and drives all four wheels via the Syncro viscous coupling system.
The W12 was styled by Ital Design but is not a pure 'flight of fancy' with VW badges tacked on. Rather, the roof line is reminiscent of the Passat while the rear reminds us of the new Golf. There are also some cues from the Concept 1 in the A-pillars and windscreen.
The body is a monocoque construction with scissor-type upward swinging doors. It is quite a large car, 4.4 metres long and 1.9 m wide, but just over a metre tall. It has a mass of 1200 kg and is fitted with 19-inch alloy wheels, with 255/40ZR19 tyres on the front and 285/35ZR19 on the back.
A very tasty-looking car indeed, its unrealistic racing aspirations aside. It reminds me of the Audi AVUS of several years ago, that showcar also having a W12 engine configuration (although with 3 banks of 4 cylinders, not 4 banks of 3!) This doesn't come as much surprise, as current VW chairman Ferdinand Piech was at the helm of Audi at the time.
Thus, as Wayne Webster also summarised, it seems that good ideas don't die, they just change brands.
Door Handle Key Change
By Bernd Felsche
May 1998
After getting the local garage to replace my Golf’s front driver’s side door handle, I realised that now I have to carry two sets of keys! One for my door, and the other for the passenger door, boot, glove box, and ignition. This is really annoying. I liked the fact that one key did it all.
Is it possible (and economical) to get the pins in the drivers lock set to the old way? How is this done? Who does it? You can do it if you have the old handle. It takes under an hour.
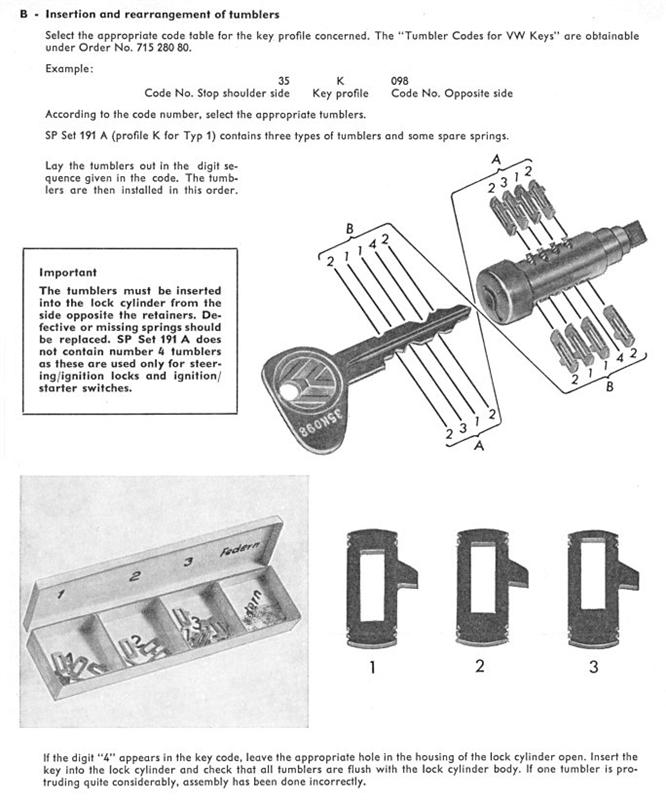
What would the dealer have done if I had gotten them to do the work? In the search for a used one, I discovered that a handle breaking off is quite common (I had to buy a new one. Not a single used handle within local calling distance!). So there must either be a lot of people with two sets of keys, or changing the key codes is a fairly minor process.
What sort of handle? On the water-cooled VWs - well most - you can either pull the entire lock tumbler out (put in a key that fits first) and slide it into the new handle. If the lock cylinder front is damaged, then you can swap the "tumblers" - one at a time.
Remove the door handle as usual by * carefully* prising off the exterior cap (black plastic or pressed steel insert). Remove the screw from the outside, open the door, and remove the screw, which is at the edge of the door. Don't drop this in the door cavity! You can then remove the door handle by sliding if forward slightly, and pulling it out gently. You'll also have two gaskets on the handle.
Take the entire assembly to a well-lit location where you won't loose little bits and pieces. Divide your work area into three; one for each handle and a central one where you do the fiddling.
The lock cylinder is held in place with a screw at the back. Insert a key that fits. Carefully remove the screw - as this also holds in the lock cam against a spring. Note how you'll have to re-install the spring. There's a tab at the base of the cam, which helps to hold the spring legs apart during assembly. If the cam hasn't popped off by now, remove that and catch the spring!
The lock barrel can be pulled out towards the front using the key. Do not turn the key while you are doing this. Leave the key in the lock barrel or you might jumble the lock. Repeat the disassembly on the new handle. Don't mix up the parts! The cam, lock barrel, spring and screw should be kept as a group from each handle. Swap the sub-assembly groups to exchange good lock barrels.
If the old lock barrel has the front damaged by somebody trying to break in, the tumblers can usually be interchanged. The tumblers are actually thin brass plates with slots cut into them. They can be pulled out from the side of the lock barrel using needle-nose pliers.
WARNING! If you get this wrong, you could spend days getting it right. There are 720 different ways of arranging the same 6 tumblers in the same barrel. READ THIS CAREFULLY BEFORE YOU TRY IT! END WARNING.
Slowly remove the key (duh!) from one barrel and allow the tumblers to extend. Note that with the correct key inserted, that the ends of the tumblers are flush with the outside of the barrel. Some tumblers may fall out as you remove the key - pull the key out slowly and don't drop the barrel with the key removed.
The tumblers sit in narrow slots. Starting at the lock-cam end, carefully grasp the extended end of the tumbler, push it down slightly and move it towards the ‘unused’ edge of the slot, then slide it out carefully. A small spring may drop out at this time from the rounded end of the slot, don't panic.
On the new lock barrel, do the same thing. Don't get the tumblers mixed up. Don't change their order! Take your time. Don't hurry.
Insert the tumbler from old barrel into the new one, complete with a spring. Make sure that it ‘latches’ in when released under spring pressure. (I never bothered to do this, but at this stage you can verify your handiwork by inserting the old key in the new barrel, and the tumbler you have just inserted should be flush with the outside of the barrel.)
Place the tumbler from the new barrel into the free slot in the old barrel. Repeat until all tumblers have been swapped.
Verify you handiwork by inserting the old key in the new barrel, and vice versa. All tumblers should be flush with the correct key inserted. If it looks wrong - don't panic. You may have tried the wrong key!
Put some lithium grease into the lock-barrel recess of door handle and fit the barrel with the key inserted. The lock should turn normally. Do this with both handles.
Now, remember what I said about keeping the barrel, cam, spring and screw as a group? Good!
Fit the spring and lock cam over the end of the barrel, spreading the spring's legs using the tab on the base of the lock cam and the, tab on the lock barrel itself. Hold this firmly in place and insert the screw to hold it. Tighten the screw well; you can imagine what happens if this comes off!
Put some lithium grease on the levers and cams. A common problem of the latch and lock feeling stiff is because there's no grease there!
Check the action of the lock turning and the latch release before installing the new handle. Installation is the reverse of removal. Take care with the gaskets, and don't break the handle trim insert. If you have any problems, take a short walk, listen to ‘Eye in the Sky’ or otherwise relax, then think about what's gone wrong.
I managed to swap the tumblers in my Golf in about 15 minutes, total time. Your mileage may vary. Don't hurry. Work systematically. Enjoy the results.
Buying and restoring a VW
By Laurence Meredith
September 1998
With over 21 million Beetles having been made worldwide, there is certainly no shortage of choice on the second-hand market. If you are considering buying a Beetle, take your time before parting with hard-earned cash. Read all you can about the marque, join your local VW club, never be afraid to ask questions no matter how trivial they may seem, and always bear in mind that even the youngest Australian-sold car is now 22 years old. Although the Beetle is able to resist corrosion better than most cars, neglected or well-used examples are almost bound to require costly attention sooner rather than later.
The days of stumbling across a low-mileage 'Split' or 'Oval' in pristine condition for $500 are over, so your decision to buy should be based on a realistic assessment of how much you can afford to spend. A Beetle in need of a full restoration, no matter how little the asking price, is going to be an expensive proposition, so it may make more sense to look for a really tidy and original or well-restored car from the outset. Such cars do exist, but they are becoming increasingly difficult to find.
Over the past 20 years or so, interest in the Beetle has increased dramatically all over the world with the result that many cars, which would have otherwise been consigned to a scrap heap, have attracted the attention of 'bodgers'. Apart from being offered for sale with a dubious certificate of roadworthiness and a shiny new paint job, such cars have very little to commend them.
Not surprisingly for a car that has been in production for around half a century, the Beetle has grown up surrounded by myth, but most of the criticism which has been aimed at these wonderful little cars is based, happily, on supposition and hearsay, and has little or no foundation in fact. Contrary to popular belief, well-maintained cars do not have lousy heaters that give but more in the way of exhaust fumes than warmth, they do not have awkwardly positioned pedals, and they are far from noisy. In truth, a Beetle fitted with genuine Volkswagen heat exchangers will comprehensively cook its occupants no matter how cold the weather. Cars that threaten the driver and his passengers with exhaust gases are those that have badly corroded or incorrectly fitted heat exchangers. Professor Porsche's design for his People's Car was conceived to bring affordable and enjoyable motoring to people like you and I. He most certainly did not set out to commit genocide by incorporating an exhaust system capable of causing carbon monoxide poisoning.
Inferior roadholding and handling are the other the two most popularly misconceived ideas which are said to set the Beetle aside from the common herd. The cars certainly have a rear weight bias, but this simply means that conducting a Beetle safely around a corner at high speed demands a different driving technique that, once learned and practised, is delightful and rewarding in the extreme, as any seasoned campaigner will confirm. Porsche expected the same standard of driving from his customers they did of his engineering.
The Volkswagen became popular in the 1950s and 1960s for many reasons. Behind the happy smiling face, legendary reliability, good fuel economy and unique styling, there was, above all else, an aura of exceptional build quality rarely seen in other makes even to this day. And although it may seem anomalous, the older the Beetle, the better the quality is likely to be (within reason).
On that basis, it would be sensible to buy a 'Split' or 'Oval', but there are drawbacks to these model: you will have to content yourself with six-volt electric's, semaphore indicators, comparatively poor engine performance and limited all-round visibility. The owner of a Beetle from the late 1960s or early 1970s, on the other hand, will certainly experience improved handling, more power and better lighting, but arguably a lot less in the way of character. It is also worth taking into consideration the fact that spare parts are more readily available for the post-1968 12-volt cars. Partly because Beetle production continues to this day in Mexico, spare parts are also relatively inexpensive, which is one reason why restoring and running a Beetle still makes extremely good sense.
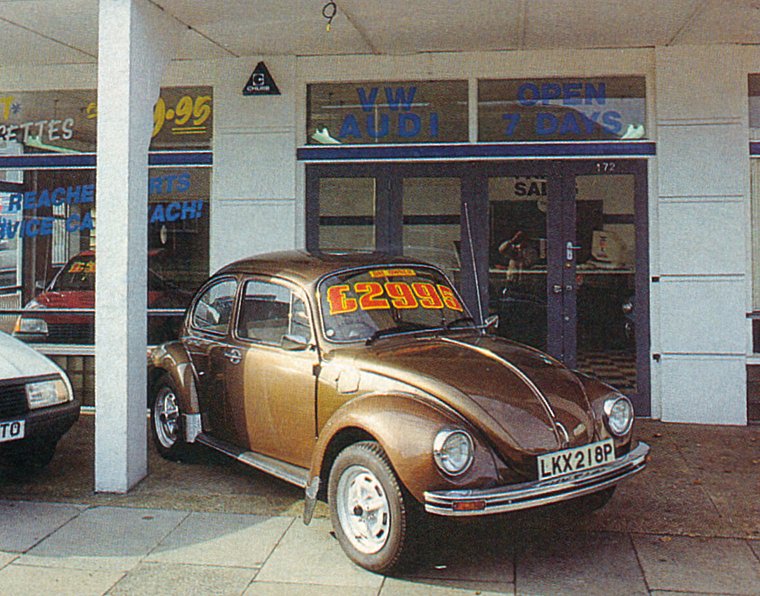
The condition of the bodywork should be of prime consideration as mechanical components are, in most cases, easy to find and cheap to replace. Rust most commonly attacks the bottom 10 cm or so and particular attention should be paid to the sills, jacking points, floorpan, inner guards, front and rear quarter panels, the bottom of the doors, spare wheel well and the front and rear bumper hangers. Repair panels are available for all these vulnerable areas but fitting them may prove expensive if you do not have the skill or equipment to do it yourself.
If you are considering a car, which its owner has already restored, ask to see a photographic record of the work as it progressed, especially if the work carried out is recent. And again, do not be fooled by a shiny new paint job - it could be hiding a host of horrors underneath. By the same token, a fresh layer of wax polish may be hiding minor blemishes in the paint, so take a good look into that deep shine for evidence of scratches. It is also useful to talk at length with the vendor not only about his car but also about Volkswagens in general. The conversation will reveal, if nothing else, whether or not he or she is an enthusiast who really cares about Beetles.
If the sills are very rusty, the only satisfactory means of repair is complete replacement with new panels, for which the body must be removed from the floorpan. In recent times, it has become customary to leave the body in place and weld new sills to the floorpan, which must be considered unacceptable on the grounds that Porsche never intended it that way. In addition, if the doors 'drop' when opened, oversize hinge pins will probably have to be fitted.
The overall condition of the interior will also offer a reasonably good idea as to how the car has been treated. Although Volkswagen fixtures and fittings are very durable, the headlining and seats are vulnerable to the wear and tear of everyday use. A collapsed and sagging drivers seat will give you the best clue towards establishing a car's true mileage. I once answered an advertisement for what was described as a ‘low-mileage 1965 1200 Beetle in excellent condition’, only to discover that the truth was completely the opposite. Apart from a broken headlight, scruffy paintwork and rusty sills, the drivers seat had collapsed in the middle which inevitably meant that the 32,000 miles indicated on the odometer was in fact more likely to have been 132,000 or even 232,000.
Lift up the rear seat cushion and check the state of the floorpan beneath the battery, a common site for advanced corrosion. At the same time, it's worth making a note of the chassis number, which is stamped on top of the backbone between the two floorpan halves, to ensure that it correlates with the information on the registration document. Search also in the luggage space behind the rear seat for evidence of damp. Water leaking through the rear window rubber seal is a common problem on older cars and will eventually cause rot in the horizontal panel, which forms the base of the luggage compartment. The rear inner guards, which protrude into the car's interior, should come in for careful scrutiny at the same time because rust in this region requires major surgery.
Mechanically, Beetles are among the most durable and rugged motorcars ever made, but that is not to say that they never break or wear out. Naturally, a car with a full service history is desirable, if a little unlikely these days, but in the absence of documentation it will soon become apparent as to whether or not the car is in good shape simply by driving it and listening to the engine.
Before turning the ignition key, take a look in the engine bay and under the engine itself. Look for petrol leaks from the carburettor (an indication of wear in the throttle spindle) and evidence of oil leaks. Is everything tidy and clean or is there filth and grime everywhere? Does the engine number stamped on the crankcase below the generator pedestal tie up with the one in the vehicle's registration document? Are the pushrods leaking oil? Most do on old engines, but a small amount is by no means serious.
Check for holes in the heat exchangers, particularly around the area where they join the tailbox. Serious rusting here will allow exhaust fumes into the car and genuine replacements are expensive. Naturally, a test drive will give you the best indication as to the car's overall mechanical condition. A good Beetle should feel taut and lively and ought to bring a smile to your face instantly. A bad one probably won't. Blue smoke from the tailpipes when the engine is started is usually indicative of worn valves (year unless the car has been parked on a slope, in which case it is perfectly normal.
Common faults which will normally rear their heads while out on the road include an inclination to wander (which can usually be traced to worn steering components such as the ball joints/kingpins or steering boxes/racks) and a tendency on high mileage cars to jump out of gear, which means worn synchromesh. From a safety point of view, make a note to change to radials at the earliest opportunity. Original tyres now would be so old as to be completely unsafe, and radials give safer, more secure handling than crossplies. New ‘vintage’ crossplies give a ‘period’ look and comfortable ride but are not designed for serious motoring. For those who would prefer to forsake safety in favour of originality, the very best of luck to you.
Once satisfied that the car is sound or is as least in sufficiently good condition to allow you to stay within your restoration budget, go ahead and write out the cheque.
One great advantage of restoring a Beetle lies in the simplicity of the car's construction. The mudguards are bolted to the body and the body is bolted to the chassis pan. Obviously, for the sake of retaining, originality, it is desirable to preserve as many parts as possible, even though buying a set of new guards is invariably cheaper in the long run than repairing the existing ones.
Repair panels are readily available for the bottoms of the doors, front and rear quarter panels, sills, front apron and inner guards. There is only one way of fitting them: the correct way. Taking a new door skin, welding it over the top of the old rusty one and smoothing it all out with body filler is not correct, but it is a particularly popular method with shonky repairers.
Rust commonly attacks the rain channels along the seam welds and, in case of advanced corrosion where a grinding will not do the job satisfactorily; shot blasting may provide the answer. Dipping the entire bodyshell in an acid bath is the surest way of eradicating rust but is generally expensive and largely unnecessary. The same applies to the floorpan. It is extremely rare for the backbone tunnel to rot out completely but the two halves of the floorpan are vulnerable. If they can't be saved, new ones are readily and cheaply available. Patching up dozens of holes is acceptable unless you are preparing your car for concours d'elegance. Having cleaned and thoroughly de-rusted the chassis, it is very tempting to reach for a tin of black Hammerite: as good at resisting corrosion as this product undoubtedly is, the 'crackle' finish is neither original nor especially pleasant to look at.
If restoring the body is relatively easy, the interior, and more particularly the upholstery and headlining, will prove a little more tricky. Frankly, both jobs are best left to a professional trimmer. Because there are a number of Beetles still languishing in wrecking yards, good seats are still obtainable cheaply, although the rear backrests of the vinyl items fitted to nearly all Beetles throughout the 1960s and 1970s have a tendency to split along their top edge. The cheapest solution to this perennial problem is a strategically placed piece of sticky tape but such a crude move will certainly not find favour with concours judges.
Steering wheels and instruments are in plentiful supply, and the best hunting grounds are Volkswagen shows and swapmeets. So many Beetles have been fitted with smaller-than-standard steering wheels that the original items are available by the bucket load. Obviously, you can expect to pay more for a three-spoke wheel for an early 'Split' than the black wheels used on 12-volt Beetles.
Mechanically, Beetles present few problems over availability of parts. The later engines can be obtained on an exchange basis or purchased outright from mainly independent specialists, but scrapyards and swapmeets are a good source if you are on a tighter budget. Almost every fellow VW enthusiast these days will be able to help out if you are stuck for an engine because the majority appear to have at least one spare unit in the garage, or under their house.
From the point of view of originality, it would always be preferable to retain the engine that is original to your car. Rebuilding your own engine from scratch is not especially difficult if you have a good working knowledge of the intricacies of internal combustion. Naturally, it is desirable to fit new parts when doing so, but it is relatively rare to find second-hand crankshafts and camshafts, for example, that are so badly worn as to be unworthy of further service. A new set of pistons and barrels is a good idea and they are cheap, but a new set of piston rings may well suffice.
Conversely, gearboxes are a definite 'no-go' area except for an acknowledged expert. Designed and over-engineered to accept power units of up to around 150 bhp, Volkswagen gearboxes are extremely reliable for many thousands of miles but when a replacement is needed the least expensive route is a second-hand unit, which is not difficult to locate. Attempting to rebuild your original one without specialist knowledge and equipment will almost certainly end in tears, so it's probably best not to try.
Generally, the suspension components of the traditional torsion bar cars are very long-lived indeed and usually require little in the way of restoration. Torsion bars can snap if they are abused, but such occurrences are rare and replacements are available anyway. The front uprights that locate the top of the shock absorbers are vulnerable to corrosion and should be checked carefully for holes. Both small and large areas of advanced corrosion can be plated, but the results are seldom pretty. If you're in any doubt about the quality of the welding work, a replacement front beam should be fitted sooner rather than later. It is simply not worth taking risks over safety, especially as a new beam costs considerably less than a decent colour television.
Throughout the course of restoration work, there will be times when you feel that you should not have started in the first place. The sheer frustration of trying to remove rusty nuts and bolts, the pain of hitting your knuckles when a spanner slips, the mess on the garage floor, the expense of it all and the seemingly never-ending nature of the work will almost certainly drive you to despair on occasions. But take heart. We have all felt like that, but the sense of elation after months or years of hard work more than compensates for the aches and pains. And, when you have finally finished, enjoy driving your Beetle because that is what Porsche intended it for.
A Volkswagen Factory Tour
By Jamie Vondruska & George Achorn
May 2002
Somewhere along the way, every Volkswagen enthusiast should try to visit Wolfsburg, Germany, the headquarters of Volkswagen AG. There is little that can prepare you for the complete immersion into a world of Volkswagens when you arrive. From the time you enter the city of Wolfsburg there is virtually no car to be seen that isn't a member of the Volkswagen brand family - Volkswagens are everywhere. Fans of the marque may feel like they have died and gone to heaven here. From the rare air-cooled split window bus to modified Golf 4 models with flared guards to the New Beetle RSI, there isn't anything we didn't see on the streets and in the employee parking lots.
Nothing can prepare you for the sheer size of the factory either. The factory grounds covers 8 square kilometres. The iconic four power station chimneys tower more than 125 metres in the air. The twin 20-story car towers next to the Kunden Center (customer delivery center) in AutoStadt are quite a sight, with every slot filled with cars from ground level to the top. The 1.6 million square metres of indoor factory facilities could easily accommodate the entire Principality of Monaco. Volkswagen calls this factory a group of factories inside a factory largely decentralized and autonomous in their organization.
The Golf, Golf Variant, Bora (Jetta), Bora Variant, Lupo and soon the new Golf 5-based Touran MPV are all built at the Wolfsburg factory. Scheduled capacity per working day is over 3,000 vehicles. In addition to this, the Wolfsburg plant manufactures components such as drive shafts, body stampings and more for other Group factories.
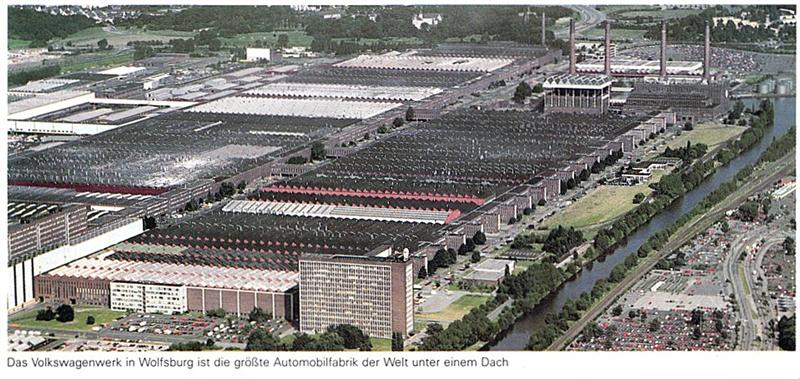
What follows is a general overview of many areas of the factory. Since photography is not permitted in the factory, we are limited to the photos that Volkswagen has provided for us. We could have easily spent 2-3 days wandering the factory asking numerous questions and driving our German hosts crazy in the process. Instead we spent 3 hours privately touring the factory and came away with a new sense of the magnitude of what is involved in bringing your Volkswagen to you, but also the tremendous amount of money that Volkswagen has spent over the last 10 years upgrading nearly every piece of equipment. What you see here is a small snapshot of the blueprint used at all Volkswagen brand factories worldwide. Much of the same equipment, methodologies, work environments, layouts and more are carried over to all group factories - perfect the process and duplicate it. Whether your car is built in Mexico, Brazil, South Africa, Belgium, Spain, Portugal or Wolfsburg, there is virtually no difference in the process used to build your vehicle.
Factory tours are available directly as part of admission to AutoStadt, Volkswagen's cultural, architectural, and historical visitor centre. The process all starts with raw materials. Carefully considered suppliers provide the best sheet metal possible and deliveries arrive 24 hours a day. Much of all the materials and parts in the factories are delivered on a ‘just in time’ basis so there is very little in the way of storage facilities and raw materials or parts stacked up. The huge rolls of sheet metal will only last a few hours and are constantly being replenished through the 24-hour workday.
Volkswagens have characteristic flowing lines, making exacting demands on the dimensional precision of the body panels. The tool and jig constructions division provides the necessary basis for this. Specialists in Wolfsburg can turn even the most complex shapes into reality with the tools they construct. A ‘tool’ is a form used to create a pattern (a mudguard for instance), out of raw sheet metal. Some of these tools weigh more than 50 tonnes and have to endure very exacting and long lifecycles of constant pounding in the presses.
Sheet metal is ‘alive’ say the experts, meaning that the shape of the pressed part after the deep-drawing process is not absolutely identical with that of the die. The metal always reverts a little after shaping. From years of experience, the specialist toolmakers know how various factors influence the dimensional precision of pressed parts. Knowledge of the interaction between nature and materials, sheet thickness and the extent of deformation are all parts of the foundation for high quality in body construction.
Good tool and jig construction is key to determining how wide and how accurate the panel gaps are and how precisely the sheet metal is formed. The Wolfsburg press shop processes some 1,500 tonnes of sheet metal a day. All the sheet stock is pre-treated in various anti-corrosion processes. The material used for the outer bodyshell skin is a light matte grey, having been galvanized by electrolysis for an especially fine surface. By comparison, a bright metallic surface indicates that it has been treated in the melting bath - also known as hot-dip galvanization. This is a robust material for the floor pan and internal parts.
Unrolled and stamped into blanks, the sheet metal is transported to the press lines. Here large capacity vacuum presses force up to 6,000 tonnes of pressure to achieve the desired shape. Deep drawing is divided into several stages. The entire process runs simultaneously and at low noise within one machine. The process is monitored by cameras and transmitted to a central location. Of particular importance are the dimensionally critical parts, for example the floor pan for manufacture of the platform; these parts are made only in Wolfsburg. They form the basis of every vehicle body, thus ensuring high precision and quality at all plants they are supplied to.
The bodies for the Golf and Bora are produced at the Wolfsburg factory on three identical production lines. The operation frequency of just under one minute determines the rhythm of the work and the transportation phases of the three lines, which together produce over 200 units per hour. This three-line system, called segmentation, allows greater variability. Golf and Bora bodies can be produced in direct sequence without any loss of time. Welding robots and picking tools are designed accordingly as multifunctional units.
Another advantage of segmentation is that it provides for continuity of the processes in the plant. If one line is undergoing maintenance or adjustment, production can continue unabated on the other two. Market fluctuations can also be balanced out in this way. The company can react flexibly to dealer's requirements. Popular model versions are manufactured in greater numbers and production of those less favoured can be throttled back.
Some 800 million Deutschmarks ($800 million dollars) went into converting production to the Golf 4 body shop. The automation level went up to 96 percent, highlighting a trouble-free and exacting process with little to no reliability issues. The same applies to the fully automated production islands, where robots assemble the pressed parts into individual assemblies. These modules are integrated into the assembly lines through various processes. More than 4,000 spot welds, laser weld seams and bonding and cold joining technology give each body its high rigidity and strength.
Primarily intended as a protective coating, the paintwork is just as important in its visual appeal as well. It must be resistant to all forms of attack - UV radiation, heat, rain, snow, frost and even stone chips. Car and attention to detail therefore have top priority.
In the past dirt, solvents and the emission of paint particulates characterized this production stage. Today the Wolfsburg paint shop activity is defined by ‘clean-room’ technology, low-solvent finishes and efficient scrubbing of the paint mist with a water circulation system as well as intense water purification and recirculation.
Degreasing, pre-treatment, washing and drying phases are the initial stages of treatment. Then follows the electrolytic dip priming. All metal joints are then sealed along their seams and folds; thermoplastic sound deadening materials are inserted for noise damping. In addition to the paint finish and galvanization, the under body seal protects against possible subsequent damage from stone chips and corrosion. After the filler coat and the pigmented coat, a clear finish is applied as the final protective layer. This coat alone is what gives the required glossy finish you see in the showroom.
Robots do all finishing work. The atomised paint is transferred in an electrostatic field to the body, with low losses in the process, and adheres to the metal. After the paint has been applied, an additional internal precaution against corrosion is taken using the hot wax cavity flooding process patented by Volkswagen. This protective measure is used on all models.
Years ago the Wolfsburg paint shop was one of the first in the German automobile industry to introduce low-solvent water-based products for the filler and pigmented coats as well. This has drastically reduced environmental pollution as a result.
In final assembly, the painted bodies are completed in accordance with customer orders. In the case of the Golf, the individual engine, equipment and colour options theoretically make over 3 million possible combinations. However, the more realistic and more frequent selection possibilities only number around 300,000. Without a maximum of product-oriented and process-oriented flexibility, however, such a variety would not be possible. Product-oriented flexibility is already evident in vehicle development. The front-end for example has been designed in such a way that it can accept various engines. Process-oriented flexibility on the other hand means that the machines needed for manufacture are multifunctional and can be adapted to changing models and equipment versions.
A Golf consists of 31 main modules and 54 sub modules. Assembly consequently requires highly organized work processes and standardized interfaces. Thus dashboard and front end, the entire running gear with engine, gearbox and exhaust system are pre-assembled in parallel in sequence-controlled production, tested and installed as complete modules. The painted doors are taken from the body and also completed on a separate line. While the doors are removed, the dashboard, seats, carpet and full interior components can be installed. At a later point the doors are returned to the right vehicle by a conveyor system. This modular construction process accelerates production and makes it more economical.
The function and precise interaction of all assembled parts and modules are then tested. This also involves a test run on the dynamometer, a drive over a special jolting section to test for creaks and rattles and a waterproofing test in a sealed high-pressure spray cabin.
After this the work is done - the vehicle is taken to the train yard or to waiting delivery trucks for local dealers.
For most Volkswagens coming off the assembly line the first big trip takes the form of a rail journey. Every day 110 double-decker train cars carrying some 2,400 Golf, Golf Variant, Bora, Bora Variant and Lupo models leave the rail freight station at the Wolfsburg plant. Only a small share leaves in about 90 road car transporters, primarily for transportation to dealers in the region. It may be hard to credit, but almost all of these new vehicles have been produced to individual customer specifications (or in the case of North America, to VWoA specifications). Equipment, engine, colour, seat covers and many other features are selected by the customer from the wide range of possibilities. So while colours and engine choices recur, in other respects combinations are selected which seldom come up more than once in a working day. It's worth bearing in mind that Volkswagen in fact builds individual personal cars en masse. The sales division runs 11,350 outlets throughout the world, with over 2,800 of them in Germany alone. These dealerships coordinate all customer wishes. To channel these orders correctly, the sales division in Wolfsburg operates a high-performance computer network system, which is also linked with the data processing system in production. In the factory, starting at the body-in-white stage, a small card with a bar code incorporating the necessary data controls the vehicle's production in line with the customer's wishes. While customer ordering your Volkswagen is not yet a reality in export markets like North America or Australia, it is possible for your dealer to look up allocations of current cars available and those still being produced to see if one matches what you are looking for.
If you ever have the chance to tour one of the Volkswagen factories, don't miss it. Tours of the factory in Wolfsburg are available as part of your admission to AutoStadt and are available seven days a week during normal business hours. Actually seeing the magnitude of what is involved in simply building a car is something you won't forget and will make you think differently about your Volkswagen from that day forward. The investments in technology, production methods, paint and more are all great signs that Volkswagen is committed to the future and striving to build the best cars ever to leave their factories.
Old and New VWs Compared
By Franz Lieberstol
March 2003
Munich, Germany. Car driving in the last 30 years has become considerably safer, with new models performing far better in crashes than older cars. That is the result of a comparison test recently held by the German automobile organization ADAC, featuring various VW models. They tested the Beetle, the Golf 2 and the current Golf 4. The test was designed to reveal how much difference the developments in passive safety have made.
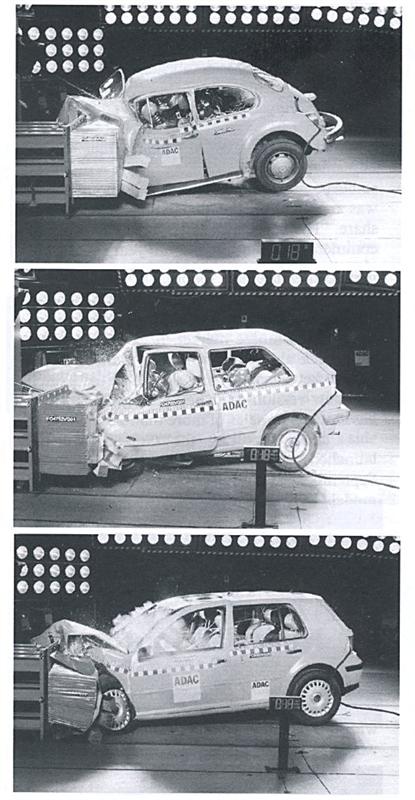
The Beetle and the Golf 2 both fail modern crash safety tests, featuring the unmerciful offset front collision style. Both older models offered hardly any survival area in a 64 km/h offset front crash. Perhaps this was to be expected in the case of the ancient Beetle, but was surprising in the case of the Golf 2, which appeared in 1984. In fact in some respects the Golf 2 performed even worse than the Beetle.
The modern Golf 4 passes the test thanks to its more advanced body design with deformation elements, seat and seatbelt retaining technology and its passive safety front airbags. In the Beetle and Golf 2 the driver’s seat was compressed by more than 50% in both cases. The Golf 4, however, reaches a good security rating with a four-star result.
However not only crash security, but also the ecological impact of cars has been greatly improved over the last 30 years. Especially good is the improvement of exhaust emissions. Thanks to the improvements in valve control and catalyser technology, the pollutant output of the Golf 4 in comparison with the Beetle has been lowered by about 97 percent, according to the ADAC.
Also examined by the ADAC was braking technology and the quantum leaps in the improvement in stopping distances. Modern cars benefit from developments like ABS, computer controlled braking assistants and other electronic measures. The stopping distance from 100 km/h for the three models varied from the Beetle's 55 metres to the Golf 2's 47 metres. The modern Golf 4's stopping distance was only 42 metres.
Petrol consumption in city traffic has also greatly improved. The Beetle's 1600cc engine consumes 9.8 litres per 100 km around town, while the Golf 4's modern 2.0-litre engine consumes 8.3 L/100 km. The smaller 1.6 Golf 4 improves again, to only 7.8 L/100km.
The crash vehicles used in the test by the ADAC are currently on display in Berlin, as part of the mobile technology exhibit of the German museum. Visitors can see the wrecked cars themselves at the premises in Charlottenburg.
A short history of Puma sports cars
By Steve Carter
January 2004
The genesis of Puma was the DKW-Malzoni, a front wheel drive sport prototype model with a DKW engine that first appeared in 1964. These cars were made in Matao, a small city in Sao Paulo state, by a farmer named Rino Malzoni. Rino was a great enthusiast of automobiles and automobile racing. The early DKW-Malzonis were made strictly for competition purposes. The DKW-Malzoni used a highly prepared two stroke, 1100 cc, three cylinder engine that made around 75 kW. With a light fibreglass body, the car was very fast and agile, and enjoyed great success racing against Willys Interlagos (a model based on the Renault powered Alpine A-108) and Carreteras (modified 1930's American five window coupes, equipped with Corvette or Ford Thunderbird engines).
Rino Malzoni recognized that the car had commercial possibilities. In order to produce more cars and bring them to market, Rino joined with three other auto enthusiasts (Luis Roberta da Costa, Milton Masteguin, and Mario Cesar Camargo Filho) and founded the company ‘Sociedade de Automoveis Luminari.’ At this time, about 35 cars were being sold each year. In 1967, the company was renamed ‘Puma Veiculos e Motores.’ Shortly thereafter, it was transformed into an open capital society named ‘Puma Industria de Veiculos S.A.’
Production quickly increased almost four times. In 1967, the body of the DKW-Malzoni was slightly modified, and the car was renamed as the Puma DKW. The new car had a small rear seat, more glass area, and new wheels, bumpers, headlights, and rear lights. It was also slightly longer. However, the biggest changes would come in the closing months of 1967. Vemag (the company that made DKWs in Brazil) was bought by Volkswagen, and all DKW cars and engines were discontinued. This meant that Puma needed a new heart if it was to continue. It was decided to use the Brazilian Karmann Ghia platform, with a 1493 cc air-cooled engine that made 38 kW. This wasn't a simple change. The Puma DKW was a front engine car, and the new model needed to receive a rear engine.
The chassis of the first VW-powered Puma was almost the same as the Karmann Ghia, except that it was made a few inches shorter. The body was slightly smaller, glass area was again modified, and the front egg crate grille was removed.
By 1970, an open roadster version, the GTE Spyder, had been placed into production. The Spyder had a fibreglass hardtop and a conventional convertible soft top. During the early 1970s, Puma cars began to be exported to North America, Europe, and South American countries. Although some cars were exported in ‘kit’ form, Puma cars were only sold completely assembled in Brazil. At this time, the basic engine was the 1584 cc aircooled VW motor, but an optional ‘big bore’ 1800cc engine was also offered.
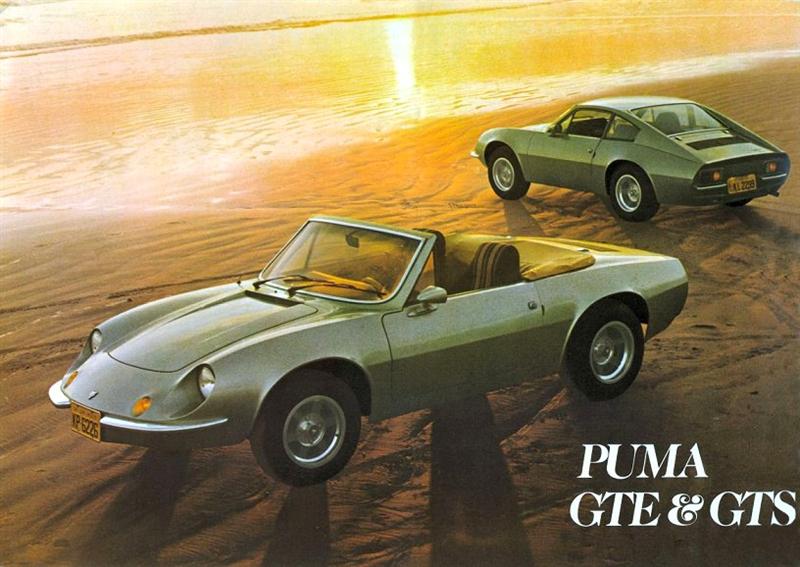
About this time, the Puma GTB, was developed. It also had a fibreglass body, but was built on a special chassis, and was powered by an in-line six cylinder Brazilian Chevrolet engine displacing 4100 cc. The GTB was not exported to North America or Europe. Before long, the VW based Pumas had to be changed again. The Karmann-Ghia was discontinued. The VW Brasilia platform was used as a replacement, keeping the same 1584 cc engine. By this time, an assembly line had been established in South Africa.
VW based Pumas received body changes in 1977. Coupes added rear quarter windows, and an updated dash and interior were introduced. More extensive modifications were made in 1981. The front and rear of the car were restyled, with relocated parking lights, and much larger taillights. The new models were called GTC (convertible, replacing the GTS) and GTI (coupe, replacing the GTE). Both were offered with an extensive list of optional items, including special engines and transmissions, power windows, etc. The following year, the P-018 was launched, with a double-joint rear axle, 1584 cc engine as standard, and optional 1700 cc, 1800 cc, and 2000 cc engines.
The economic crisis of the 1980s was devastating to the Brazilian speciality car industry. Sales that in the late 1970s were about 150 per month began a steady decline. In 1985, the Puma brandmark was sold to ‘Araucaria S.A.’, a small company in Parana state. Two years later, Araucaria sold the production rights to a company named ‘Alfa Metais.’ Alfa Metais tried to maintain the Puma brandmark, creating two new air cooled models, AM-1 (coupe) and AM-2 (roadster), both for export. The company also made a few Puma AM-3, with a rear water-cooled VW Golf engine, only for Brazil.
The final model appears to have been the AM-4, also water cooled. But the 1990s were coming, and the Brazilian market was opened to imported sports cars. This effectively sealed Puma's fate. Production of Puma cars ceased completely around 1992. Total complete cars exported, 1969 through 1980, was 1,035.
Road tests at the time reported a 0-100 km/h time of 9.9 seconds with a stock 1600. There is only one reported Puma in Australia; a yellow one owned in the 1990s by Jim Gibson. Jim’s yellow Puma featured in ‘Volkswagen Australia Magazine #5’, published in April 1995. This car was later bought by Carl Bruce.
Power vs Torque
By Barry Lake
March 2005
One only has to read some of the rubbish written about the subject on the Internet to know the relationship between torque and power is one of the most widely misunderstood aspects of the motor car.
Horsepower is a term still used by Americans in reference to production and racing cars, drag racing, NASCAR, CART and classic V8 performance cars, and so is still commonly used in Australia in ‘classic car’ circles, despite the fact we have gone metric and have used kilowatts for new cars since the 1970s.
In the late 1700s James Watt, a Scottish engineer whose many achievements included numerous improvements to the efficiency of steam engines, came up with a method of measuring the relative power of steam engines. This has carried over to the internal combustion engine.
Watt attached to a dray horse a rope that ran over a pulley wheel and down a well, with a 200-pound weight attached to its end. Then he calculated that the horse's power was the ability to lift this weight through 165 feet every minute. Multiplying the weight by the distance, we get 33,000 foot-pounds per minute.
A dynamometer doesn't measure power, as such. It measures the torque produced at any given engine speed and this is then converted mathematically to power.
Torque is the tendency of a force to rotate the body to which it is applied. In the case of a reciprocating internal combustion engine, this force is applied to the cranks on the crankshaft.
A steam engine offers a good way to explain torque. When the steam in the boiler is at full pressure but the engine is braked so that it can not move, the torque created by that pressure is at its maximum.
At this point there is no power produced because no work is being done. As the brakes are released, the engine begins to operate and the pressure drops, so torque also falls away. But, because the engine is moving and work is being done, it begins to produce power. Because the speed increases at a greater rate than the torque diminishes, the power also increases - up to a point.
Another way to demonstrate the difference between torque and power is if you have four heavy boxes of goods to move from one end of a warehouse to the other. You have two workers. One is a huge, lumbering man who can pick up all four boxes at once but cannot move very quickly. The other is a small man who can carry only one box at a time, but who can run with it like blazes. The small man arrives with his last box just as the big man does with all four of his boxes.
The big man applied more force (similar to our torque figure) in lifting all four boxes. But both men produced the same amount of work in the same time (similar to our power figure) because the small man operated at a higher speed. So torque is a force applied; power is work done in a given amount of time.
Engines are the same; a small engine can produce as much power at 8000 rpm as a larger engine with double the torque can produce at 4000 rpm. Complications arise with the internal combustion engine in that its torque figure is not consistent throughout its speed range.
Older designs used to have a peak torque figure at a certain rpm, but that figure fell off quite dramatically at any speed above or below that point.
Modern engines have all sorts of technology to circumvent this problem. Variable valve timing, variable inlet tract length and so on can help to maintain this maximum torque figure, or very near to it, over quite a wide range of engine speeds (rpm).
It has come to a point where quoted maximum torque and power figures are not as informative as they once were. Graphs of power and torque figures can tell much more. Perhaps even better would be a quote of ‘average horsepower’ over a given range of rpm. Today's computerised dynamometers actually can provide such a figure. While race engineers understand the value of this average, many road warriors want only a big number to tell their friends. They aim for a peak figure at the expense of true performance.
An engine that has peak torque at quite low rpm, provided the torque curve doesn't fall away rapidly, can still produce maximum power at quite high rpm. In fact this is the ideal. Peak power might be the same, or even slightly less, than a similar engine, but that extra torque all through the rpm range will also provide better power all the way through to the peak and, therefore, better average power.
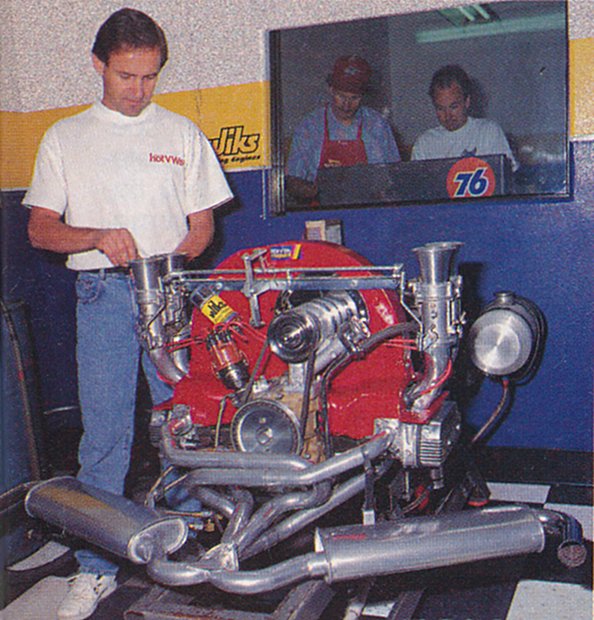
Another factor that comes up often in Internet chat is the mysterious figure of 5252 (often quoted as 5250). If the torque figures are known at various rpm points through the range, power at any given point can be calculated by multiplying the torque (in pounds-feet) by the rpm, and dividing the answer by 5252. Where this 5252 number comes from is that the torque, which is pounds of pressure applied to the crank at a distance measured in feet, has to be multiplied by 2-pi (π). This brings into the equation the distance of the circle through which the crank pin rotates for one revolution. Then this is multiplied by the number of revolutions per minute. That answer is then divided by 33,000 - which we already know is the number of foot-pounds per minute in one horsepower. The final answer is the horsepower produced by the engine at the rpm in question.
The 2-pi figure can be cancelled out by dividing the figures above and below the line of the equation by 2-pi (or 2 x 3.1415926...), which is 6.2831852..). The 33,000 foot-pounds figure divided by 6.2831852 equals a little over 5252. The simplified formula becomes: Power (bhp) = Torque (ft-lbs) times rpm divided by 5252.
This has caused some to point out that torque and power are ‘equal’ at 5252 rpm. It is true that 200 foot-pounds of torque at 5252 rpm gives 200 bhp at 5252 rpm, but to say they are ‘equal’ is nonsense. You might as well say that koalas and ball-point pens are equal when you have 5,252 of both of them. It is merely a mathematical coincidence.
In metric terms, when we are measuring Newton-metres (Nm) of torque and kilowatts (kW) of power, the simplified divisor is 9550, so Nm and kW will be ‘equal’ at 9550 rpm. Again, it means nothing. The figure 9550 is the result of dividing 60,000 (the number of metre-kilograms per minute in one kilowatt) by 2-pi, or 6.2831852.
People often ask if a large, low-revving engine with a high torque output is better than a small, high-revving with less torque but equal power. The latter will usually have an overall weight advantage, but requires a multi-speed close-ratio gearbox and suitably low overall gearing to produce its best.
With either engine, it is the average power output over a range of engine speeds that counts in the end. This could be, for example, 4000-6000 rpm for a big engine with high gearing, and 6000-9000 rpm for a small engine with low overall gearing. But this also depends on the number of gears available and the difference in ratios from gear to gear.
Applying the formula to the maximum torque figure will not provide you with the maximum power figure. The latter is the result of a lower torque figure multiplied at a higher rpm figure. If you know the rpm involved, you can calculate the torque output that provides the maximum power, and calculate what power is produced by the maximum torque figure.
The clearest way is to measure the torque on a dyno at series of rpms, say at 2000, 2500, 3000, 3500, 4000 and so on. You draw the torque graph based on these measurements. Then, you calculate the power using the formula at each of the rpms. The result is a series of power figures, from which you draw the power graph. Then you can see how the torque and power curves interact. Every engine is different.
The 100 Millionth Volkswagen
By Steve Carter
June 2005
Wolfsburg, 24th May 2005. The 100 millionth vehicle to wear the VW badge came off the assembly line in Wolfsburg today. It was a 1.9-litre TDI Touran in reflex silver metallic.
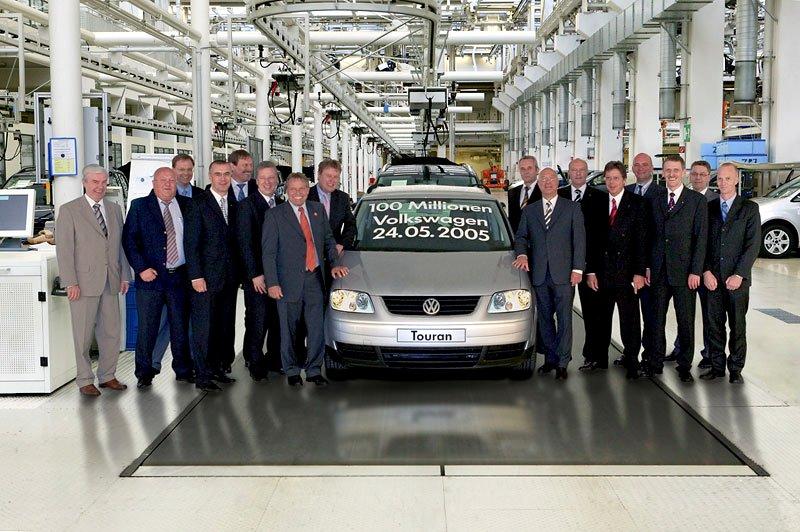
“Our past success is above all, the achievement of our employees, combined with the diversity of our production plants. With their experience, we can master current start-ups and their creative ideas shape our future innovative products and processes," commented a delighted Reinhard Jung, Volkswagen Production Manager.
Volkswagen's success began with the now legendary Beetle, when the occupying British Army made 1,800 of them in 1945. Production steadily increased and the factory became German-owned in 1948. Only two years later the 100,000th Volkswagen had already left the assembly line – only the Type 1 Beetle and Type 2 Transporter were being made in 1950.
New Volkswagen plants were built to meet the expanding range: Volkswagen do Brazil was established in 1953, Volkswagen Australasia Ltd in Melbourne in 1954, Volkswagen Commercial Vehicles in Hanover in 1955, Volkswagen of South Africa in 1956 and the Kassel plant was founded in 1957. Volkswagen de Mexico and the Emden plant were added in 1964.
Six years later, the Salzgitter plant was built, followed a decade later by the Volkswagen Argentina production facility. The mid-1980s saw the first joint venture in China, Shanghai Volkswagen (1985), with the second, FAW in Changchun, following in 1991. In Europe, Volkswagen set up production plants in the 1990s in Poland (Poznan 1993, Polkowice 1998), Slovakia (Bratislava 1991, Martin 2000) and the former East Germany (Mosel 1990, Dresden 1998 and Stollberg 2003).
The model range continued to grow. Seven different Beetle models, five generations of Transporter and Golf; six generations of Passat and Polo are milestones in this development. 21.5 million Beetles, 23 million Golfs and 13 million Passats, as well as 9 million Polos, are further confirmation of success. In 2002, Golf production overtook the Beetle production total, and set a new record for the Volkswagen brand.
Volkswagen now builds vehicles all over the world at plants in Wolfsburg, Emden, Hanover, Mosel, Brussels, Pamplona, Bratislava, Palmela, Poznan, Mexico, Argentina, Brazil, South Africa and China.
Model components and engines are delivered by Volkswagen plants in Braunschweig, Salzgitter, Chemnitz, Polkowice and Martin. 270 petrol and diesel engine variants are built at the Salzgitter plant.
Customers can now choose from a range of 41 different Volkswagens models, spanning the Lupo to busses and trucks.
In 2004, Volkswagen delivered 3.064 million vehicles to customers in more than 150 countries around the world (2003: 3.075 million). The Volkswagen brand has a global workforce of over 133,000.
Volkswagen vehicles offer customers leading-edge technology, discerning design and the highest quality in almost every segment of the automobile market. The range includes models such as the Golf and Jetta, the Passat, the Lupo and Polo compact cars, the Touran and Sharan people movers, and the Phaeton and Touareg top class vehicles.
Canberra Volkswagen A-Z
By Bruce Walker
May 2006
This list was recently compiled on the ACT VW Forum, so we thought we'd share it with other Vee Dubbers:
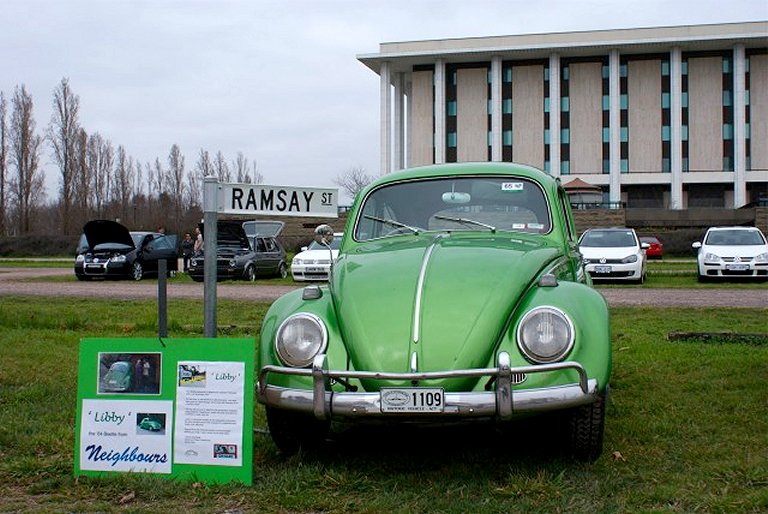
A - Awesome to cruise in a group
B - Beetle: the one that started it all...
C - Can never have to many VeeDubs.
D - 'Dak Dak' - the noise we all love...
E - Economical
F - Fun for the whole family.
G - The girls love em!
H - HUGE fun to be had by all !!!
I - Ingenious design
J - Jetta, check the new model out!
K - Kombi, what else!
L - Life in the fun lane
M - Making new VW friends
N - New Beetle - the legend lives on
O - Ooo Yeah!
P - People's car - people's wagen = Volkswagen
Q - For the quirks that always pop up...
R - For the racing VWs that kick arse on the track
S - Damn SEXY curves. It's true, you can't say they're not!
T - Type I, Type II, Type III and a massive Type IV motor
U - Ultra reliable, and Ultra classic status...
V - The shape on the front of a splitty that we all love soooo much
W- WOW!!! There goes another VW!!! Wonderful!!! Wishing everyone else could share the joy of a VW.
X - The X-factor, every 'Dub has it!
Y - Youth, encourage them to drive Dubs...
Z - Zzzzz... asleep in the back of my Kombi. Zooming and Zippy VWs. There should be more on the road.
Phil’s Volkswagen A to Z
By Phil Matthews
June 2006
In last month's magazine there was an ‘A to Z’ listing for Volkswagen owners that had been put together on the ACT VW Forum. It was a lot of fun to read and I bet you saw some familiar things in there too.
However as a long-time VW enthusiast, historian and writer, I thought some of the listings were bit silly. ‘I - Ingenious design.’ Sure, but ‘C - Can never have to many VeeDubs’ (sic). Oh dear. And let’s not mention ‘O - Ooo Yeah’…
I thought I would try to put together my own VW A-Z list, and do it like a proper poem. It should have one specifically Volkswagen-oriented word for each letter; none of this ‘X-X-factor or Z-Zzzz’ nonsense. And better still, it ought to be in rhyming pentameter as well - it should read, scan and rhyme properly with the proper number of ‘beats’ per line.
Now this isn't easy to do. You are more than welcome to try doing your own and you'll see what I mean, but this is my effort. Thanks also to my brother Si who threw in a few suggestions for this one.
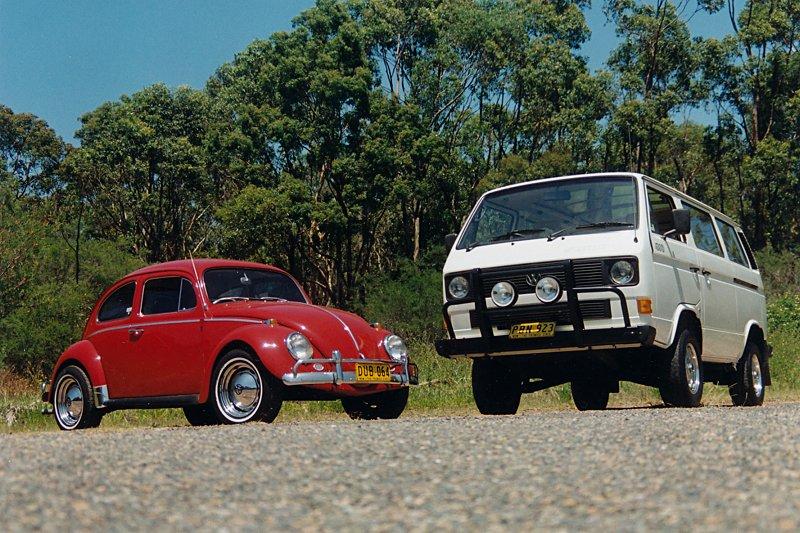
A is for ADOLF, our old Nazi friend,
B is for BEETLE, on which we depend.
C is for CABRIO Karmann, seats four,
D is for DAK DAK, Deutsche Afrika Korps.
E is for EBERSPÄCHER, warm as can be,
F is for FASTBACK, the stylish Type 3.
G is for GOLF, transverse front wheel drive,
H is for HERBIE, who thinks he's alive.
I is for ILTIS, a beaut four by four,
J is for JETTA, booted Golf with much more.
K is for KOMBI, with a big Type 4 sound,
L is for LANOCKS, no longer around.
M is for MELBOURNE where VWs were once made,
N is NEW BEETLE, a trend that will fade.
O is for OSNABRÜCK, Karmann's factory is here,
P is for PASSAT, Wheels' Car Of The Year.
Q is for QUANTUM, an American name,
R is for REDEX, the trial that brought fame.
S is SCIROCCO, not sold here, we lose,
T is for TOUAREG, at home in Vaucluse.
U is for UITENHAGE, South African port,
V is for VOLKSIE, Volkswagen for short.
W is for WOLFSBURG, Volkswagen's home town,
X is for XAVIER Reimspeiss, I found.
Y is for YELLOW, or 'Wattle' will do,
Z is for ZÜNDFOLGE, 1 - 4 - 3 - 2 !